DIY swing gates. How to make a gate with your own hands - drawings, sketches, design and other important manufacturing nuances Do-it-yourself swing gates made from reinforcement
If you are planning to make a gate with your own hands, you will need step-by-step instructions that will help you calculate all the nuances of the work and will facilitate the process of creating them.
Before purchasing the necessary materials, decide on the type of gate that is suitable for a particular case and a convenient method for installing it.

Types of structures
There are many types of gates, which can be made of different materials and equipped with special mechanisms. A wide selection allows you to create homemade gates based on the characteristics of the room or area, your needs and frequency of use.


Before making gates, you should study the main types of designs that are popular.
Sliding
Sliding canvases are divided into several categories. Depending on your preferences, you can choose the option you need. For each type of structure, you will need to clear a free area along the fence so that the sash can open freely.
There are cantilever sliding structures, suspended and sliding. The structure of such canvases involves moving along rails and other metal profiles.


Hanging options are not popular for use on private property, since the entry height is limited by the upper profile to which the canvas is fixed. The valves also move along this profile.
Some country house owners install fan designs, which received this name due to their appearance.

Sliding doors, which move on a rail located along the wall, are also not popular in snowy and northern cities.
In order for the sash of sliding structures to move freely along the rail, it will be necessary to constantly remove ice and other debris, which is not always comfortable in winter.

Cantilever leaves are considered the most optimal design for sliding gates. The canvas is rigidly attached to the beam, which moves along the cantilever assembly and moves the sashes behind it. Despite the fact that the structure of the products is complex, they work great in the winter season, since the sash does not come into contact with the ground.

Tilt&Turn
This design is optimal for garage conditions. They are not suitable for installation in the yard, since the gates limit the entry height. The canvas should function freely by lifting and sliding the sash under the ceiling of the room.

Swing
Such structures with a door are often installed on the fence in the private sector. Swing gates are based on pillars, two of which are located at the width of the door leaf, and the third pillar is located next to the gate, if it is located next to the structure.


Rolled
These designs have recently appeared on the market. Gates are made of steel strips, which are combined into a flexible sheet. When it is necessary to open the gate, they begin to roll up and wrap around the shaft. This solution allows you to drive close to the room.


Folding
Folding gates are known to many as “accordion gates”. The door can be opened upwards and sideways. There are sealing gaskets between the metal mesh. Designs that open upward have become widespread.

Manufacturing Features
Each type of gate has its own design features. Before starting the manufacturing process, you should study the structure diagrams of the canvas and work out an action plan. Swing gates are not an exception to this issue. Even a beginner who has not previously worked with metal products can make a swing gate from corrugated sheets with his own hands.
To make products, you will need skills in working with a drill, welding, screwdriver, construction tape and grinder. The design of the products is created in such a way that the use of free space should be accompanied by maximum functionality. The reliability of the gate is ensured by roller blocks, which are located in the lower part of the profile beam and move due to the opening or closing of the doors.


There are several features of this type of gate that distinguish it from other designs:
- when assembling the canvas, push-button corner connectors are used, thanks to which it is possible to prevent the sashes from sagging during use;
- The material fasteners are hidden, thereby preserving the decorative properties of the gate. Also, this solution prevents foreign objects from entering the space between the profile;
- The sashes are fastened using three-section hinges. Details allow you to extend the service life of the structure.


Studying the drawings of a standard sheet made of corrugated sheets, you will notice that a frame made of a square metal profile is used as the basis of the structure. As an alternative, a thick-walled pipe with a diameter of 30 mm is used.
To strengthen the doors, a metal vein is used. It should be positioned horizontally. Such reinforcement allows you to maintain the geometry of the canvas.

You can secure the doors using electric welding or metal screws. Since the corrugated sheet is light, two strong loops with a diameter of 20 mm will be enough for it. Metal pipes with a diameter of 60-100 mm can act as a load-bearing support.
The gate leaves are fastened on the basis of the fence that is present on the site. If you are planning to install a brick fence, consider installing embedded joints between the bricks in advance. Hinged supports will be welded to them.

The optimal width of entrance gates on private property is 3 m. These dimensions are sufficient for a truck or car to enter the yard. The height of the gate should not exceed 2 meters.
L-shaped pins can be used as a locking mechanism. They should be located at the bottom of the sashes. Special clamps are dug into the ground, which are metal tubes whose diameter exceeds the thickness of the locking mechanism.
To ensure that the new gate fits harmoniously into the overall interior of the site, you can use corrugated sheets to finish the frame part. As a rule, the material is attached to the frame of the canvas.
Maintain a distance from the ground, which should be 50-70 mm.

Material selection
The type of material from which the gate will be made is influenced by the dimensions of the structure, its weight and other factors. Typically, the frames for the sashes are made from a profile pipe with a cross-section of 60x40 mm. Choose metal whose thickness is 1.5-2 mm.
The cross-sectional size also depends on the weight of the gate, but experts recommend making a choice based on the following indicators:
- if the total weight of the gate leaves does not exceed 150 kg, you can use a pipe whose cross-section is 80x80 mm. The metal thickness should be 4 mm;
- when metal gates weigh from 150-300 kg, it is necessary to use a pipe with a cross-section of 100x100 mm and a thickness of 5 mm;
- if the weight of the structure exceeds 300 kg, iron pipes with a cross-section of 140x140 mm and a material thickness of 5 mm are suitable for you.


To create racks, you can use brick, wood or concrete. When choosing a material, you should study the properties and its resistance to expected loads.
Hinges can have adjustable or non-adjustable mechanisms. Make sure that the material used is of high quality, as the hinges must support the weight of the fabric.
The lock may have a mechanical structure or operate on the basis of electromechanics. The choice should be made based on your preferences. You will also need paint to paint the racks and metal profile cladding.
The sheathing can be made of any material. Many people make cladding from profiles; some owners of country houses choose combined options made of wood and metal or PVC. Any option you like will be suitable for this purpose.


If you are planning to create an automatic gate, make the frame more durable. Automation can be installed immediately or later.
Dimensions
The best option is to build a gate at the same time as a fence. However, many people are faced with a situation where they need to widen their driveway or replace an old product. In this case, you will need to make an accurate calculation of the future gate.
Taking measurements and calculating the required amount of material, take into account the surface of the driveways. If your territory is equipped with an asphalt, concrete or tiled surface, you can leave a clearance of 5 cm. If there is grass on the road, increase the clearance to 10 cm for comfortable opening of the gate.


Do not forget to leave a gap between the sashes so that in the future it will be possible to level out the displacement of the supports.
Tools and accessories
Gates can have a variety of structures. Many people equip their canvases with built-in gates for convenience. Before creating a gate, you will need to carefully consider how the finished canvas will look, draw a diagram or sketch of the structure. This decision will help you decide on the tools and materials that will be required to create the canvas.

The standard list of components for creating gates consists of the following items:
- sheathing for sashes, support pipes;
- reinforcement for creating stiffeners;
- a pipe made of a profile or a square of metal for the frame of the structure;
- primer, material for painting;
- bolts, latches or bolt mechanisms;
- hinges for sashes, guides and closers if necessary.

You will also need the following tools:
- construction cord made of nylon;
- welding machine;
- hammer;
- screwdriver or drill;
- electric grinder;
- special scissors for metal.


When planning a new gate, you will need to pay special attention to the dimensions of the structure and the presence of a gate. Due to the large sashes, the weight of the entire structure increases, so the frame should be made of reinforced material.
How to do it yourself?
Gates are manufactured in stages. The process is divided into two steps:
- installation of racks for hanging canvas;
- creation of swing gates.

You can replace the stages, but the posts for the gate structure must stand for at least seven days, after which you can hang the frame on them. In order not to waste time, you can start welding.
Installation of supports
Supports can be made from:
- profile pipe;
- concrete pillars. You can buy a finished product or fill it yourself;
- brick or natural stone.
- wooden beam.


Installation of supports can be carried out using the following methods:
- driving. The driving depth should be about 1.5 meters. This method is considered the fastest and most economical. When choosing this method, you should carefully monitor the level so that the gate does not warp;
- concreting with reinforcement. You will need to strengthen the pillar with concrete.


Step-by-step instructions for installing supports:
- if you decide to do concreting, you will need to drill a pit with a minimum depth of 1 meter. Drilling must be done with a drill whose diameter is more than 200 mm.
- The depth of the pit will depend on the degree of soil freezing in your region. The width of the sides can be determined using the quality of the soil and the size of the support itself.
- create a concrete cushion 150-200 mm high. It should consist of sand and crushed stone. The cushion is used to prevent deepening of the racks;
- then you will need to mount the post and level it using a building level. After leveling the support, you can begin pouring;
- The concreted structure must last for a week. This is the minimum period required for concrete to harden. Do not forget to periodically moisten the concrete with water to prevent cracks from appearing;
- to increase the reliability of the supports, it will be necessary to make reinforcement and install a pair of reinforcing embeds under the hinges.


Creating sashes
Before you begin construction of the structure, you should decide on the location and appearance of the gate. The place where the products are installed can influence the appearance of all elements.
If you are planning to install a gate in your backyard, at the entrance to a garden area, or to create a fence for a future building site, you will need to choose simple materials. For the front gate you should choose more expensive and presentable products.

A universal guide for making gates with your own hands:
- prepare a drawing of the future structure. Using the diagram, you can make an accurate calculation of the required materials;
- The gate frame must correspond to the finishing dimensions. By observing this condition, you can simplify the entire work process and will not encounter connecting seams on the front part of the canvas;
- when making calculations, you should use the indicators of the working width of finishing materials;
- to create components for the frame, you will need to cut the pipe to the required length and sand it;
- Grinding is required to clean products from rust. If there is oil grease on the metal, it can be removed using solvents.


Welding
When interacting with welding, do not forget about safety precautions. If you do not have enough experience, contact specialists. Using this method, you can improve the quality of work and get an attractive design.
Joints should be made in such a way that water does not flow into the pipe.. If the joints are welded incorrectly, snow or water will get into the pipe, which will begin to increase in volume in warm weather. This will lead to expansion of the walls of the product and deformation of the entire structure.

If you are welding the outer and inner frames, a staggered order will be required. In this way, it is possible to prevent ruptures of welding seams due to thermal expansion.
Stiffening ribs influence resistance to wind loads. If you are sewing a fence using finishing material, weld the pipe in the middle part of the outer seam. In this way you will mark the place where the sheathing material will be attached.
Welding of the loop should be done to the posts and to the frame. If you used bricks to make the pillars, but no reinforcement was removed, you will need to attach a channel to the brick, and then start welding the hinges.

Primer
No matter what material you use to create the frame, it will require priming. The primer extends the life of the paint and makes the application process more comfortable. Welding areas should be primed more thoroughly.

Painting the frame
Before painting, remove all dust from the frame. To paint the part, you can use any type of paint. Most people use a spray gun as it ensures a more even coat application. Using a brush delays the process, but reduces paint consumption.

With this step-by-step guide, you can make your own gate and simplify the process as much as possible.
To learn how to install a gate with your own hands, see the following video.
Beautiful examples and options
A beautifully decorated gate will attract attention to the site and demonstrate the good taste of its owner. Openwork canvases are popular. Decorative doors look expensive and sophisticated. The inner side of the structure can be sheathed with polycarbonate sheets. Externally, such gates look like a real work of art.
The products can be installed in a country house or on a country plot. With patterned elements you can show the individuality of your territory.

Stained glass inserts on the entrance gates give the entire area an impressive and unusual look. The designs demonstrate their brightness and originality, attracting the attention of others. You can choose any design depending on your imagination. The style of the idea must be combined with the rest of the design components.

If you want to give your site a more austere look, pay attention to solid metal gates with forged elements. They will harmoniously combine metal with decorative patterns. The chosen design will show the good taste of its owner and will hide the area from prying eyes.

On the site that borders the plantings, you can install gates made of natural materials. You can use a stone for support. Such canvases look beautiful against the backdrop of nature. Natural components will last a long time if you treat the surface with protective products.
The strength of the gate is guaranteed by stone supports. This design is convenient, since when replacing the main leaf there is no need to dismantle the entire gate.

Compact white gates always attract attention. The white color scheme gives the products lightness and weightlessness. Although the gates have a catchy color, they will blend organically with the overall style of the area.
The design will attract the attention of passers-by, since there is an opinion that only wealthy people can afford such gates.

Sliding products with an original design will look good in the country. They can save space on your site and will delight you with their modern style.

Many people equip gates with wooden gates, which can be used not only as an entrance to the territory, but also for zoning space.
The main task of any gate is to ensure the entry of motor vehicles beyond the fenced area, into an industrial or commercial building. Such structures are installed in suburban areas, in country houses and in garages. And, as a rule, they are made to order. However, knowing the features of these products and how to make swing gates with your own hands, you can do without outside help and save on the enclosing structures of your site.
Advantages and disadvantages of the chosen option
Swing gates, which are two doors hung on hinges, are considered one of the most popular options in the field of private construction. The reasons for their choice include:
- simple design, which reduces the risk of gate failure and increases its service life;
- relatively low cost, especially for do-it-yourself structures;
- no height restrictions (except for garage doors). A car with oversized vertical cargo can pass through the swing gates;
- a large number of shapes and design solutions that are practically not found in other types of gates;
- no need for concreting the site;
- the ability to automate their opening, ensuring the use of the gate even without leaving the car.

Among the disadvantages of this option is the need for a large space to use the gate. In addition, the structure is almost impossible to insulate. And when constructing a gate, you should also take into account the wind load in the area. However, all these disadvantages are easily compensated for. Moreover, the swing structure still has more advantages.
Types of structures
Before starting work on the manufacture of gates, you should decide on the features of their design. You should choose a specific option based on the characteristics of operation and frequency of use. The width of the passage that such gates enclose also matters. In total, three types of structures are used:
- With one leaf;
- Bivalve;
- With two doors and a gate (mortise or located separately).
Single-leaf structures, consisting of one continuous leaf, are used less frequently than others. First of all, due to the need to install a more powerful support and metal frame. And more space is required to open them with the same width. 
The most popular double-leaf gates are simpler to manufacture and easy to install yourself. The structure consists of two panels of the same size, covered with sheet metal. The space needed to open it is half that of a single-leaf gate. And the pillars do not require additional reinforcement.

A design intended for constant use not only by vehicles, but also by people - a gate with two leaves and a wicket. They are made according to the same principle as conventional double-leaf structures, but the difference is the presence of additional support. Although, if the gate is installed in a garage or in the opening of a production workshop, the gate is built into one of the leaves and does not require the installation of a third post. 
You should know: Not all gates are made with solid leaves made of metal sheets. Some may be made from wrought iron or other features that provide visibility through the gate. This option is more decorative than protective.

Basic materials
One of the main classifications of gates is their division according to the material of manufacture:
- Gates made of metal sheets are suitable for fencing any area and are most often installed in garages;
- Solid wooden doors are more suitable for fencing around the site. To make their doors, dense, heavy wood is used - oak, spruce or pine;
- Polycarbonate or corrugated sheets are ideal for automatic gates, as their weight is lower than other options.

Often used for the manufacture of structures and combined options - wooden with metal elements or metal with forged parts. One of the most affordable options is corrugated sheet metal, which is characterized by its light weight, variety of colors and durability. And sheets of such coating are produced in sizes convenient for use, allowing to reduce the volume of cutting and reduce the time of gate production. 
Features of design and installation
Before you make a swing gate with your own hands according to the drawing, you should understand the design diagram, which should indicate:
- Dimensions of sashes and pillars;
- Placement of transverse parts on the swinging part of the gate;
- Location of locking elements.
The standard gate design consists of a rectangular frame made of a metal profile (round, that is, a pipe, or rectangular). The cross-sectional diameter of the profiles is from 2.5 to 4.5 cm. The sashes are made of metal and strengthened transversely (or diagonally) using a cross with a diameter of 2–4 cm. The number of such elements required to increase the rigidity of the structure depends on the height and width gate 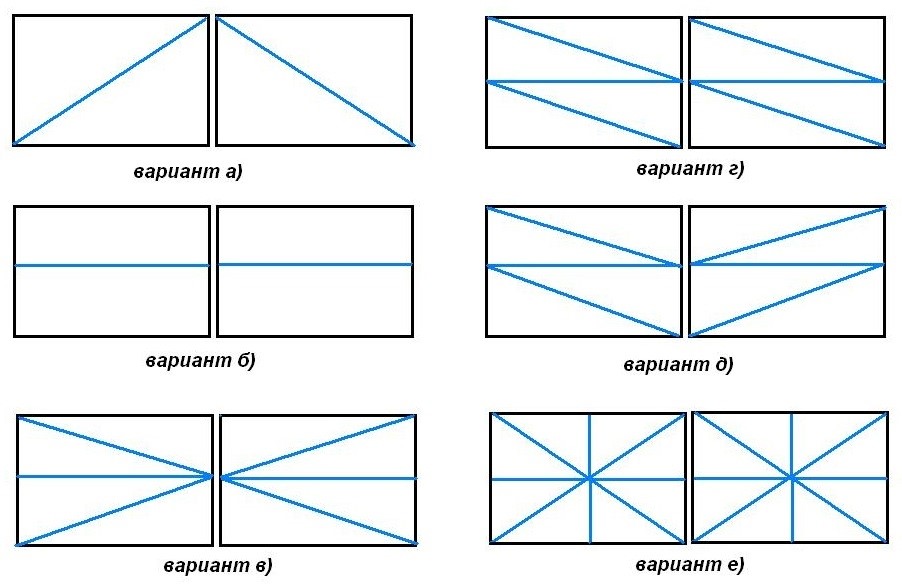
Hanging canvases
The supports on which the metal doors are hung are also most often made from metal pipes of larger diameter (up to 10 cm). Sometimes a channel or I-beam can be used as a rack. Metal loops are attached to the supports, the dimensions of which also depend on the parameters and weight of the canvases, and the number is usually two on each side. 
The diagram according to which the gates are assembled may provide for hanging the leaves not on metal, but on brick or concrete supports (with or without reinforcement). This increases the cost of work, but makes the structure stronger. Especially if so-called embedded metal parts are placed in the brickwork. 
When designing, it should be taken into account that the minimum recommended width of any gate should be 300 cm. If it is not possible to construct such a structure, it is allowed to reduce it to no more than 280 cm. This will ensure the passage of any vehicle, even freight transport, through the gate. And the recommended height from the bottom of the sash to the ground is taken to be 80–100 mm.
The height of the structures may differ noticeably from each other. This parameter largely depends on the installation location:
- for a garage or production workshop, the height must be no less than the maximum vertical dimensions of vehicles passing through the gate (including railway vehicles, if we are talking about an enterprise);
- for an ordinary passenger car, 2 meters is enough.
A hinged locking mechanism will ensure reliable fastening of the sashes when closed. It looks like the letter “G” and serves as a stopper when opening. In the place where the locking mechanism enters the ground, it is recommended to dig a hollow metal pipe 1 cm thicker in thickness - its presence increases the reliability of protection, although it complicates the automation of the opening or closing processes. The rack stopper should fit 40–100 mm inside this structure. Horizontal locks can be installed in the middle, top or bottom of the structure. To ensure reliability of their fastening, the parts are mounted on one of the crossbars. 
Installation of automation
Almost any swing gate design can be additionally equipped with automation for more convenient opening and closing. On the materials market you can find several standard solutions for electrical drives, which include a control unit, a signal lamp, an electromagnetic lock and a receiving antenna. As a rule, the devices operate from a regular single-phase power supply and can be designed in the same way as automatic swing gates themselves, which are more difficult and more expensive to make with your own hands than regular ones. 
Automation is used both for systems with external opening of the valves, and for options with internal ones. And the control unit is placed immediately next to the pole, providing a special place for it. If this was not the case, and the wall is brick, a niche is hollowed out in the brick to install the equipment. The main thing in this case is to install wiring of a suitable cross-sectional diameter, providing a place for its installation.
After installing a device that ensures automated operation of the structure, the number of its swing advantages increases noticeably. Now they can be controlled even at a fairly large distance. For example, from home – the range of the remote control for automatic opening and closing can reach 30 meters.
Do-it-yourself sliding gates - drawings, diagrams, installation and design details. We have made 100% free sliding gate drawings for you.
You no longer need to scour the Internet in search of sensible drawings, stumbling upon ancient drawings that are devoid of practical meaning, you don’t need to give your Viber or other messenger so that sectarian managers will call you for months. There is no need to buy components at exorbitant prices from companies that promise a “free” drawing when you purchase their product, etc.
"HOW TO MAKE SLIDING GATES WITH YOUR OWN HANDS"
We tried to create a database of sliding gate drawings so that every user who decides to make a sliding gate with their own hands can easily find useful information for themselves. You can find out the general theory about the design of sliding gates in the article sliding gate diagram. It is better to view the drawings on a large-diagonal tablet, desktop computer, or print it out.
BUY SLIDING GATE ACCESSORIES.
A few words on how to use the database. Let's say you have a classic opening 4 m wide. Find a drawing in the range that your opening falls into and feel free to make a gate along it. The fact is that sliding gates must cover the opening in each direction by 100-200mm. Firstly, the gaps are closed, and secondly, such overlap is necessary for proper fixation of the gate with catchers and an upper limiter. In the drawings, the covering of the opening with a sash is indicated - D, there is never too much of it, there is only a little. This is another important advantage of sliding gates - it’s harder to “mess up”
That is, for an opening of 3.9 m and 4.1 m, the sash will be the same, only parameter D will differ, 200 mm and 100 mm, respectively, which is within normal limits. For the required opening of 4 m, the covering will be 150 mm in each direction, which is excellent.
If your opening is, say, 4.15 m, then do it either like 4.1 or like 4.2, it will still work out correctly.
BUY AUTOMATION FOR SLIDING GATES PRICE
Regarding the height of the gate. The database contains drawings for an opening 2 m high from the level of the finished floor; if you have more or less than 2 m, then add or subtract the desired distance from the frame heights and that’s it.
Example: let’s say the height of your gate from zero (in the drawings - H) is not 2m, but 2.5m.
Add 500mm to all heights. and we get: H=2500mm, H2=2430mm, H1=2370, h3=2310mm, h4=2230mm. All.
The same thing applies to the direction of opening - the database contains gates that open to the left, when viewed from the yard; with a right opening, everything will be the opposite without any design changes.
HOW TO CHOOSE THE CORRECT ACCESSORIES FOR SLIDING GATES.

The recommended fittings for sliding gates with a width of 3-5.4 m are SP PREMIER STANDART-500. Your gate will move easily, smoothly and silently. That's how it is in the video.
With fittings from another manufacturer, such a smooth and quiet gate operation may not be possible.
As they say, feel the difference. Gates with fittings from one brand widely advertised on the Internet:
FREE DRAWINGS OF SLIDING GATES:
Drawing of a sliding gate with an opening of 3.0-3.2 m (click to enlarge)

Drawing of a sliding gate with an opening of 3.3-3.5 m (click to enlarge)

Drawing of a sliding gate with an opening of 3.6-3.8 m (click to enlarge)

Drawing of a sliding gate with an opening of 3.9-4.1 m (click to enlarge)

Drawing of a sliding gate with an opening of 4.2-4.4 m (click to enlarge)

Drawing of a sliding gate with an opening of 4.5-4.7 m (click to enlarge)

Drawing of a sliding gate with an opening of 4.8-5.0 m (click to enlarge)

Drawing of a sliding gate with an opening of 5.2-5.4 m (click to enlarge)

Drawing of a sliding gate with an opening of 5.5-5.7 m (click to enlarge)
Please note that from this gate size onwards a large guide 94x85x5 is used.
Recommended fittings for gates with a width of 5.4-10 m are STRONG-800 or Roll Grand #1 up to 800 kg.

Drawing of a sliding gate with an opening of 5.8-6.0 m (click to enlarge)

Drawing of a sliding gate with an opening of 6.0-10.0 m (click to enlarge)
For such gates, fitting kits for 800 kg with a guide 94x85 and a wall thickness of 5 mm are also used. We recommend STRONG-800 or Roll Grand #1 up to 800 kg.
The technology and methodology remain the same. We calculate the length of the gate structure using the formula: Lopening*1.5+200mm. Where Lopening is the clear width of the opening, the length of the counterweight is 0.5 from Lopening, 200mm is covering the opening with a canvas of 100mm on each side. For such large gates, it is highly advisable to make the counterweight part equal to half the opening. That's all the nuances.

In this article we will tell you about the main secrets and nuances of manufacturing sliding gates. Sliding gates are the best solution for organizing entry into a yard or enterprise territory. Let's consider their advantages: simple kinematics - sliding gates move (roll away) along the fence, requiring less labor to opening and closing are easily and cheaply automated, do not require fixation in the open position - they will not be closed unexpectedly, for example, by the wind, as happens with swing gates. To manufacture sliding gates, special components are required - the so-called fittings for sliding gates or otherwise sliding gate mechanism.
In addition, sliding gates, unlike classic swing gates, require space for rolling back the door leaf and a special foundation. See fig.

To calculate how much space is needed to roll back the gate, you need to multiply the clear width of the opening by 1.4. In other words, the space for sliding should be 40% greater than the width of the opening, since sliding gates consist of a door leaf and a counterweight, the length of which is 40% of the door leaf.

If your site meets these conditions, then you can get down to business. If there is a shortage of space, then the minimum possible length of the counterweight for normal operation of the gate will be 33% less; it is no longer possible - the gate will peck and it will be difficult to “walk”; if there is no space at all, then we must admit that sliding gates cannot be installed and it is worth considering other types, for example, swing, roller, etc. Sliding gates with a wicket - these nuances are described.

So, if everything is in order with the place for the sliding gate, then we proceed to constructing the opening for the sliding gate. First, you need to install pillars enclosing the opening, we will not dwell on this in detail because everything is clear here, we will only note that the pillars should not wobble, be concreted taking into account the depth of soil freezing, and also mortgages (3 pieces each) should be placed on the surface of the pillar facing the courtyard, the strips will subsequently be attached to these mortgages, we will come to this later. The optimal size of each mortgage is 60x60mm. The mortgage must be flush with the brick or protrude slightly; connection with the central pipe in the column is required. If the pillars are metal, then mortgages are not needed - the strips will be welded directly to them. An example of a well-prepared opening:

Scheme of concreting the foundation of sliding gates with electrical wiring: Clickable. More about the foundation -

After installing the pillars, we proceed to pouring the foundation. You need to dig a hole half the width of the opening. We start from the edge of the opening and move towards the rollback of the gate. The width of the pit is 400-500 mm, the depth is 1000-1500 mm, depending on the soil. For quicksand, swamps, and quicksand, we study construction documentation for foundations. The foundation should not sag, be subject to seasonal sinking, pushing, etc.
After our pit is ready, we make a “banquette”, see fig. higher. We take a channel 10-16 cm wide and also half the width of the opening, weld reinforcement with a diameter of 10-14 mm to the shelves and form an adequate spatial grid from the reinforcement. Next, we fix the bench in the hole, set the surface of the channel to the level of the “finished floor” (final asphalt or tiles), in addition, the surface of the channel must lie exactly at the horizontal level, this is important. We lay the channel close to the post. After this, we fill the pit with solution and wait a week or two.
As a result, after this we will get the following foundation:


The photo above shows the foundation for the sliding gates laid out in the “clean zero” of the yard, but the area will still be filled up. Therefore, it is also important to determine the level of the finished floor of your site before pouring; you may have to install formwork. Now let’s move on to manufacturing the supporting frame of the sliding gate.
As a rule, profiled pipes 60x30 and 60x40 with a 2mm wall are used for the external frame, but 50x50, 60x60 are also possible. First, we fence our pipes - remove rust, degrease and prime. In Fig. these pipes are shown in green. We form an external frame from a 60*30 pipe, make sure that all the necessary angles are right, the canvas is in the same plane, and we do not make the common mistake when the frame, usually in the area of the counterweight, lifts up a little along with the guide - everything should be smooth and neat. Welding seams must be continuous, without holes. To weld the gate frame, it is also convenient to use a specialized T-profile, this will significantly reduce the amount of welding work, since in itself it is already the desired combination of pipes 60x40 and 40x20.
Drawing diagram of a sliding gate device in the general case. External frame (green), internal sheathing (red), guide from the hardware kit (black).

The principle of forming a frame for sliding gates:

FREE DRAWINGS OF SLIDING GATES.
And this is a cross-sectional drawing of a sliding gate to help you understand the components of the gate height:

An example of a drawing of a gate frame for an opening of 4 meters and a height of 2 meters.

After this, you need to weld the internal frame (sheathing), which serves to ensure the rigidity of the structure, and also serves to fasten the lining - corrugated sheets, boards, polycarbonate, block house, etc.). The internal frame is made from a 20*20mm, 20*40mm pipe; it is easier to get into a 20*40 pipe with a rivet or a self-tapping screw. The internal frame is shown in Fig. above in red.
Distance “a” is equal to the width of the corrugated sheet used (often 1150mm); the joints of the sheets must pass along the vertical pipe of the sheathing. Distance "b" is equal to the distance remaining after sewing with solid sheets. The outermost sheet is usually always carefully cut to width using a grinder
It should look like this:

If the gate is sewn up on one side, then the inner sheathing can be moved to the edge of the outer frame towards the yard; this is true if the sheathing material is thick, for example corrugated sheeting with a “high wave”, sandwich panels, boards, etc. Welding work, as I already said, is carried out competently so that the pipes do not “lead”, we follow the principle of “chessboard order”. When the outer frame is ready and the sheathing is welded, we weld the guide from the fitting kit to the frame from below along the entire length. It is advisable to fix them with clamps. The guide rail must also be welded in a “checkerboard pattern”, otherwise the gate frame and guide may “lead” from welding and it will resemble a propeller. After this, we clean the weld seams, prime and paint the damaged areas. Sliding gate frame before covering with corrugated sheets:


When the paint is completely dry, we move on to sewing the fabric. We attach the lining material to the internal frame (sheathing) using rivets or self-tapping screws. Sliding gate frame after covering with corrugated sheet:


Please note that this section of the sliding gate counterweight is level and not “lifted up” and this is correct.

Let's consider some of the features of large openings, more than 5 meters. The figure below shows a drawing of a sliding gate for an opening 6 m wide and 2 m high. Please note the design of the counterweight part here is not triangular, but in the form of a rectangle with two diagonals. In addition, with a large opening length of more than 5.5 m, the counterweight should be made at 45-50% of the opening.

Well, the time has come to install the gate. The entire process of installing sliding gates with your own hands is perfectly illustrated in this video.
To begin with, we place the carriages on the foundation and spread them as far as possible within the limits of our counterweight (triangle). See fig.

but we mean that the end roller has a size of about 110 mm, so we place the carriage closest to the opening from the opening, taking into account this distance, and we place the carriage farthest from the opening so that it does not knock out the plug when closed. The wider between the carriages the better, but without fanaticism.

After that, we “roll” our sliding gate frame onto the carriages, set the sliding gates to the level and “grab” the heels of the carriages to the channel by welding, if everything is good, then we scald the heels, if we don’t like something, we set it up again, we achieve the desired result (the position of the gate in level, absence of distortions, etc.) and then scald. Then we weld the upper support rollers, install the end roller, and weld the upper and lower catchers. The rolling roller must roll onto the lower catcher and unload the gate in the closed position.
If your posts are made of metal pipes or channels, then the catchers and upper limiter can be welded directly to the post. If brick, concrete or stone pillars are used, they need to be attached to a profile pipe-plate (usually 60*30, which is attached to the pillar using mortgages, and in their absence, to dowels, anchors, fittings, etc.
Installation of the upper limiter (upper rollers)
 :
:
If you have peaks or a semicircular arch of peaks on your gate, then a so-called portal is used - a U-shaped structure is welded near the pillar, allowing your peaks to pass through in height. The upper limiter is cut in two and welded to the portal so that the rollers “clasp” the gate on both sides. To do this, you need to provide a pipe (flat surface) along which the rollers of the upper limiter will roll. See pic:


Or using a remote pipe (60x40), if it is not possible to implement it as in the photo above, i.e. this way: More details.

Attaching catchers to the strip.
To mount the carriages, you can use a special accessory - adjustment platforms, with their help you can adjust the gate in height and eliminate distortions, within some reasonable limits. And also to “get out of the situation” in case of any miscalculation. But if all the levels are set correctly and the foundation level is not “filled up,” then your gate will stand correctly and without any adjustments.

The supports are welded to the channel and the carriage is secured with nuts. Do-it-yourself sliding gates will cost you significantly less than ordering "turnkey" from companies. To do this you will need We are always ready to provide you with a wide selection of components for sliding gates and affordable prices. This material will certainly help you make your own sliding gates easily, quickly and without unnecessary overpayments! Assemble the sliding gates yourself - save your money.
Still have questions? Call and our managers will be happy to advise you on all questions! Call or request a consultation.
When arranging a summer cottage or a country house, the question arises of how to make a gate with your own hands. Before starting the work process, you should decide on the type, materials and installation method. Taking into account all the nuances, you can make the gate yourself, without resorting to the help of professionals. Each type of gate is different from each other and has its own characteristics and quality characteristics. They are worth considering in more detail.
Swing type
In the photo of the gate you can see the easiest model to implement. The design of this plan is equipped with a gate. This is a fairly common option for a private home. Pillars are used as a basis; they are installed in width. The third post is necessary in order to establish the exact width of the gate.

Mounting occurs according to the following gate diagram:
First, the gate leaves and gates are installed on welded hinges that are located on the posts. This is an important stage, because depending on it in the future the direction of their discovery will be determined.

In general, sashes are frames made of metal. Other options are also possible, for example, a profile pipe, or a corner that is sheathed with a metal sheet, wood, or corrugated board.


There is a manufacturing option that involves using exclusively wood. In this case, it is worth securing the boards to a reinforced frame.

Heavy gate structures should not be used, as this places a significant load on the hinges and support posts. It is best to adhere to the weight of the sashes. A closing device is useful for the lock's hinge; you can use a powerful latch.

This type is really easy to install. The work can be done independently. It is worth considering the disadvantages in this case as well.

During installation, the support pillars may tilt, as well as the sashes may sag. This drawback is observed if the installation was initially broken. Reasons also include incorrect calculation of the weight of the sashes. It is important to deepen the foundation of the supports. Heavy material will make the situation worse. The weight of the loops must match the material.

The advantages of this choice are as follows:
- economical, fairly compact placement, there is no need to clear additional space for installation;
- easy installation work.

The working process
For a successful final result, you need instructions for installing the gate yourself. If the weight of the gate is normal, then the choice of metal poles made from pipes is considered optimal. Their diameter is on average about 80-100 mm.


A profiled pipe with a similar diameter is also suitable. This type of support elements copes with the task perfectly.


The following installation methods can be distinguished:
- clogging;
- concreting.

If we are talking about the first method, then the depth to which the pillars are driven is 1.2-1.3 m. This type has its advantages. Among them, reliability and speed of work are of particular importance.

You should drill the hole you need. This should be a depth of half the future depth of the pillar.
Columns should be installed in the wells. You can hammer them in with a sledgehammer or impact head. When doing this, pay attention to the verticality of the stand.

The next step is to attach the posts to the fence posts. Then you need to weld the hinges. Designate a place for this in advance.

After this, you should hang the doors on the hinges. At the same time, the correct convergence of the elements to the central part is checked.
The second installation method is concreting.

This method increases rigidity as well as stability. This method will require the use of heavy and wide sashes.

Reinforcement is not carried out. You will need a reinforcing glass. The workflow steps for beautiful homemade gates look like this:
- drilling The diameter is about 200 – 250 mm, the depth is about 1.9 mm;
- prepare sand and crushed stone, they will be needed to fill the bottom of the hole. The components should be compacted carefully, each layer should be about 100 mm;
- the pillar is installed directly on a bed of sand and gravel;
- It is worth pouring the solution around its area. Until it hardens, it is important to install the post vertically. Use supports as anchors.


You can use a reinforced structure for installation. In this case, installation work is carried out in the same way as without the use of reinforcement.

conclusions
After carefully studying the drawings, as well as step-by-step instructions, you can do all the work yourself. It is necessary to pay attention to the selection of necessary materials and get into the flow of work.

It is best to carry out work together with a person who has experience in this area. Then the quality and duration of work will pleasantly surprise you.


DIY gate photo


It is believed that swing gates are the oldest type of gate. Their existence is measured in millennia, but the principle of the device remains constant, and changes concern only the materials of manufacture and design.
They are used almost everywhere: in enterprises, cottages, and private homes. The availability of materials necessary for their manufacture, reliability and simplicity of design explain such a wide distribution of gates of this type. Gates can also become a decoration for your property if you manage to make their lining beautiful. The lining can be made from corrugated sheets, metal sheets, forging, etc.

The advantages of swing gates include:
- simplicity of design
- low manufacturing cost
- versatility
- long service life
- almost complete absence of maintenance required.
However, these gates also have disadvantages:
- In winter, snow removal is required to open them
- Gate leaves require significant free space so that they open freely
Let's start production - stages of work
The first thing to take care of is load-bearing pillars. They need to be manufactured and then installed. For swing gates, pillars made of a profile metal pipe with a diameter of at least 100 mm, wooden beams made of hardwood, or concrete can be used. When installing such pillars, they must be concreted to a depth of 1 m or more.

If the pillars are built of bricks, then their foundation must be concreted to the same depth. The pillars themselves and their base must be reinforced. From the pillars inside the opening, a corner must be released or installed, which will be necessary for attaching the gate posts.
Concrete for concreting pillars is made from a mixture of cement, crushed stone and river sand in a ratio of 1:4. To make it easier to work with, it is best to use fine crushed stone.
After pouring the load-bearing pillar, let it sit for 7 days or more so that the concrete sets well.
While waiting for the concrete to harden, you can do manufacturing of gate leaves. First of all, you should prepare the pipes for making the frame. They must be cleaned of corrosion and dirt, degreased with solvent or gasoline and a layer of anti-corrosion primer applied. When the pipes are ready, the frame must be welded in the form of a rectangle or square. To ensure double-sided lining, an additional pipe is welded flush with the main one in the middle part of the frame. After sanding the weld seams, the gate frame must be primed and painted.

After the paint has dried, you should begin sewing up the door leaf. The choice of lining material and the order of lining is a very individual matter and depends mainly on the taste of the owner.
The next stage is suspension gate If the supporting pillars are metal, then the gate hinges are welded to the pillar itself. If the pillars are stone or brick, then a metal stand must be attached to them using dowels. And the hinges are already attached to this rack.
If you make swing gates with your own hands, they will cost you much less. If you know how to do basic plumbing and if all the necessary materials are on hand, then making swing gates will take two or three days.