Logs for a floor distance between support. Insulation of the floor on the logs. Sheet piling or not sheet piling
Many owners of summer cottages during the construction of houses choose wooden floors. This is due to the fact that wood is an environmentally friendly material that has aesthetic appeal and natural naturalness. In most cases, the installation of a wooden floor requires lag - wooden beams laid on the main floor. During installation, it is very important to choose the right distance between the logs of the floor.
Appointment and installation methods lag
Logs (beams) perform several very important functions:
- increase in noise and heat insulation of the base;
- creation of a ventilated space under the floor in which engineering communications can be laid;
- proper redistribution of load on the rough floor;
- creation of a flat and strong base for the installation of the finishing flooring.
In most cases, the logs are made from wooden beams of coniferous and deciduous species. Sometimes metal, reinforced concrete and polymer analogues are installed, but it is economically disadvantageous. In the absence of a wooden beam, lags can be constructed from several boards, knocked together. In this case, they fit on the ribs.
When choosing a beam for the manufacture of lags should be guided by the following recommendations:
- Choose inexpensive wood (fir, pine or spruce). If the room in which the floor is mounted will have a high humidity (for example, a bath), then hardwood should be used.
- To save the budget, you can choose building materials of 2 or 3 grades with a moisture content of 17-22%.
- Beams must have a rectangular section of a certain size.
- The dimensions of the beam should be selected based on the span, that is, from the distance between the beams of the lower interchange.
How to choose the lag section correctly?
The cross-section of the beam for the manufacture of logs is determined by 2 factors: the span between the support points (columns, lining or transverse beams) and the maximum load under which the floor will be during its operation (for a residential building it is no more than 300 kg / m 2).
The cross section of the beams should be rectangular in shape with a width multiple of 1.5 and a height of 2, that is, the aspect ratio in the section should be 1.5x2. When laying the beams, the large side should be vertical. This will allow to achieve maximum structural rigidity with minimal volumes of wood and, accordingly, minimum costs. Table 1 presents the dependence of the cross-section of the beam on the span size.
Table 1
Also, the cross section of the beam will depend on the thickness and strength of the floor covering. When installing the floor, you should pay attention to the layer of thermal insulation material.
Between the finishing floor and the insulation laid between the logs, there should be a small gap for natural ventilation of air with a width of at least 2 mm.
This means that the beam must be purchased taking into account the size of the ventilation gap.

To construct a wooden floor in logs, it is recommended to use a bar with a small margin of cross-section. Beams can be mounted both on a concrete base and directly on the ground. The differences in these laying methods are in the supports that will be used under the uneven bars. If the base is soil, then concrete or brick posts, which are installed every 1.2 m. These elements are made of red brick M100.
The use of columnar supports allows you to save on the thickness of the wood. So, with a log length of 400 cm, only one support installed in the middle will reduce the cross-section from 180x100 to 110x60, which will ultimately be significantly reflected on your budget.
Calculation of the distance between the lags when installing the floor
The distance between the lags (step) is a very important parameter, on the basis of which calculations of the required amount of building material are made. When thick boards with good strength are used as finishing floors, beams can be mounted relatively rarely. If the flooring is carried out by thin elements, then the step needs to be reduced. Table 2 shows the dependence of the distance between the lags on the thickness of the finish coating.
table 2
The data shown in table 2 are approximate. For a more accurate calculation of the pitch, we can give an example when it is necessary to find out what distance should be between the beams when constructing the floor in a room 9 meters long. In this case, a beam with a section of 180x100 mm is used, and boards with a thickness of 30 mm are used as a finishing coating.
Since the thickness of the board is 30 mm, according to table 2, the step should be 0.5 m. The total number of beams will be indicated as k. Therefore, the width of all lags will be equal to 100 * k (mm). The first bars will be laid at a distance of 30 mm from the wall. Based on this, the step between them is equal to k-1, and the distance between all elements is 0.5 * (k-1).
To find out the step between the beams, you need to create an equation: room length \u003d beam width + distance between all lags + indent from walls. The result is: 9 m \u003d 100 mm * k + 0.5 * (k-1) m + 30 mm * 2. Having brought all the values \u200b\u200binto a single system of calculation, you get: 9 \u003d 0.1 * k + 0.5 * (k-1) + 0.03 * 2.
Having solved this equation, you will see:
- 9 \u003d 0.1 * k + 0.5 * k - 0.5 + 0.06;
- 9 + 0.5 - 0.06 \u003d 0.1 * k + 0.5 * k;
- 9.44 \u003d 0.6 * k;
- k \u003d 15.7 pcs.
The number of beams must be integer, so the resulting value should be rounded up. That is, for the construction of the floor, it is necessary to prepare 16 lags. The sum of all the intervals between the lags will be equal to: 9 - 0.06 - 16 * 0.1 \u003d 7.34 m. Dividing this value by the number of intervals, you will receive: 7.34 / 15 \u003d 0.489 m. For the given example, it is necessary to set the lags through every 0.489 m or 48.9 cm.

Follow the tips so that the resulting design is reliable:
- The base on which the floor is supposed to be mounted must be thoroughly cleaned of debris and treated with a deep penetration primer.
- All wooden elements should be treated with an antiseptic, with which you can increase the operational life of the wooden structure.
- It is necessary to lay the beams along the window with gaps between the walls of 3-4 cm.
- After installation, the lag surface is checked for horizontal evenness with a long level. If there are no gaps between the level and the beams, then all the work is done correctly.
The reliability of the whole structure depends on the log section and the step between them. Therefore, the choice of these parameters should be taken seriously.
We begin to disassemble the device of the floors into lags. This article is an introductory article and tells how to choose floor logs, what the floor cake consists of logs consists of and what material is better to use for floor on logs. In addition, we will examine in detail what should be the distance between the floor lags (step lag) and what should be the size of the lag. At the end of the article, a detailed calculation of materials for the installation of the floor in the logs and calculation of the logs, plus the necessary tool that will be needed when installing the floor to the floor logs will be given.
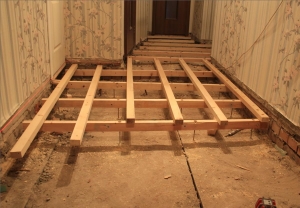
At what stage do the floor on the lags
At this point, foundation pillars and grillage should be flooded, roll waterproofing laid on the grillage, the bottom trim bar is fixed to the grillage surface through the waterproofing (the logs will rest on it), the frame of the house can also be ready, although this is not necessary .
Those. You can start installing the floor on the logs after assembling the frame and before it.
Final work on the installation of the floor, namely the installation of thermal insulation and the finishing floor (tongue and groove board) is very desirable to do after painting the walls. If you paint the walls after laying the finishing floor, then it will inevitably become contaminated with putty, paint and just dirt that will be worn behind your feet. Reliably protect something already laid floor, from experience, it is practically impossible.
If, after reading this article, you understand that to support the lag, you need intermediate supporting posts, then at least I (pillars) I advise you to do it before assembling the frame. So it will be easier for you to make columns and wear all the materials necessary for them (concrete, brick).
Before proceeding with the installation of the floor, you need to do the following:
- choose flooring material;
- decide whether to insulate your floor;
- choose the cross section of the log, given the thickness of the insulation;
- pick a step lag;
- determine the step of the columns under the lags;
- calculate the required volumes of all materials.
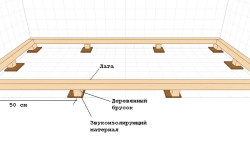
Log floor construction
To begin with, I will schematically show what the floor on the lags consists of, then it will be more clear what kind of floor elements we are talking about.
The device of a floor on logs
The choice of material for flooring on the logs
This choice depends primarily on your personal preferences and floor requirements in terms of aesthetics, environmental friendliness, installation speed and of course cost. So, if you want a natural wood floor, then a covering is suitable - a board (sheet pile or not sheet pile). If you plan to cover the floor with something, for example, a laminate, then you can also consider laying options for the plywood or OSB lags instead of the board.
The minimum thickness of plywood for flooring is 12 mm with a step of 30 cm. The minimum thickness of OSB is 18 mm with the same step of 30 cm.
From experience, most often a tongue-and-groove board is used to cover the floor on the logs, so in this article we will consider in more detail just this option for flooring.
The choice of wood for coating
Pine, spruce, fir - are most often used for flooring, suitable for floors with a small load, as these materials are quite soft, dents are easily made on them. If you decide to lay the floor of these materials in rooms with high traffic and load, then try to treat the coating as carefully as possible and not walk on it with thin heels. Not suitable for wet rooms.
Aspen and alder are medicinal wood species, so they are suitable for a bedroom and a children's room.
Oak - dense and durable wood, is more expensive, but the floor of such a board will be very strong and durable.
Siberian larch is as hard as oak, thanks to resins it practically does not decay, therefore it is suitable for all floors, including with high humidity, for example for a bath. 2-3 times more expensive than pine. Also for the floors in the bath, you can use alder, birch, beech.
It is generally not used for plank floors - Smereka (too soft wood), and linden and poplar are used only for non-residential premises.
I will add that even though a board made of oak and larch is more expensive than a more common board made of pine, the floor will definitely serve not only you, but also your grandchildren (if there is such a goal), while the floor from the pine will already be replaced several times . But if there is no such need for a board to serve 100 years without replacement, then choosing a board from pine you can count on 50 years. With proper installation and proper care, of course.
Sheet piling or not sheet piling
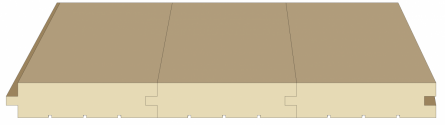
Grooved board. Connection in a rectangular tongue (tenon groove)

The board is not grooved. End to end seam
Those floors that we used to see in old houses - with crevices and an uneven surface - these are floors from an ordinary non-grooved board. So, no matter what the ideal geometry, new non-grooved boards would be, you should understand what exactly the floor will look like in a couple of decades. An exception may be only not tongue-and-groove boards made of hard wood, such as oak or Siberian larch.
Therefore, not a tongue-and-groove board made of inexpensive wood species (pine, spruce, fir) is suitable only for the subfloor, i.e. the floor to be covered on top.
For a fine wooden floor you need to take a grooved board.
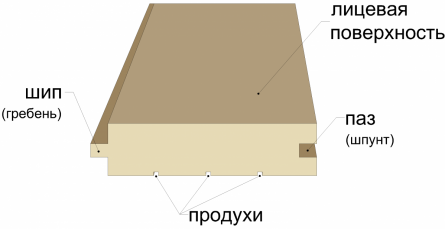
Tongue and groove board
This is a floor of a completely different level and not at all what we are used to seeing in old houses (creaks, crevices, uneven, etc.).
Thickness and size of floorboards
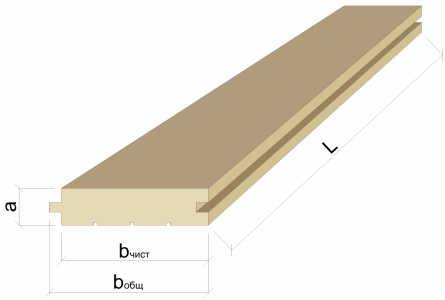
Main board sizes
Board thickness
Boards come in a thickness of 20 to 40 mm.
Often, when choosing a thickness, they are guided by the principle - the thicker the board, the stronger the floor. But in this case, it should be remembered that a tree is a natural material that has the ability to shrink and at the same time it (the tree) leads a little, twists. So if, for example, you take a 40 mm board not dried as it should in the drying chambers, but raw (as a rule, they take it because it is cheaper), then such a board will behave very sharply during natural drying. Maybe she can tear out the self-tapping screw with which it is fixed. And at the same time, the same not sufficiently dried board of smaller thickness (22, 24 mm) will behave much better (less mass, less mass of the array, so it does not break the screws). Therefore, the most practical thickness of the floorboard is 22, 24 mm. If you take a thicker board - 30, 40 mm, then only dried in drying chambers to a moisture content of 10%, maximum 12%.
Board width
The width of the board is also different - 100, 120, 140 and even 200 mm. Just as with thickness, here you need to make your choice depending on the moisture content of the wood. With a moisture content of 12%, you can take a wide board (150-200 mm), it is better to take an unfinished board narrower - 100 mm. The most popular is the last width of the board - 100 mm.
Board Length
Boards on sawmills are sold in multiples of 1 metu in length, i.e. 3, 4, 5 and 6 m. It can never be longer. If you plan to stack the boards with an offset, then, in principle, the length does not matter much, and you can order a shorter board (it is slightly cheaper), but the laying method itself is more time-consuming (many joints). If the boards are stacked without displacement, then of course it is ideal to take the board along the length (or across the width of the room). So, for example, for a room with a size of 7x4 m - a length of 4 meters, and for a room of 4x3 m - a length of 4 or 3 meters.

Laying options for floorboards: a) with an offset; b) without bias
Tree variety
Which grade to choose depends on the purpose of the board covering (it will be fine or will be covered on top) and on the financial ability, as well as on which protective agent you plan to cover the boards on top if it is a fine floor (varnish, paint, wax).
Top grade. Boards of this grade are the highest quality, but also more expensive. They are completely without knots, which by the way is not everyone likes. This is purely a matter of taste. They are suitable for coating with transparent compounds, under which the structure of the tree is visible (varnish, wax, oil), and there is no point in buying such expensive boards for such a coating as paint.
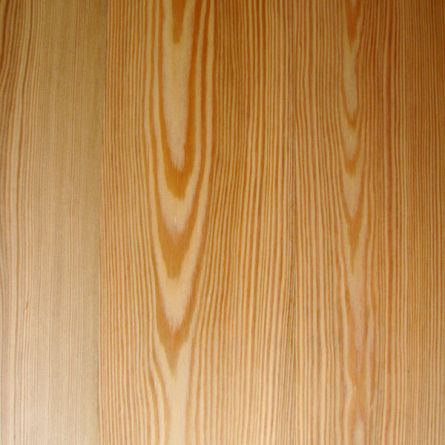
Top grade board
1 grade. Board with lively light knots. The best option in the issue of price / quality is under the coating with transparent compounds that show the structure of the tree.
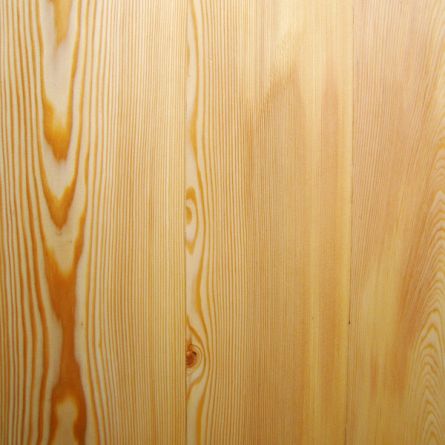
Board 1 grade
2 grade. On the surface of the boards you can see many knots, among them there are dead dark knots. Ideal for the floor for painting. Bitches will still not be visible.
Board 2 grades
3 grade. Boards have a noticeable curvature, poor geometry, a lot of knots (sometimes even falling out). This board is noticeably cheaper, but its laying will be longer and more expensive (to customize, trim, cycle). Therefore, such a board is a suitable option for floors in utility rooms and technical rooms, where you do not need to especially heave and loop.
Board 3 grades
Humidity
As mentioned above, the ideal option is a board dried in special drying chambers on a sawmill to a moisture content of 12%. Such a board needs to be transported and mounted in dry weather (not in fog and not in rain). A more economical option is not a dried board, humidity is 18-20%. She needs to be laid as soon as possible. Those. on the day of delivery already be ready for installation (have the appropriate tool and already installed floor logs). Or if you do not plan to do the installation yourself, then hire a team of installers on the day of delivery. If you don’t lay the not dried boards at once, then they will begin to dry out, get out, blow out with an arc. All this leads to losses as a result, since such a board will have to be looped, which can be avoided by laying it right away.
Board laying method (orientation)
Boards are usually laid in the bedrooms and lounges - along the direction of light from the windows, and in rooms with increased cross-country ability, such as a vestibule and a corridor - along the direction of movement.
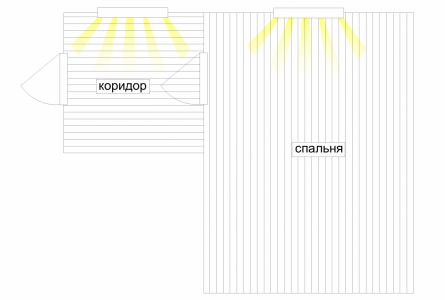
Floor Laying Orientation
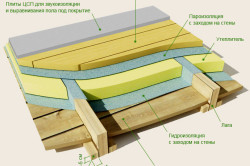
Insulation of the floor on the logs
If we are talking about the floors of the first floor, then they need to be insulated necessarily and always, without exception. You can not insulate only the floor on the logs, which is bordered below by a heated room, such as a heated basement. A vapor permeable insulation, such as basalt mineral wool or fiberglass wool, is best suited for floor insulation on logs. In the floors on the logs, the insulation does not carry a load, so soft positions with a density of 30-50 kg / m3 are suitable. The thickness of the insulation depends on the region in which you are located, usually it is not less than 150 mm, but in some regions of Russia the thickness reaches 200 mm, so it must be considered. We make such calculations, ask - we will calculate. Except, it is better to take with a margin.
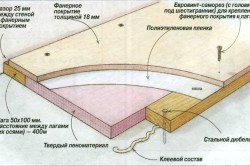
The device of the wooden floor on the logs
Wood species, variety, moisture. Logs are most often made from an inexpensive array of pine, spruce, fir, less often from a more expensive larch tree. Grade 2-3. Humidity 18-20%.
We select the lag section
The section should be rectangular with an approximate ratio of height equal to 1.5-2 width. With this cross section, the lags work best.

Section lag. Optimum height to width ratio
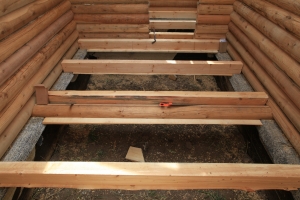
The cross section of the lag depends on the span on which these lags will be laid. The span in this case is the distance between the bars of the lower harness, on which the logs will rest.
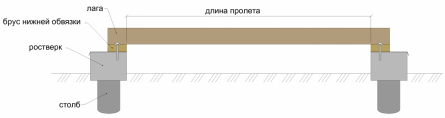
Span
And also the section of the log, namely their height (h log in the figure below), also depends on the thickness of the insulation (h ut), which must be placed between them. And here it is necessary to remember that between the upper boundary of the insulation and the floor board there must be a ventilation gap h vent \u003d 2-3 cm. And from below, the insulation will be laid on the roll (h roll), which is placed on the cranial bar (h b.b.) fixed to the lags.
Thus, the minimum height of the lag is calculated by the formula: h lag \u003d h bw + h forward + h ut + h vent,
H b \u003d 50 mm;
H roll ≥25 mm;
H ut is calculated for a specific region;
H vent \u003d 2-3 cm.
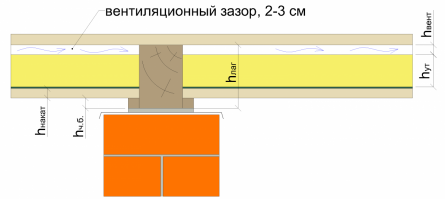
Ventilation gap between the insulation and the board
In order not to lay expensive logs of large cross-section, the span can be reduced by installing intermediate supports - supporting columns under the logs.
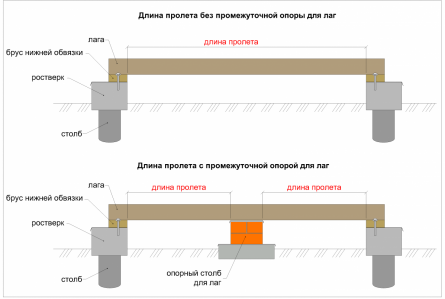
Span reduction due to the installation of an intermediate support - a support column under the logs
Below I will give lag sections for different spans, provided that the lags will be laid no more than 70 cm.
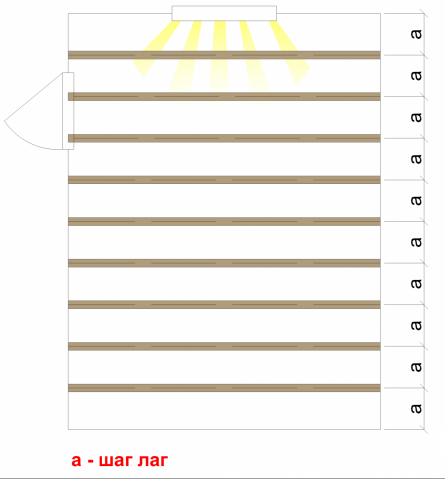
Step lag
If you have a lag step less than 70 cm, then the given sections will be with a small (indeed with a small) margin.
(span - lag section)
- 2 m - 110x60 mm;
- 3 m - 150x80 mm;
- 4 m - 180x100 mm;
- 5 m - 200x150 mm;
- 6 m - 220x180 mm.
If your span has an intermediate value, then it is better to take the log section with a margin, i.e. such that suits the closest flight to yours. Or ask, we will count you.
Well, a lag step of more than 70 cm is permissible only if the floor is covered with a thick board, more than 40 mm, which is extremely rare. Therefore, in the framework of this article, we do not consider sections of logs laid with such a large pitch (800-1000 mm). If you have such a thick board, then ask, we will count.
It makes sense to install intermediate support posts for logs in increments of 2 to 1 meter. Optimum 1-1.2 m. Log sections in this case will be as follows:
(pitch of support pillars - lag section)
- 2 m - 110x60 mm;
- 1.5 m - 100x50 mm;
- 1.2 m - 90x50 mm;
- 1 m - 80x50 mm.
All lag sections that I brought up at this point (with and without support pillars) are optimal for the indicated spans. Taking a section less is not safe. And more is possible. Therefore, if you, for example, have lags of a larger cross section than you require, then you can safely use them.
And further. I did not take into account the thickness of the insulation, choosing sections, since this thickness in each region will be different, and for someone the floor will not be insulated at all. So if you need to lay, for example, 150 mm of mineral wool per 2 m span, then the section I have indicated for this span of 110x60 mm needs to be increased so that there is a minimum ventilation gap of at least 20 mm between the insulation and the floor board. We consider - 150 + 20 \u003d 170 mm, this will be our minimum height of the log. Then its cross section can be 170x60 mm or more (170x80 mm, 170x100 mm, etc.).
Step lag
The step lag depends on the thickness of the floor covering. The stronger the flooring, the less often you can put logs. Conversely, if the flooring is thin and not very durable, then the lags will have to be laid often.
Below I will give different options for flooring and the recommended step lag.
(board thickness - step lag)
- 20 mm - 30 cm;
- 24 mm - 40 cm;
- 30 mm - 50 cm;
- 35 mm - 60 cm;
- 40 mm - 70 cm;
- 45 mm - 80 cm;
- 50 mm - 100 cm.
Support posts for logs
They are made of brick grade M 100. Often they say and write that silicate brick cannot be used on supporting posts. This statement is true only for areas with a high level of groundwater (less than 2 meters from the ground surface). Then it is better to apply a red brick. In other cases, red and silicate bricks are equally suitable.
Waterproofing the floor on logs
It is laid on the foundation for breaking the capillary rise of groundwater, as well as on the brick in front of the logs for additional protection. The number of layers of waterproofing depends on its thickness. So if the waterproofing is 3 mm thick, then 1 layer is enough, if thinner, then in 2 layers. We do not recommend using roofing, but if you have one, then for normal waterproofing it should be laid in 2-3 layers.
Sound insulation of the floor on the logs (soundproof lining)
Help dampen shock noise. They are laid on the roofing material directly under the logs. In size, they should be slightly larger than the thickness of the log, about 1 cm protruding beyond the edge of the log on each side. For example, for logs 100x150 mm (width x height), the soundproofing lining should be 120x120 mm in size.

Soundproof lining. Lug size
Such linings are made of a variety of materials: plywood, chipboard, OSB, antiseptic wooden stitches, cork substrate, special compensation tape or a foam polyethylene substrate (like under a laminate, only thicker). The recommended thickness of such a substrate is 1-4 cm.
Foundation for posts for flooring on logs
You will also need a small amount of concrete for the foundation for the columns. This foundation can be either separate for each column, or common on one line of columns, as you prefer.

Separate foundation for each support pillar
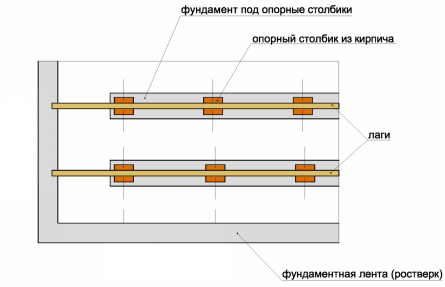
Common foundation tape for each row of support posts
Preparation of the base of the floor for lags
Well, the last thing you need is crushed stone (about 4 cm over the entire area of \u200b\u200bthe base under the floor) or crushed clay (about the same, 4-5 cm).
Calculation of the amount of materials for the floor by logs
In order to start the calculation, you need to make a drawing of the room on a scale. The drawing schematically show windows and doors.
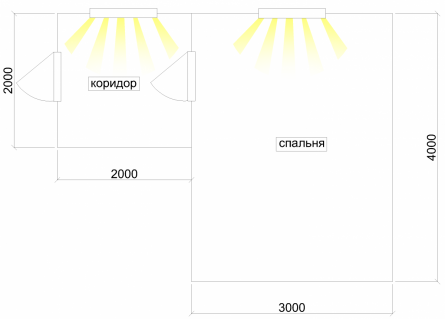
Drawing of the room
Now you need to make the layout of the floor lag. The step is selected taking into account the thickness of the board. For example, we will have a floor board 24 cm thick, logs under such a board must be installed in increments of 40 cm.
In the first room (corridor), our boards will be laid in the direction of travel, and the logs, respectively, perpendicularly. In the second room, since this is a bedroom, the boards will be laid along the direction of the light from the windows, and the logs, again perpendicular. The distance of the first lag from the wall should be no less than the accepted lag step, i.e. ≤ 40 cm. Next in increments of 40 cm.
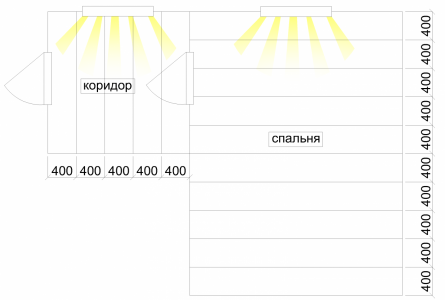
Mark the axis of the lag
Pay attention - a step, this is the distance between the axes of the lag. Having made such a layout, we already know how much we need lag.
Lag layout
Now we will determine the cross section of these lags themselves. Suppose we need to place 50 mm of insulation between them, respectively, the height will be 150 mm (50 mm of cotton wool + ventilation gap of 20 mm + cranial block 50 mm + roll 30 mm \u003d 150 mm).
At our step of 40 cm, for a span of 2 m (first room), bearing capacity, taking into account the required height of at least 150 mm, logs with a cross section of 150x50 mm (even with a margin) will fit without additional support posts for logs.
For a span of 4 m (second room) there are few such lags without intermediate supports. Here you need lags with a section of 150x100 mm. Therefore, we have three options.
- Buy all beams of one section (150x100 mm) and use them.
- Buy the right number of beams with a section of 150x50 mm and the right one - 150x100 mm. But buying a pair of lag of different sections for money can cost almost the same as buying a lot of lag of one section at once.
- Buy all the logs with a smaller cross-section (150x50 mm), but in the second room install intermediate support columns for the logs. One column for each lag.
Note: The option is to buy all beams with a section of 150x50 mm and splicing them to obtain 150x100 mm, we do not consider, since it is not recommended to merge the floor beams in height. Then the floor covering will be attached to the lags and the fasteners will fall on the joint of the halves of the lag or close to the joint, which will negatively affect the reliability of fixing the floor covering.
If you have chosen the third option, then you need to calculate the number of materials per column. For each column there are 4 bricks, a piece of roofing material 52x52 cm, a lining for the lag, and concrete on the foundation floor column.
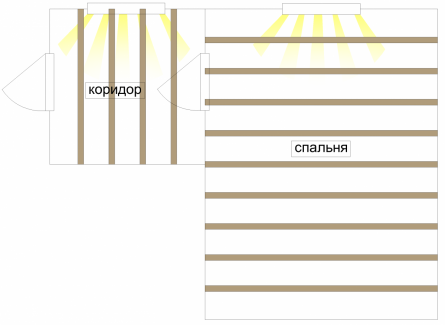
Board quantity calculation
Usually an order for boards is taken in m 2. Less often in pieces or m 3. Further I give an example of calculation.
Square. Suppose you need to cover the same two rooms with a board: the first 2x2 m and the second 3x4 m.
1. We calculate the area of \u200b\u200beach room.
S 1 \u003d 2x2 \u003d 4 m 2; S 2 \u003d 3x4 \u003d 12 m 2.
2. Now we summarize the area S \u003d S1 + S2 \u003d 4 + 12 \u003d 16 m 2
And we determine that our board should have a thickness of 24 mm and a width of 100 mm. The length should be ordered the most convenient, based on the available size of the room. In our case, it’s convenient to take a length of 4 m: the whole board will go to the second room, and we will cut the remaining boards into 2 parts and cover the floor of the first room. Thus, our order will sound like this: 16 m 2 boards 4 m long, 100 mm wide and 24 mm thick.
Pieces. We determine along which wall the boards will be laid. For example, we decided to lay them in the first room along side a (i.e., in the direction of travel), and in the second room along side b (perpendicular to the entrance).
Then, to calculate the number of boards for each room, we divide the length of the side, perpendicular to which the boards will be laid (side g for 1 room and side b for the second) by the width of our board.
D1 \u003d 2000mm / 100 mm \u003d 20 pcs.
D2 \u003d 3000 mm / 100 mm \u003d 30 pcs.
In total, we need 20 boards 2 meters long and 30 boards 4 meters long, 100 mm wide and 24 mm thick, or 40 boards 4 meters long.
16 m 2 x0.024 m \u003d 0.38 m 3.
You will also need flooring material (varnish, wax, oil, paint) and wood putty.
And do not forget that the logs, roll and cranial bar should be saturated with an antiseptic. Preferably before installation. Read in detail about how to soak a tree with an antiseptic on its own in paragraph.
Tools for installing the floor on the logs
And also do not forget to prepare the following tools before installing the floor:
- Hammer;
- Roulette;
- The water level is ordinary and the water metal level is 2 meters long;
- Drill;
- Hammer drill;
- Electro-jigsaw or conventional saw;
- Screwdriver;
- Nail clipper;
- Ax;
- Plane;
- And consumables (dowels, wood screws, nails).
Logs are stiffeners that are laid on a concrete, wooden or soil base and support the floor boards. Depending on how the house is built and which flooring is chosen, the installation of the lag for the floor is carried out in different ways, and the beams themselves are used in different thicknesses and densities.
What are floor lags
Logs - a rigid beam, which serves as the basis for laying flooring. They are usually made of wood, but in some cases the base can be of concrete, metal or hard plastic, but these materials are rarely used in construction. For low-rise construction, private houses and cottages, utility outbuildings, a wooden beam is usually enough, on top of which floors are laid.
Sex on the lags has a large list of advantages:
- The flooring is more durable and durable if the distance between the logs of the floor is maintained correctly;
- Easy do-it-yourself installation. Before starting repairs, you can use a special calculator and calculate how much wood is needed, and then just assemble the wooden floors with your own hands. This can be done in a few days;
- Logs are stacked and aligned in level, and therefore the wooden floor on the logs turns out more even than without them. In addition, laying logs on a concrete floor in a panel house allows you to even out the slope and surface height differences;
- The presence of a certain distance between the lags and the base of the building allows laying communications under the floor. These include not only electrical wiring, but also water pipes, and even a water heated floor;
- The wooden floor on the logs has better thermal insulation even without a layer of insulation under the floorboards. And if the laid floors on the lags are insulated, then you can walk on them barefoot even in winter;
- In apartment buildings, the floor on the logs has another useful property - additional soundproofing. Since a layer of insulation is usually laid under the floorboards, the noise of neighbors from below does not penetrate through the wooden floors, and the neighbors, in turn, do not hear the tramp of the tenants of the apartment above them;
- In the event of damage to one structural element, it can be easily replaced with another without disassembling the entire floor.
Thus, having put a little effort into the construction and repair, using a special calculator and carefully making the calculation, laying the floor on the logs, the owner of the house receives not only an even warm coating, but also sound insulation, and a guarantee that for several decades about repair will forget.
Sometimes homeowners complain that wooden floors begin to creak. To avoid this trouble, it is necessary to carefully remove all debris and sawdust with your own hands while laying the foundation, treat all materials with special means that will not allow the beam to dry out, and use only suitable nails and dowels to fasten the tree.
Where can flooring be applied on logs?

Logs are a universal and practical way of laying flooring, and therefore they are used with different types of substrates. But each method has its own characteristics, and can be used in certain conditions.
The first option for laying the lag is on a wooden base. Wooden rough coatings laid in a wooden house are often insulated and strengthened with the help of a lag. Basis in wooden frame sometimes strong round logs and large beams are laid at home, and on top of them are logs, which become the basis of the wooden floor. Wooden beams can even be laid on strip foundation or supporting posts. The device of a wooden floor on logs made of wood should not cause difficulties even for novice builders who make DIY repairs for the first time.
The second type of installation, which is often chosen by owners of private houses, is laying logs on top of concrete. Concrete bulk foundation is a quick and easy way to make the foundation for building a house with your own hands. Cement screed can be used on any floor and in almost any room. wooden logs on top of concrete is easy even with your own hands.
The third way of laying the floor in the house is on rammed soil. This method is the most labor-intensive and is used only in cold summer houses and outbuildings, which do not have to keep warm. The basis for laying logs in the house is a shallow pit, cleared of soil and soil, and covered with gravel and sand for strength. A wooden beam is laid directly on a layer of soil and gravel, and on top of the log you can use a wooden flooring. Due to the soil, which is located under the floorboards, such a floor is difficult to insulate.
In addition, many owners of private houses lay timber on concrete or brick columns or piles driven into the ground. The construction of the house in this case should have additional stiffening ribs, and the beam should be held not only on self-tapping screws and dowels, but also on more reliable fastenings.
How to choose a beam and logs for the floor

Wooden timber and logs for the floor should serve for more than a dozen years. But, if the wrong materials were selected for repair or incorrect calculations are used, then you should not expect the house to stand idle for several centuries.
For construction and repair, it is advisable to choose a beam of coniferous wood. The best option for laying flooring is pine. It is inexpensive, lightweight, but strong enough, and you can even handle it with your own hands. A more expensive coniferous breed is larch. Its wood is not subject to decay and is characterized by high strength and durability. But the price of larch is many times higher than the price of pine timber. Hardwoods are good for decorative coatings and furniture making, but they are rarely used as flooring materials.
Calculating the distance between the floor logs and the thickness of the logs on the calculator, it is necessary to select material with a margin of safety. This implies not only rounding the resulting value up, but also the acquisition of a slightly larger timber than the calculation provides. Such a precaution is necessary for safety, in case mistakes are made when installing the floor with your own hands.
The device of a wooden floor is possible without a beam. If the house is being built lightweight, small in size, then the logs can be made of thick boards placed on the edge. If you make the distance between all structural elements a little smaller, then the design will turn out no less reliable than the standard wooden floor device.
Logs that can be used to install or repair the floor should be rectangular in shape, with an aspect ratio of 1/2 or 1 / 1.5. It is possible to install a wooden floor on square logs, but such a material has a smaller margin of safety, and therefore the distance between them should be less.
Calculation of the distance between the lags
To ensure that the flooring is strong and durable, the floorboards do not bend or creak underfoot, it is necessary to calculate the distance between all structural elements in advance. Including the correct calculation depends on how long the floor covering will last and how much it will cost to lay the wooden floor on the logs.
Depending on the place of installation, the logs can be selected in different sizes. For example, in an apartment building where there is already concrete or wood flooring, a thin beam is sufficient for attaching floorboards. When constructing a frame building, the lags, as a rule, are an element of the frame and perform a bearing function, and take on the weight of the entire structure, and therefore their size should be significantly larger.
When performing the calculations, it is necessary to take into account:
- The thickness of the material from which the floor will be made, that is, boards or chipboard;
- The maximum load that will fall on 1m2 of coverage;
- The approximate distance between the logs of the floor.
The size and cross-section of the timber, boards and other materials that will be used for construction or repair will depend on these parameters. To calculate the optimal distance between all elements, you can use a special calculator, or calculate the necessary parameters according to the table.
In addition, when calculating the distance between the logs of the floor, it must be remembered that it is impossible to position the logs further than 30 cm from the walls, and because of this, you will have to make adjustments. If after calculating the integer it did not work out, it is recommended to round up, that is, if 9.5 lags came out during the calculation, then it is better to reduce the distance between them and use 10 than to save, use 9 pieces and make wooden floors less durable. Moreover, the savings are very small, since the cost of the material is low. You can find out how much lags for the floor cost in building online stores or at sawmills, where all wood materials are a little cheaper.
Saving by installing the floor on the logs is not recommended. The lags themselves must be not only the right size, but also the right density. Increasing the distance between the lags will cause the boards to bend, and if you make the flooring not of wood, but of plates, then the plates can crack or crumble. Accurate calculation of sizes, including - with a calculator, suitable wood species and competent preparation of the foundation - all this will help preserve the internal structure of the wooden floor for many years.