The device of brick columns for logs. Installation of wooden floors on brick posts
In contact with
Classmates
3
knowledge about how to make a wooden floor in logs, very useful information that sooner or later is sure to come in handy for you, or is already needed. Do-it-yourself laying of a wooden floor will give significant savings, whether you are planning a new construction or major overhaul. If there is no desire or time to do the work yourself, you will be able to effectively control the work.
Content
1.
2.
3.
4.
5.
6.
Wooden floors laid on logs
Consider the most common scheme - wooden floors laid on logs. This system is used both in the construction of substrates with a subsequent finishing coating, and in the finishing floors.
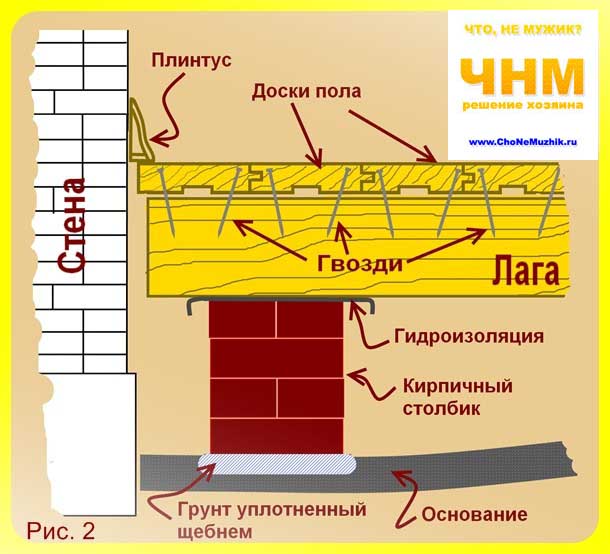
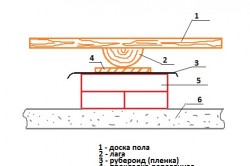
The main elements of wooden floors on the logs.
1.
Brick columns (not always arranged)
2.
Logs, which are flat wooden bars of rectangular cross section;
3.
Coating, boards or artificial sheet materials (OSB, chipboard, plywood).
4.
Plinth or fillet - elements of the junction of the floor and wall coverings.
For rough floors use not planed (often not edged) boards, pressed boards from waste wood. Finished floors are made of high-quality, well-dried milled boards having a curly edge for tongue-and-groove joints, a longitudinal groove for ventilation. Often, such boards are pre-treated with protective and decorative compounds.
The main requirements for the correct arrangement of the wooden floor in logs
Do-it-yourself wooden floor laying on logs requires strict adherence to the following basic requirements:
1.
Logs are installed strictly horizontally (except in rare cases when the slope is provided by the project)
2.
The lags must be stable.
3.
The moisture content of the wood used should not exceed 12%.
4.
Underfloor ventilation must be provided.
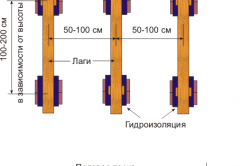
If the wooden floor is arranged on the first floors of the premises with the hands on the ground, the logs are usually laid on brick posts size 250x250 in plan, made of ceramic (required!) brick on cement mortar.
Marking and preparation under the wooden floor for logs
Before starting the masonry work, we carry out the markup. We determine how much and where it is necessary to remove (pour) soil so that all the columns reach the same level (taking into account the height of the brick and the thickness of the seams). You can find out about masonry. We carry out the filling with "incompressible" soil - sand or small gravel, with a layer of up to 5 cm.
Prior to masonry, we compact the soil under the columns. To do this, on the "spots" where they will stand, sprinkle crushed stone with a layer of approximately 1.5-2 sizes of the largest pieces. With a tamper we drive in crushed stone into the ground.
DIY lag
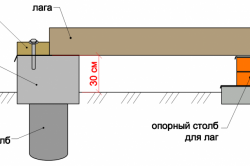
 For logs stacked on columns (stands) we use a beam of 50x100 mm. At the same time, the distance between the centers of the columns (pedestals) is left in a meter or so. With increasing distance between the columns, we increase the log section.
Doing wooden floor do-it-yourself concrete preparation (floor slabs), logs are laid directly on concrete. For logs laid on a solid foundation, you can use a beam of much smaller cross section, because they will not experience a load on the bend. In fact, lags in this case are needed for precise alignment and for nailing boards. The size of the bars 40x50 or 50x50 will be enough.
The distance between the lags depends on the thickness of the coating material. For a milled board, it will be 60 cm. For a coating of plywood or OSB with a thickness of 12-14 mm, the step will be no more than 40 cm. On top of the posts, under the logs, waterproofing from roofing felt is laid.
We mount all the logs strictly parallel to each other, in a single horizontal plane. First, using the building bubble level, we set the extreme lag. Then, at the same height, using the hydraulic level we set the lag on the opposite side of the room. Between the extreme lags we stretch the fishing line, on which we expose all the others, if necessary, laying plates of dry wood. This is usually required when laying logs on a concrete base. The columns are displayed, as they say, "to zero" during the laying process.
DIY wooden floors
After the lags are exposed, we make the floors. We cut out the details so that the end joints fall in the middle of the lags. We fasten sheet materials using screws - self-tapping screws, with heads "in the pot".
We press the boards of the rough floor to each other, nailing with two nails into each lag, or through one. We drive in nails at a slight angle "towards" each other.
When laying a wooden floor with your own hands is done from milled boards, simply pressing them against each other with your hand is not enough. For good pairing, use wedges and stops, various lever tightening devices.
We also fasten the boards with nails, so that the hat goes 2-3 mm below the surface. The recesses are covered with putty and hidden when painting the floor.
Instead of nails, long screws can be used. This is much more reliable, but also more laborious - you have to drill holes and countersink recesses for the heads.
It is more difficult to mount when the floors are not subject to subsequent painting, or are coated with colorless varnish. In this case, open and hidden fasteners are used. For open, special nails are used, and the fasteners are an element of design. Nails are placed at the same distance from each other, on the same line.
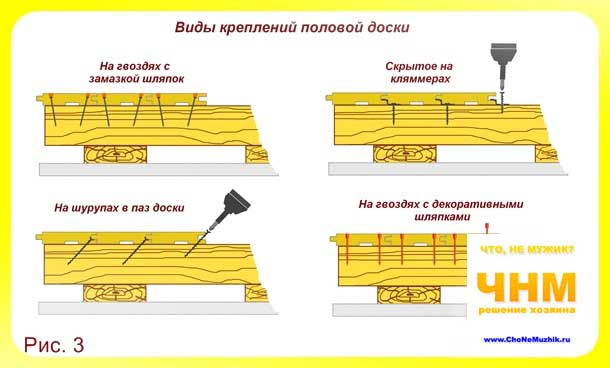 For hidden fixtures, a wide variety of fixtures are used. Hats of nails (self-tapping heads) can be hidden in special recesses, which are then closed with precisely fitted corks from the same tree. Grooved boards can be fastened with screws or nails into the grooves of the boards, steel clamps, etc. The drawings will give you a more accurate picture of the various floor units and types of fixtures.
Between the ends of the logs and the walls, as well as the extreme boards and walls, we definitely leave 10-15 mm gaps, which are covered with a baseboard. This gap is needed to compensate for moisture swelling and thermal expansion.
Questions on the installation of a wooden floor in logs
That’s all in a nutshell. We told how to make a wooden floor in logs. As you can see, the task is not simple, but quite doable. We are talking about other types of floors in. If you have questions, you can ask them below either.
- Preparatory work in the process of organizing sex
- Foundation under supporting posts
- The device of poles under the logs, how to fill the foundation?
- Brickwork of columns, laying and fastening of logs to columns
- Stage of floor insulation frame house on lags
- Fixing floor boards in the house
- Processing floorboards and fixing floor skirting boards
- Floor coating with varnish, oil or wax
Preparatory work in the process of organizing sex
It is necessary to start arranging the floor in a frame house from such an important stage as laying a solid foundation under it, then a durable and functional floor design will be provided. The purpose of the preparatory phase is the construction of an incompressible strong base for installing support pillars under the logs.
Try to level and compact the soil, which is located inside the perimeter of the foundation. Then mark out the places where the support posts will be placed. First, you should outline the location of the axes of the lag. Marks can be made with a construction pencil or chalk, if the logs are laid on a waterproofing material, for example, roofing felt or roofing material. To start laying the lag, step back from the wall about 20 cm and lay the extreme lag in this place.
Back to the table of contents
Base for support columns
The concrete base for the floor in the frame house on the logs can be poured separately for each column or made a single row of several columns. If you make separate bases, then each pillar will have to rest on a site measuring 40x40 cm, the height of which should not be less than 20 cm.
Under a row of several columns, leave the pit width and height the same, but the length will depend on the length of the row of columns. The height of the foundation consists of 2 quantities: about 5 cm should protrude above the surface of the earth, and the rest will be in the ground.
Make sure that the axis of the support columns coincides with the axis of the lag. The step through which they will be laid is 20 cm on both sides of the wall, for which you need to put marks at these distances. Then in these places pull the lace. We do the same thing perpendicular to the lags, and again with the help of a lace, mark the edges of the rows of support columns.
Where the laces intersect, the corners of the foundations are arranged. For convenience, you can install pegs on all 4 corners of each base. Only then remove the shoelaces that are no longer needed.
If the foundation will look like one trench, then with the laces it will be enough to mark only the edges of the arranged row. At the marked points, you need to dig out the soil. Digging depth should be calculated depending on what type of soil is on the site and what is the level of groundwater.
Back to the table of contents
The device of poles under the logs, how to fill the foundation?
The foundation under the floor in a frame house is better to do the same as under an ordinary house. After all, the floors will carry a fairly heavy load. The composition of the concrete mortar includes the following components:
- 3 parts of sand;
- 1 part of cement;
- 3 parts of crushed stone, fractions up to 10 mm;
- water needs to be added until the moment when the consistency of the solution resembles thick sour cream.
Before pouring concrete into the pit, it is better to cover it with a plastic film, which will not allow moisture from the concrete solution to penetrate into the soil and will contribute to its gradual evaporation. Thus, concrete can gain the required level of strength. If you have clay soils or you made a clay castle at the base, then you can not lay the film.
After covering with a film, the foundation must be reinforced.
To do this, use a steel mesh or wire with a diameter of 8 mm. It is stacked with cells whose approximate value is 150x150 mm. But the whole height of the foundation is not worth reinforcing, it will be enough to place it in the lower middle. Only after tying with steel wire can the foundation be filled. Then you have to rest a couple of days in order to allow the base to freeze.
The next stage is waterproofing, it involves laying the material (roofing material). This material will protect the brick from moisture that enters the concrete base from the soil adjacent to it. Ruberoid should be cut into rectangular sheets, the sides of which will slightly (by 0.5 cm) exceed the area of \u200b\u200bthe foundation.
Back to the table of contents
Brickwork of columns, laying and fastening of logs to columns
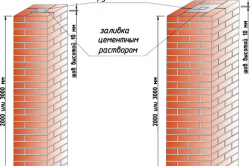
Brick will need to be laid in just 2 rows. In this case, you need to remember the rule that the bricks of the upper row in the column should be laid so that the logs are located strictly perpendicular to them. It is important to make the columns of brick, the brand of which is not less than M100, capable of withstanding heavy loads.
A suitable solution for masonry will be a mixture of 1 part cement and 3 parts sand. It must be diluted with water, bringing to the proper consistency. After the columns are ready, the next day you can put waterproofing under the logs. This can be a sheet of roofing material measuring 25x25 mm.
After you install the logs on the posts, you should get a perfectly smooth base on which you can lay the floor boards. It is at the stage of leveling the floor on the lags that you should stop in more detail. First recommend lighthouse lags. They are stacked in increments of approximately 2 m, the hydrolevel must check the horizontalness of each log separately and their horizontal evenness with each other.
The most convenient way to fix the lag is to use metal corners. To do this, we attach 1 edge of the corner to the lag using self-tapping screws and a screwdriver. Make sure that the self-tapping screw enters the 4-5 cm lag. We attach the other edge of the corner to the element on which the lags rest. In this case, it is necessary to screw it to a brick column, for which it is advisable to use 2 dowels.
Drill holes in the brick very carefully using a powerful drill with a hard-alloy or drill bit. A ceramic drill may also work. Even before laying on the posts, the lags must be treated with an antiseptic.
Back to the table of contents
The stage of warming the floor of the frame house on the logs
For the successful implementation of this stage, on the sides of the log, at their lowest point, it is necessary to knock the supporting bars, the cross section of which is 50x50 mm² or slightly less - 30x50 mm². After that, a run is laid on the bar, which is a lower grade board - unedged (for example, croaker), with a thickness of at least 25 mm.
This lumber will need to be properly processed, having previously removed the bark from the boards and treated with an antiseptic. This will save the floor from the fatal invasion of bark beetles and other insect pests. You can attach the roll to the bar using self-tapping screws.
On top of the organized run, lay a waterproofing membrane, the vapor permeability of which should exceed 800 g / m². Thanks to this, the insulation will be reliably protected from moisture and the wooden floor elements will be able to breathe.
It is possible to safely lay a heater on the waterproofing membrane of your choice, for which it is not worth using foam or EPS. It is best to use cotton wool, which will contribute to good ventilation of the floors. Soft cotton insulation, the density of which reaches 35-55 kg / m³, is sold with plates that are convenient for installation.
It is important to remember that between the insulation and floor boards there must be a ventilation gap of at least 2 cm, and preferably 4 cm.
In this article, we will examine in detail how to choose logs for flooring, what should be the distance between them, what is a pie cake on the logs, what material is better to use for the floor made on the logs.
At what stage do the floor on the lags
By the time the flooring is laid, foundation pillars and grillage should be poured, then rolled waterproofing is laid on the grillage, the bottom trim bar is fixed to the grillage surface through the waterproofing, because the logs will rest on it, the frame of the house can also be ready, although this is not required.
Final work on the installation of the floor, namely the installation of thermal insulation and the finished floor of the tongue-and-groove board, it is advisable to do after finishing the walls. If you finish the walls after laying the finishing floor, then it will inevitably become contaminated with putty, paint and just dirt that will be worn behind your feet. Reliably protect something already laid floor, from experience, it is practically impossible.
To support the lag, intermediate supporting columns are needed, then they (columns) need to be laid out just before the frame is assembled. So it will be easier to make columns and wear all the materials necessary for them (concrete, brick).
Before proceeding with the installation of the floor, you must do the following:
choose flooring material;
decide whether to insulate the floor;
choose the cross section of the log, given the thickness of the insulation;
determine the step of the columns under the lags;
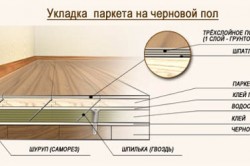
Log floor construction
To begin with, we will schematically see what the floor on the lags consists of, then it will be more clear what kind of floor elements we are talking about. 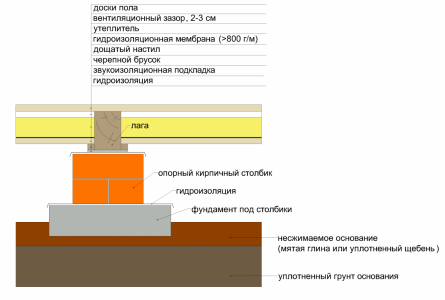
The device of the floor on the logs
The choice of material for flooring on the logs
The choice of floor material depends primarily on personal preferences and floor requirements in terms of aesthetics, environmental friendliness, installation speed and of course cost. So, if you stopped at a choice of material for a natural wood floor, then a covering is suitable - a board (sheet pile or sheet pile). If the floor is planned to be covered with something, for example, with a laminate, then you can also consider laying options for plywood or OSB lags instead of a board. The minimum thickness of plywood for flooring is 12 mm with a step of 30 cm. The minimum thickness of OSB is 18 mm with the same step of 30 cm.
From experience, most often a tongue-and-groove board is used to cover the floor on the logs, so in this article we will consider in more detail just this option for flooring.
The choice of wood for coating
Pine, spruce, fir - boards of which are most often suitable for floors with a small load, as these materials are quite soft, dents are easily made on them. If you decide to lay the floor of these materials in rooms with high traffic and load, you need to try to treat the coating as carefully as possible and not walk on it with thin heels. Such material is not suitable for wet rooms. - Aspen and alder are medicinal wood species, so they are suitable for a bedroom and a children's room. -Oak - dense and durable wood, it costs more, but the floor from such a board will be very strong and durable. -Siberian larch is as hard as oak, thanks to resins, the board from the Siberian larch practically does not rot, therefore it is suitable for all floors, including with high humidity, for example, for a bath. But it costs 2-3 times more than pine. Also for the floors in the bath, you can use alder, birch, beech.
Despite the fact that a board made of oak and larch is more expensive than a more common board made of pine, but the floor is made of it, it will definitely serve not only the owner, but also the grandchildren (if there is such a goal). But if there is no such need for a board to serve 100 years without replacement, then choosing a board from pine can count on 50 years. Of course, with proper installation and proper care.
Sheet piling or not sheet piling
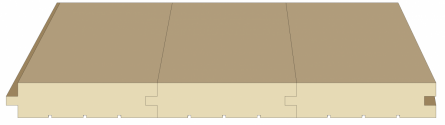
Grooved board. Connection in a rectangular tongue (tenon groove) 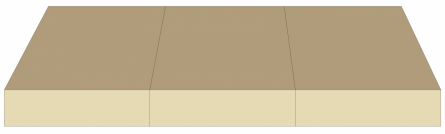
The board is not grooved. End to end seam
Those floors that we see in old houses - with cracks and an uneven surface, these floors are laid out from an ordinary not grooved board. So, no matter what the ideal geometry, new, not grooved boards are, one must understand that this is how the floor will look in a couple of decades. An exception may be only not tongue-and-groove boards made of hard wood, such as oak or Siberian larch.
Therefore, not a tongue-and-groove board made of inexpensive wood: pine, spruce, fir, is suitable only for the subfloor, i.e. the floor to be covered on top. For a fine wooden floor you need to take a grooved board. 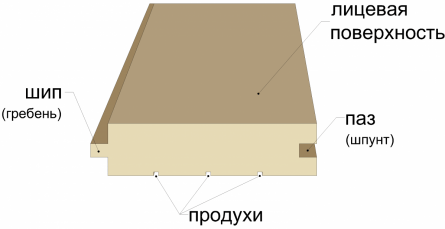 Tongue and groove board
This is a floor of a completely different level and not at all what we are used to seeing in old houses (creaks, crevices, uneven, etc.).
Thickness and size of floorboards
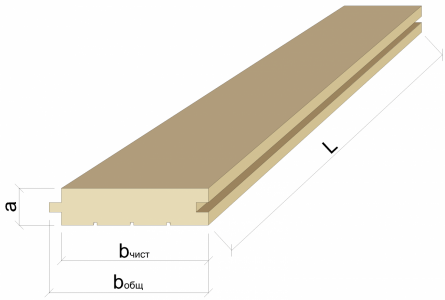
Main board sizes
Board thickness
Boards come in a thickness of 20 to 40 mm. Often, when choosing the thickness of the board, which they intend to lay on the floor, they are guided by the principle - the thicker the board, the stronger the floor. In this case, it should be remembered that a tree is a natural material that has the ability to shrink and at the same time it (the tree) leads a little, twists. So, for example, if you take a 40 mm board for the floor that is not dried properly in the drying chambers, but raw, as a rule, they take it, since it is cheaper, then such a board will behave very sharply during natural drying. Maybe she can tear out the self-tapping screw with which it is fixed. And at the same time, the same not sufficiently dried board of smaller thickness (22, 24 mm) will behave much better, the array is smaller, the array strength is less, so it does not break the screws. Therefore, the most practical thickness of the floorboard is 22, 24 mm. If you take a thicker board - 30, 40 mm, then it should be dry, dried in drying chambers to a moisture content of 10%, maximum 12%.
Board width
The width of the board used for flooring is also different - 100, 120, 140 and even 200 mm. Just as with thickness, you need to make your choice depending on the moisture content of the wood. With a moisture of the material of the board of 12%, you can take a wide board (150-200 mm), it is better to take a narrower narrower board - 100 mm. The most popular is the last width of the board - 100 mm.
Board Length
Boards on sawmills are sold in multiples of 1 meter in length, i.e. 3, 4, 5 and 6 m. It can never be longer. If you plan to stack the boards with an offset, then in principle the length does not matter much, and you can order a shorter board, it is a little cheaper, but the laying method itself is more time-consuming and has many joints. If the boards are stacked without displacement, then of course it is ideal to take the board along the length (or across the width of the room). So, for example, for a room with a size of 7x4 m - a length of 4 meters, and for a room of 4x3 m - a length of 4 or 3 meters. 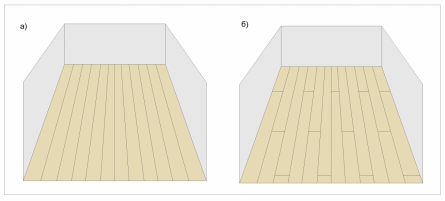
Laying options for floorboards: a) with an offset; b) without bias
Tree variety
The type of wood from which the board will be made depends on the purpose of the plank coating — it will be draft or fair, as well as financial ability and what the top floor covering will be like, such as varnish, paint, wax.
Top grade. Boards of this grade are the highest quality, but also more expensive. They should be completely without knots, which by the way not everyone likes. This is purely a matter of taste. They are suitable for coating with transparent compounds, under which the structure of the tree is visible - varnish, wax, oil, and there is no point in buying such expensive boards for such a coating as paint. 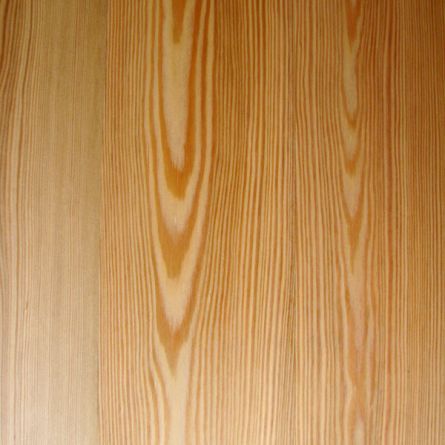 Top grade board
1 grade.Board with lively light knots. The best option in the issue of price / quality is under the coating with transparent compounds that show the structure of the tree. 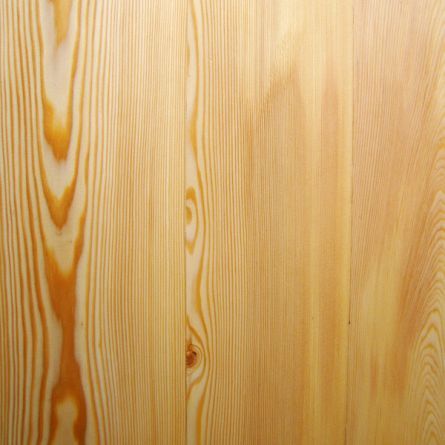
Board 1 grade
2 grade. On the surface of the boards you can see many knots, among them there are dead dark knots. Ideal option for a floor under painting, knots all the same will not be visible. 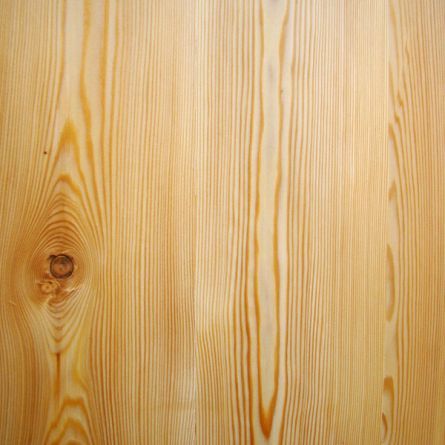
Board 2 grades
3 grade. Boards have a noticeable curvature, poor geometry, a lot of knots (sometimes even falling out). This board is noticeably cheaper, but its laying will be longer and more expensive - to customize, trim, cycle. Therefore, such a board is a suitable option for floors in utility rooms and technical rooms, where you do not need to especially heave and loop. 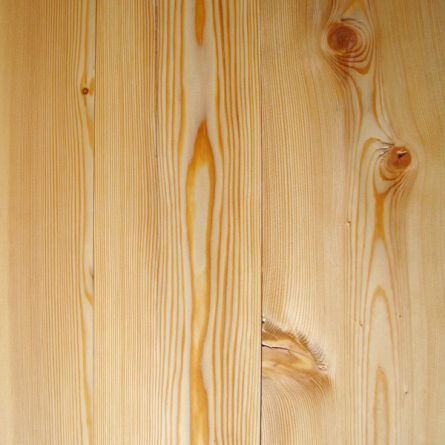 Board 3 grades
Humidity
We know that the ideal option is a board dried in special drying chambers on a sawmill to a moisture content of 12%. Such a board needs to be transported and mounted in dry weather, not in fog and not in rain. A more economical option is not a dried board, humidity is 18-20%. She needs to be laid as soon as possible. Those. on the day of delivery already be ready for installation, have the appropriate tool and already installed floor logs. If the installation is not planned to be done independently, then hire a brigade of workers for the flooring on the day of delivery. If you do not put them right away, then they will begin to dry out, get out, blow out with an arc. All this leads to losses as a result, since such a board will have to be looped, which can be avoided by laying it right away.
Board laying method
Boards are usually laid in the bedrooms and lounges - along the direction of light from the windows, and in rooms with increased cross-country ability, such as a vestibule and a corridor - along the direction of movement. 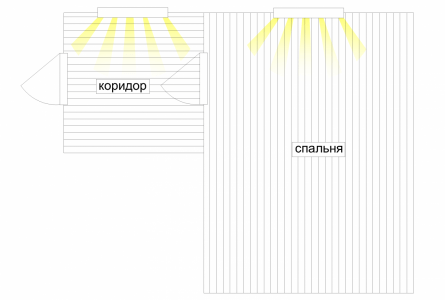
Floorboard laying orientation
Insulation of the floor on the logs
If we are talking about the floors of the first floor, then they need to be insulated necessarily and always, without exception. The floor on the logs can not be insulated only if the floor is bordered from below by the heated room. To insulate the floor on the logs, a vapor-permeable insulation, for example basalt mineral wool or fiberglass wool, is best. In the floors on the logs, the insulation does not carry a load, so soft positions with a density of 30-50 kg / m3 are suitable. The thickness of the insulation depends on the region in which the construction is located, it is usually not less than 150 mm, but in some cold regions, the thickness reaches 200 mm, so the thickness of the insulation should be calculated by a specialist.
The device of the wooden floor on the logs
Wood species, variety, moisture. Logs for flooring are most often made from an inexpensive array of pine, spruce, fir, less often from a more expensive larch tree, grades 2-3, with a moisture content of 18-20%.
Lag section selection
The cross section of the log should be rectangular with an approximate ratio of the height should be equal to 1.5-2 widths. With this cross section, the lags work best. 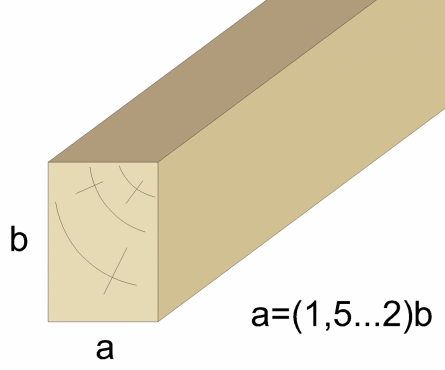
Section lag. Optimum height to width ratio
The cross-section of the lag mainly depends on the span on which these lags will be laid. The span in this case is the distance between the bars of the lower harness, on which the logs will rest. 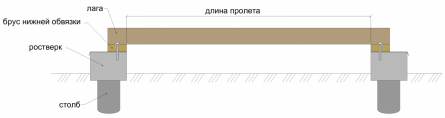
Span
Also, the cross section of the lag, namely their height - hlag in the figure below, also depends on the thickness of the insulation (hut), which will need to be laid between them. And here it must be remembered that between the upper boundary of the insulation and the floor board there must be a ventilation gap equal to hvent \u003d 2-3 cm. And from below, the insulation will be laid on a roll (h roll), which is placed on the cranial block (h b.b.), fixed to the lags.
Thus, the minimum lag height is calculated by the formula: hlag \u003d hb.b. + hnakat + hut + hvent,
- hb.b. \u003d 50 mm;
- h ≥ 25 mm;
- hut is calculated for a specific region;
- hvent \u003d 2-3 cm. 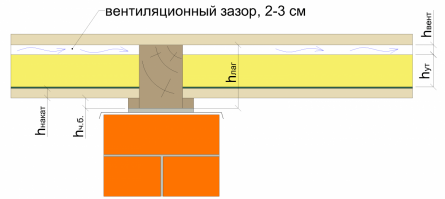
Ventilation gap between the insulation and the board
In order not to lay expensive logs of large cross-section, the span can be reduced by installing intermediate supports - supporting columns under the logs. 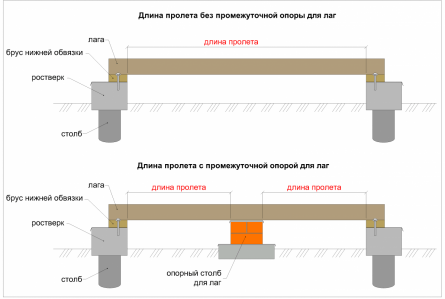
Span reduction due to the installation of an intermediate support - a support column under the logs
Below are the sections of the logs for different spans, provided that the logs are laid no more than 70 cm. 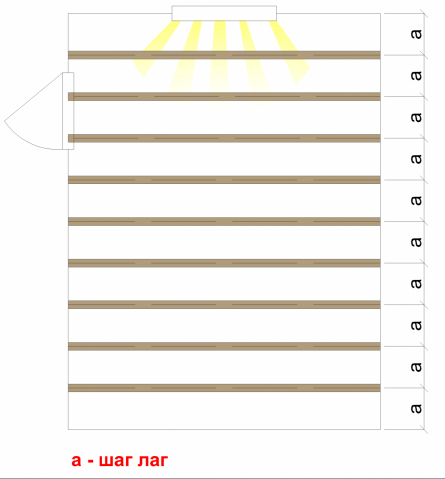 Step lag
If you have a lag step less than 70 cm, then the given sections will be with a small (indeed with a small) margin.
(span - lag section)
2 m - 110x60 mm;
3 m - 150x80 mm;
4 m - 180x100 mm;
5 m - 200x150 mm;
6 m - 220x180 mm.
When the span has an intermediate value, it is better to take the log section with a margin, i.e. such that is suitable for the next larger span. A lag step of more than 70 cm is permissible only if the floor is covered with a thick board, more than 40 mm, which is extremely rare. Therefore, in the framework of this article, we do not consider sections of logs laid with such a large pitch (800-1000 mm).
It makes sense to install intermediate support posts for logs in increments of 2 to 1 meter. Optimum 1-1.2 m. Log sections in this case will be as follows:
(pitch of support pillars - lag section)
2 m - 110x60 mm;
1.5 m - 100x50 mm;
1.2 m - 90x50 mm;
1 m - 80x50 mm.
Taking a lag section less is not safe, more is possible. Therefore, if for example, there are lags of a larger cross section than required, then they can be safely applied.
Step lag.
The step with which the logs are laid depends on the thickness of the floor covering, the stronger the floor covering, the less often the logs are installed and vice versa, if the coating is thin and not very strong, then the logs will have to be laid more often.
Below are the different options for flooring and the recommended step lag. (Board thickness - step lag)
20 mm - 30 cm;
24 mm - 40 cm;
30 mm - 50 cm;
35 mm - 60 cm;
40 mm - 70 cm;
45 mm - 80 cm;
50 mm - 100 cm.
Support posts for logs
They are mounted from brick of brand M 100. Often they say and write that silicate brick cannot be used on supporting posts. This statement is true only for areas with a high level of groundwater (less than 2 meters from the ground surface). Then it is better to apply a red brick. In other cases, red and silicate bricks are equally suitable.
Waterproofing the floor on logs
It is laid on the foundation for breaking the capillary rise of groundwater, as well as on the brick in front of the logs for additional protection. The number of layers of waterproofing depends on its thickness. So if the waterproofing is 3 mm thick, then 1 layer is enough, if thinner, then in 2 layers. We do not recommend using roofing, but if you have one, then for normal waterproofing it should be laid in 2-3 layers.
Sound insulation of the floor on the logs
Soundproof linings help dampen shock noise. They are laid on the roofing material, directly under the logs. In size, they should be slightly larger than the thickness of the log, about 1 cm protruding beyond the edge of the log on each side. For example, for logs 100x150 mm (width x height), the soundproofing lining should be 120x120 mm in size. 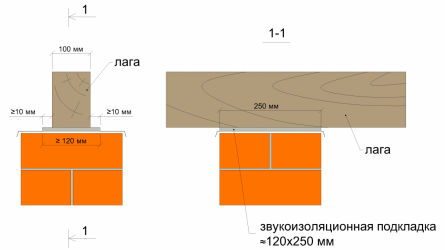
Soundproof lining. Lug size
Such linings are made of a variety of materials: plywood, chipboard, OSB, antiseptic wooden stitches, cork substrate, special compensation tape or a foam polyethylene substrate (like under a laminate, only thicker). The recommended thickness of such a substrate is 1-4 cm.
Foundation for posts for flooring on logs
It will take a small amount of concrete to build the foundation under the columns. This foundation can be either separate for each column, or common to one line of columns, as it is more convenient. 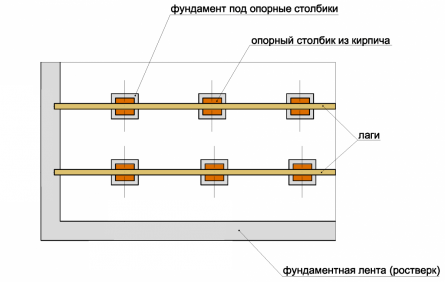 Separate foundation for each support pillar
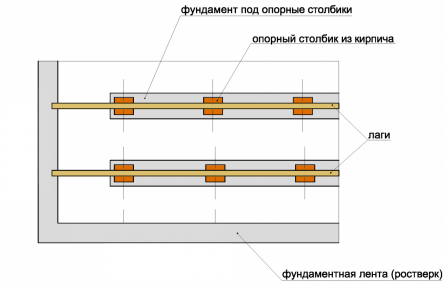
Common foundation tape for each row of support posts
Preparation of the base of the floor for lags
The last thing you need is crushed stone (about 4 cm over the entire area of \u200b\u200bthe base under the floor) or crushed clay (about the same, 4-5 cm).
Calculation of the amount of materials for the floor by logs
In order to start the calculation, you need to make a drawing of the room on a scale. The drawing schematically show windows and doors. 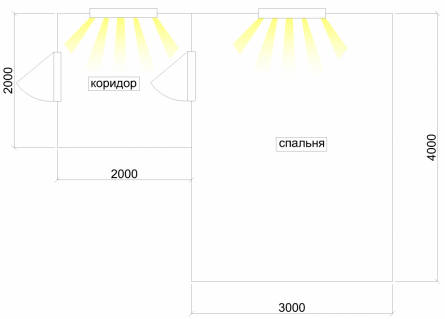
Floor plan
Now you need to make the layout of the floor lag. The step is selected taking into account the thickness of the board. For example, we have a 24 cm thick floorboard, logs under such a board need to be installed in 40 cm increments.
In the first room (corridor), our boards will be laid in the direction of travel, and the logs, respectively, perpendicularly. In the second bedroom, the boards will be laid along the direction of the light from the windows, and the logs, again perpendicular. The distance of the first lag from the wall should be no less than the accepted lag step, will be ≤ 40 cm. Next, with a step of 40 cm. 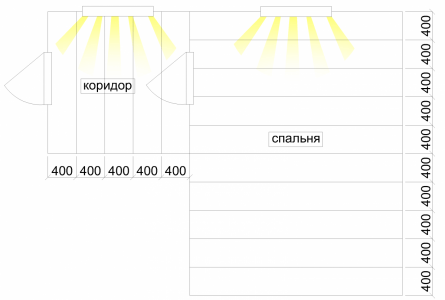
Mark the axis of the lag
Pay attention - a step, this is the distance between the axes of the lag. Having made this layout, we know how much we need lag. 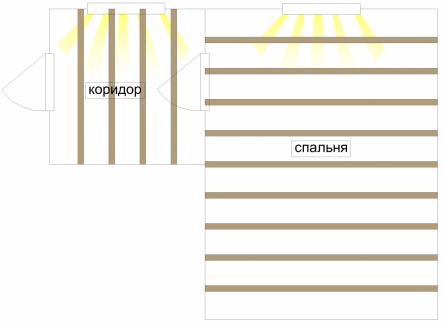 Lag layout
Now we will determine the cross section of these lags themselves. Suppose we need to place 50 mm of insulation between them, respectively, the height will be 150 mm (50 mm of cotton wool + ventilation gap of 20 mm + cranial block 50 mm + roll 30 mm \u003d 150 mm).
At a step of 40 cm, for a span of 2 m (first room) according to the bearing capacity, taking into account the required height of at least 150 mm, logs with a cross section of 150x50 mm (even with a margin) without additional supporting posts for logs are suitable.
For a span of 4 m (second room) there are few such lags without intermediate supports. Here you need lags with a section of 150x100 mm. Therefore, we have three options.
Buy all beams of one section (150x100 mm) and use them.
Buy the right number of beams with a section of 150x50 mm and the right one - 150x100 mm. But buying a pair of lag of different sections for money can cost almost the same as buying a lot of lag of one section at once.
Buy all the logs with a smaller cross-section (150x50 mm), but in the second room install intermediate support columns for the logs. One column for each lag.
Note: Option - to buy all beams with a cross section of 150x50 mm and to merge them to obtain 150x100 mm, we do not consider it, as it is not recommended to merge floor beams in height. Then the floor covering will be attached to the lags and the fasteners will fall on the joint of the halves of the lag or close to the joint, which will negatively affect the reliability of fixing the floor covering.
Choose the third option, for this you need to calculate the number of materials on the columns. For each column there are 4 bricks, a piece of roofing material 52x52 cm, a lining for the lag, and concrete on the foundation floor column.
Board quantity calculation
Usually the order for boards is accepted in m2. Less often in pieces or m3. Further I give an example of calculation.
Square. Suppose you want to cover the same two rooms with a board: the first 2x2 m and the second 3x4 m.
1. We calculate the area of \u200b\u200beach room.
S1 \u003d 2x2 \u003d 4 m2; S2 \u003d 3x4 \u003d 12 m2.
2. Now we summarize the area S \u003d S1 + S2 \u003d 4 + 12 \u003d 16 m2
And we determine that our board should have a thickness of 24 mm and a width of 100 mm. The length should be ordered the most convenient, based on the available size of the room. In our case, it’s convenient to take a length of 4 m: the whole board will go to the second room, and we will cut the remaining boards into 2 parts and cover the floor of the first room. Thus, our order will sound like this: 16 m 2 boards 4 m long, 100 mm wide and 24 mm thick.
Pieces. We determine along which wall the boards will be laid. For example, we decided to lay them in the first room along side a (i.e., in the direction of travel), and in the second room along side b (perpendicular to the entrance).
Then, to calculate the number of boards for each room, we divide the length of the side, perpendicular to which the boards will be laid (side g for 1 room and side b for the second) by the width of our board.
D1 \u003d 2000mm / 100 mm \u003d 20 pcs.
D2 \u003d 3000 mm / 100 mm \u003d 30 pcs.
In total, we need 20 boards 2 meters long and 30 boards 4 meters long, 100 mm wide and 24 mm thick, or 40 boards 4 meters long.
16 m2x0.024 m \u003d 0.38 m3.
You will also need flooring material (varnish, wax, oil, paint) and wood putty.
We must not forget that the logs, roll and cranial bar should be saturated with an antiseptic. Preferably before installation.
Tools for installing the floor on the logs
And also do not forget to prepare the following tools before installing the floor: hammer, tape measure, water level, normal and water metal level 2 meters long, drill, puncher, electric jigsaw or conventional saw, screwdriver, nail puller, ax, planer, consumables (dowels , wood screws, nails).
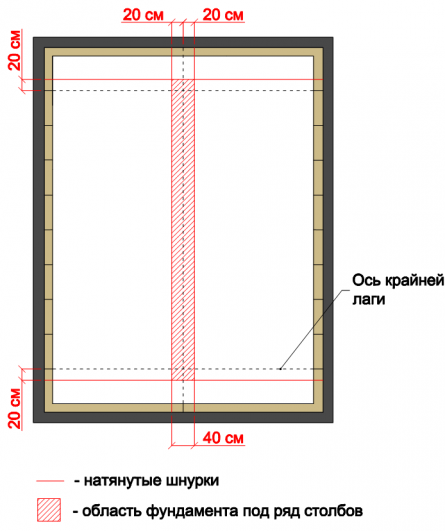
Now you need to make the layout of the placement of the support columns. To do this, you first need to outline the axis of the lag. If the lags will rest on the beam of the lower harness, then we put marks on the harness with a construction pencil. If the lags will rely on a grillage (covered with roofing material), then with chalk we put marks directly on the roofing material.
Note: The margin of the extreme lag from the wall should be about 20 cm. A little more, but no more than the accepted step of the lag, is possible.
The foundation for the floor on the lags can be separate for each column, or maybe for a series of columns. The foundation for 1 pillar has dimensions 40x40 cm and a height of at least 20 cm. For a row of pillars - a width of 40 cm, the length depends on the length of a row of pillars and the same height - at least 20 cm. At the same time, about 5 cm of the foundation protrude above the ground surface, the rest of it part in the ground.
The axis of the support pillars must coincide with the axis of the lag. Given this, as well as the fact that the size of the foundation under the support poles will be 40X40 cm, we measure 20 cm from each axis of the lag in both directions and put marks. Now we pull the laces in these places. We do the same perpendicular to the lags, i.e. we mark with laces the edges of the rows of support pillars.
At the intersection of the laces will be the corners of the foundations under our support pillars. We install pegs in the four corners of each foundation. Shoelaces can now be removed.
If you decided to make the foundation one for a row of columns, and not for each column separately, then it is enough to mark only the edges of this row with laces.
Note: Unlike marking the foundation under the walls of the house, where everything should be exactly up to a centimeter, small deviations of a couple of centimeters when marking the foundations under the support posts are allowed. Since these foundations will subsequently be completely hidden.
Now in the designated places you need to make a excavation. The depth of this excavation depends on the type of soil and the level of groundwater (ground water) in the area:
If the soil is rocky or sandy, then irrespective of the groundwater level, the depth of excavation will be 15-20 cm, since no backfilling is necessary. The soil is removed, the bottom and walls of the resulting pit are compacted. Also, bedding is not needed for any other type of soil, provided that the groundwater level passes at a depth of more than 2 meters.
If the soil is not sandy or rocky, for example, clay, loam or sandy loam and an UWW above 2 meters, then sand and gravel bedding must be made under the support columns to break the capillary rise of groundwater. Therefore, the excavation will be 20 cm deeper, i.e. the total depth of the pit will be 40-45 cm. About 10 cm of sand is poured onto the bottom of the pit, compacted. To make sand easier to compact, it can be shed with water. Crushed stone of a large fraction (fr. 30-50 mm) is poured on top, compacted. Crushed stone should also be about 10 cm (after compaction).
If you have a very high level of groundwater on the site (groundwater level of 0.5 - 1 m from the ground surface), then instead of sand and gravel bedding in the base, as well as on the walls of the excavation under the foundation, you need to make a clay castle. It is made in the old fashioned way from a well-compacted layer of crumpled clay, 20-25 cm thick. Such a clay castle will protect the foundation from groundwater.
Important. Remember that the top of the finished support pillar should be on the same level with the element on which the edges of the lag will rest. That is, if the edges of the lag will rest on the beam of the lower harness, then the top of the finished support column should be at the same level with the top of the bar of the lower harness.
If the logs are based on a concrete grillage, then, accordingly, the top of the finished support pillar should be at the same level with the top of our grillage.
The aforementioned foundation protrusion of 5 cm above the ground is designed to support logs on a concrete grillage, provided that the grill protrudes 30 cm above the ground (we considered the grillage of this height in the cycle article). If you have a grillage higher, or if you plan to support the logs on a bar of the lower harness, then the foundation under the support posts should protrude more than 5 cm.
It is also important to remember that irrespective of the water supply in your basement, ventilation should be made for constant ventilation of the underground. We talked about them in more detail in the article.
The device columns for logs
Foundation pouring
Often, the foundation for supporting pillars is recommended to be made of the so-called “lean concrete”. It has less binder (cement) and more aggregate (crushed stone, sand) than usual. We advise taking the same proportions as for the main foundation of the house. Since the floors that will be based on this foundation are no less important part of your home. Therefore, we recommend taking concrete B15-B25. Its approximate composition: 1 part of cement, 3 parts of sand, crushed stone fractions of 5-10 mm - 2-3 parts. We add so much water that the concrete is like thick sour cream in consistency.
Note: If you decide to use lean concrete, then its proportions are as follows (B 7.5): 1 part cement to 6 parts of crushed stone of a fine fraction (up to 5 mm). If your crushed stone is larger, then the composition of lean concrete can be as follows: 1 part cement, 4 parts sand and 6 parts coarse gravel (30-40 mm). We add so much water that, in consistency, the concrete resembles wet earth, i.e. It was quite thick (about 0.5-0.7 parts of water). Water can no longer be added, since concrete will then be insufficiently strong and will simply crumble. Given that there is very little water in lean concrete, it can evaporate too quickly in hot weather, and the concrete will not have time to gain strength. Therefore, the foundation of lean concrete in hot weather should be covered with a film immediately after pouring. In general, as you see, with skinny concrete there are many nuances, therefore we recommend ordinary concrete for the foundation.
For that part of the foundation that will protrude above the ground (this is about 5 cm), a small formwork with an internal size of 40x40 cm and a height of about 10 cm (or larger if the foundation is immediately under a row of pillars) is knocked together.
Before pouring concrete, it is advisable to lay a hole under the foundation with ordinary plastic film. It will not allow the concrete milk to go into the ground (it should gradually evaporate, while the concrete is gaining its strength). If you have clay soils or you made a clay castle at the base, then you can not lay the film.
The foundation needs to be reinforced. For this, a mesh welded from reinforcement with a diameter of 8 mm with a mesh of about 150x150 mm is suitable. You need to position the grid in the lower belt of the structure, i.e. slightly below the middle. The reinforcement spacing from the edge of the concrete is at least 5 cm.
Note: If the concrete is ordinary (B15-B25), like thick sour cream, then you can install the reinforcement on the supports and freely pour concrete. If the skinny concrete (B 7.5), i.e. very thick, like wet ground, then you need to tamp some of the concrete, then lay the reinforcing mesh and lay the rest of the concrete.
After pouring concrete in 1-3 days (visually the concrete should dry), you can proceed to the next step - laying waterproofing. If the formwork does not interfere, then it can be removed later, in a week, for example. The whole foundation will be. But this is not necessary, so if it interferes, then you can remove it after the same 1-3 days.
Waterproofing is laid on the foundation before brickwork. It performs the function of protecting the brick from moisture, which concrete can pull from the adjacent soil through capillaries (anti-capillary waterproofing). This is an analogue of the waterproofing that is laid on the grillage in front of the lower strapping beam.
For some reason, they often forget about it, laying waterproofing higher - between the lags and the brick. But a brick is a wall material, it is not designed for continuous operation in a humid environment. So it is necessary to lay waterproofing in front of him.
The waterproofing is cut to the size of the foundation (40x40 cm), 0.5-1 cm more can be placed directly on the foundation without coating with bitumen primer. If there is a desire, you can certainly miss it, but this is not necessary.
Brick laying
Bricks are stacked in just 2 rows. The upper bricks in the column are laid in such a way that after laying the logs they are located perpendicular to the logs.
The mortar is cement-sand in proportion - 1 part cement to 3 parts sand. Brick mark is at least M 100. Smaller, for example M 75 just falls apart in the hands, and therefore not suitable for columns.
Waterproofing
The waterproofing, laid on a brick column in front of the logs, additionally protects the logs from moisture.
Waterproofing (roofing material) is cut to the size of the column (25x25 cm) and placed on a brick. It is not necessary to pre-coat with a bitumen primer.
Padding
In detail, all the possible options for soundproofing linings, we examined in the previous article of the cycle. We put the lining in the center of the column directly on the roofing material. For convenience, so that the pads do not move from the right place before and during laying, the lag can be fixed by any means at hand.
Lag setting
As a result of installing the lag, we should get a perfectly even base for laying floor boards on it. Therefore, aligning the floor with lags is a very important element. To do this, the first to fix the so-called "lighthouse lags." These are logs laid in increments of about 2 meters. Then check the level of horizontal. You need to check both the horizontal position of each lag and the horizontal lag relative to each other.
If the lags are not level in level, then we align them with an electric plane or put lining under the lags in the right places. The maximum permissible deviation at the level of 1 mm per meter. Then we lay the intermediate lags.
How to fix logs to the floor
To fix the lag to the floor, it is sometimes advised to make cuttings under soundproofing linings in the lags from the bottom. It only reduces bearing capacity lags, so do not need to.
The lags are most conveniently fixed with metal corners, the same as the frame.
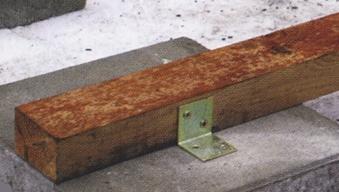
Mounting lag corners
One edge of the corner is attached to the lag with self-tapping screws. The self-tapping screw should enter the lag by 3-5 cm. The second edge of the corner is attached to the element on which the lags rest. For example, the edges of the lag can rest on a wooden beam of the lower trim (then the corner to the binding is also fastened with screws), the edges of the lag can be supported on a concrete grillage covered with waterproofing (then the corner to the grill is fastened with two dowels). To attach the corner to the brick column, you can also use 2 dowels.
Important! Drill a hole in the brick carefully. A puncher will not work for this, the brick will just fly apart. You can use a hammer drill or, if there is a powerful hammerless drill, you can try it using a carbide drill, a drill with a solder bit or a drill for ceramic tiles.
Also, the lags can be mounted using U-shaped metal mounts.
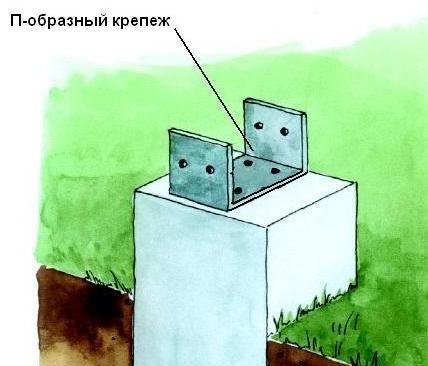
Fastening lag U-shaped fasteners
If the lag length is not enough, then you can dock them end-to-end or by cutting into the floor of a tree. At the junction, the lag needs to be strengthened by segments of 1 meter in length from at least one, and preferably from both sides. Strengthening can be done with a board with a slightly smaller cross section than the logs themselves, but, as a rule, trimming the logs along the length goes for this. Fastened to bolts or screws. Just as an option, you can consider the option of installing an additional column at the junction of the lag, instead of amplification.
When lengthening adjacent lags, the displacement of the joints of neighboring lags must be maintained at least 50 cm. Pieces of length not less than 1 meter are allowed to grow (this value is shown in the figure below as L min).
Lags should be pre-treated with an antiseptic.
Floor insulation on logs
Note: Before laying the thermal insulation and the finishing floor (tongue and groove board), it is advisable to paint the walls. If you paint the walls after laying the finishing floor, then it will inevitably become contaminated with putty, paint and just dirt that will be worn behind your feet. Reliably protect something already laid floor, from experience, it is practically impossible.
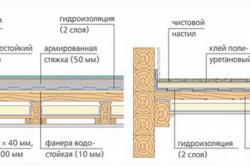
On the side to the lags at the lowest point, support bars (they are also called the “cranial bar”) are knocked out with a section of 50x50 mm, a little less - 30x50 mm. Then a roll is laid on this bar - boards of the second or third grade, not edged boards, OSB or slab, the minimum thickness is 25 mm. Almost everything will do here, since only the weight of the insulation will carry the roll, and it is quite light. For the same reason, the run-up does not have to be continuous, i.e. if it is, for example, not edged boards, then they can be laid at a distance of about 2 cm from each other. It is imperative to first remove the bark from a non-edged board and croaker. Otherwise, the bark beetle will start. And treat with an antiseptic.
The roll-up to the cranial bar is sometimes not fixed, but we advise you to grab it with self-tapping screws, this will give additional strength to the floor structure and the whole house.
A waterproofing membrane is laid out on top of the run, necessarily with a steam capacity of more than 800 g / m 2. This membrane will protect the insulation from moisture, and at the same time release steam from it, and also allow the wooden elements of the floor to breathe. Conventional waterproofing and especially vapor barrier film will not work here. Since they will not allow couples to freely leave the insulation and wood, as a result, the insulation will be wet, and floor boards and other wooden elements will quickly become worthless (rot). So if there is no way to lay the membrane, it is better not to put anything at all. This will be less harmful to your floor than films.
Which side to lay the waterproofing membrane in is not important in this design, since its steam throughput is the same on both sides. And ultraviolet protection, which is only on one side of the membrane, will not be involved.
Insulation is placed on the waterproofing membrane. For thermal insulation of such a floor, only breathable insulation is suitable. Then all the wooden floor elements will be ventilated and will last a really long time. Therefore, EPSP and polystyrene are not suitable, only cotton wool. The insulation in the floor structure on the logs does not carry a load and it is possible to apply soft positions of cotton insulation with a density of up to 35-55 kg / m 3, preferably in plates.
Important! remember that between the insulation and floor boards there must be a ventilation gap of at least 2, and preferably 4 cm.
Installation of floor boards
Mount
Floor boards are usually brought wrapped in foil. At the same time, they seem to be perfectly even. After unwinding the film, you will most likely notice a slight curvature of some boards, possibly small cracks. This is normal. Well, in general, remember that boards are a material of natural origin, you need to treat it a little more loyally than to an ideal, but artificial laminate, for example. Also remember that while the boards are not fixed, they are quite easily deformed when the humidity in the room changes. Therefore, it is advisable to install floor boards immediately. Especially if they have a moisture content above 12%.
When laying the extreme board, you need to withstand an indent from the wall of 1-2 cm. This is a deformation seam that will help preserve the integrity of the floor at various temperature and humidity differences in the room. After laying the floor boards, this indent will be closed with the plinth.
The first board is placed with a spike (protrusion) to the wall, leveled, attached.
Note:It is with a spike to the wall because when the next floor boards are laid, then you will need to tap on the end, and if there is a spike on the end, it will easily break off and the groove will withstand.
Then we drive the next one to the extreme board, driving its spike into the groove of the extreme board with a hammer blow, preferably through an intermediate piece of the board with a spike. This process of fitting one board to another is commonly called rallying.
Often boards are recommended to be fastened with nails, which we do not recommend. Since the nails then often rust, they rise above the board. We recommend fastening with yellow self-tapping screws with a minimum length of 60 mm, and preferably 70 mm and a diameter of 4-4.5 mm. Alternating screws with nails is also not worth it.
There are two mounting options. The first is to fix the boards with screws in a groove at an angle of about 45 degrees. Thus, fasteners remain hidden from view.
And the second option is to fasten with screws with a narrow hat on top in the pot (i.e. so that the cap is completely sunk into the board and does not protrude). With this fastening, reliability increases several times, the floor boards just will not lead, will not twist and swell. And regarding aesthetics - recessed hats are hidden with a sealant to match the tone of the tree.
If you stack the boards with a run, then they need to be perfectly trimmed at an angle of 90 degrees. For this, it is best to use trimming or a miter box. If they are not there, then a hacksaw, a jigsaw or an electric circular saw will do, but it will be a little more difficult to maintain an ideal angle of 90 degrees. If you need to go around some ledges with floor boards, and there is no certainty, then it is better to draw a template, transfer it to the board, and only then saw it off. And minor irregularities near the wall will be hidden by the baseboard.
Treatment
If the floor boards are very unequal in height or if you did not mount them immediately after the purchase, and managed to lead them, then the floor will have to be looped. If the boards are even, then only sanding with a grain of 150-180 grit is enough.
The most ideal floor treatment is:
Lay the floor boards.
Open the head of the self-tapping screw with a sealant in the color of wood.
Open the floor with starting varnish along the fibers. Further, if the floorboard is not dried, i.e. has a humidity of more than 12%, then leave the floor exposed by the starting varnish for 2-3 months and only then grind it. Before grinding, it makes no sense - the floor will dry and may additionally bend. Given the need for such a long break, it is most convenient to lay an unhardened board in the fall, and grind in the spring.
If your board is dried, then it is enough to wait only 2-3 weeks before grinding.
Note: Why open the floor with the starting varnish (this layer of varnish is also called the "substrate"). Sometimes the floor looks perfectly even and it seems that you do not need to grind it at all. But when the floor is covered with starting varnish, defects invisible to the eye appear. After the varnish dries, all the roughness of the board becomes more pronounced, they seem to rise. Therefore, only after drying the starting varnish can you objectively decide whether to grind the floor.
Sand with a grain of 150-180 grit. Vacuum. Collect dust from grinding, it will come in handy.
Fix the skirting board.
If you have wooden plinths, then make sure that the surface of the walls is perfectly even. Since the wooden baseboard does not bend. And in places where a flat wooden plinth adjoins uneven walls, there will inevitably be cracks. And to fix the evenness of the walls after mounting the baseboard is already an order of magnitude more complicated.
If the skirting boards are plastic, then the evenness of the walls and floor is not so critical. This skirting board bends well and easily bends around minor irregularities.
Whatever baseboard you choose, it is better to fix it before opening the floor with varnish. So, if after installing the skirting, small gaps are found between the skirting and the floor board, then these gaps can be puttied.
If the boards were with a humidity of more than 12% and you left them after opening with the starting varnish for 2-3 months, then during this time they should have completely dried. During drying, gaps usually form between the boards. They do not look particularly attractive, like dark stripes in a beautiful bright floor. In addition, when varnish gets into them when opening the floor, the floor will creak. Therefore, these gaps must be hidden. Often, putty is used for these purposes. It flies out of the cracks over time, so putty is not recommended here. It is better to cover the cracks with this composition: mix the dust from sanding the boards with PVA glue. Coat and rinse immediately with a slightly damp sponge. Another option is to use a special sealant for wood.
Now you can tint, paint or open with varnish, oil or wax.
Log flooring
It is important to understand that coating a wooden floor is not only enhancing its color and texture, but also protecting the wood and extending its lifespan.
Lacquer
The varnish is suitable only for rooms in which you plan to move around in soft shoes (bedroom, study, possibly a living room). Because the varnish easily bends from the heels along with the tree on which it is applied. And in such places, varnish will no longer protect the tree.
If you have chosen a varnish for flooring, then it must be applied in 2, and preferably in 3 layers. After this, you can not actively exploit the floor for up to 2 weeks, so that the varnish crystallizes. If the floor is varnished, then it needs to be refreshed about once every 5-7 years.
Varnishing a wooden floor
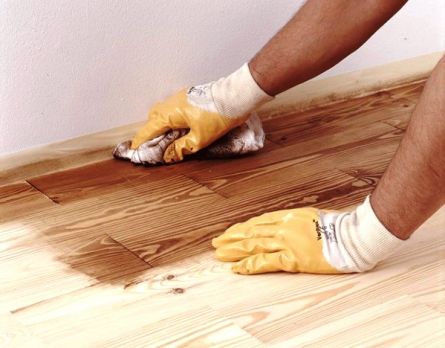
Oil
Oil does not cover the tree (like varnish), but is absorbed into it; therefore, it is suitable for rooms with increased cross-country ability (corridor, living room) and humidity (kitchen, bathroom). Usually it is made on the basis of natural linseed or wood oil, without the addition of any solvents.
Paint
Paint the floor now quite rarely. Preferences are mainly given to coatings that do not hide the texture of the tree. But if you decide to paint, then it is right to do it in such a sequence. Open the floor with linseed oil or primer. Wait 3 days. Apply the first coat of paint, let it dry, usually about a week. Then apply another coat of paint and let it dry again.
Wood Floor Care
The most important thing is not to pour water on such a floor. Mopping, of course, is possible and necessary, but not every day and a well-wrung mop. This is especially true of the massive floor of a thick board of solid wood, such as oak and beech. From experience, after about 4 months of plentiful daily moistening, the wooden floor may swell. So it’s better not to overdo it with water. Cleaning the wooden floor should be wet, not wet.