The device of supporting columns for logs of wooden floors. Installation of wooden floors on brick posts
In this article, we will examine in detail how to choose logs for flooring, what should be the distance between them, what is a pie cake on the logs, what material is better to use for the floor made on the logs.
At what stage do the floor on the lags
By the time the flooring is laid, foundation pillars and grillage should be poured, then rolled waterproofing is laid on the grillage, the bottom trim bar is fixed to the grillage surface through the waterproofing, because the logs will rest on it, the frame of the house can also be ready, although this is not required.
Final work on the installation of the floor, namely the installation of thermal insulation and the finished floor of the tongue-and-groove board, it is advisable to do after finishing the walls. If you finish the walls after laying the finishing floor, then it will inevitably become contaminated with putty, paint and just dirt that will be worn behind your feet. Reliably protect something already laid floor, from experience, it is practically impossible.
To support the lag, intermediate supporting columns are needed, then they (columns) need to be laid out just before the frame is assembled. So it will be easier to make columns and wear all the materials necessary for them (concrete, brick).
Before proceeding with the installation of the floor, you must do the following:
choose flooring material;
decide whether to insulate the floor;
choose the cross section of the log, given the thickness of the insulation;
determine the step of the columns under the lags;
Log floor construction
To begin with, we will schematically see what the floor on the lags consists of, then it will be more clear what kind of floor elements we are talking about. 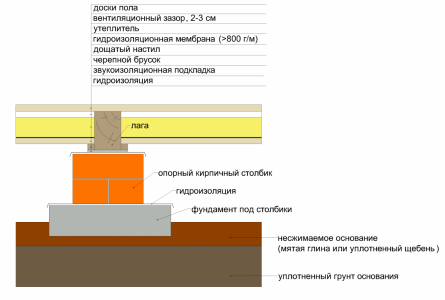
The device of the floor on the logs
The choice of material for flooring on the logs
The choice of floor material depends primarily on personal preferences and floor requirements in terms of aesthetics, environmental friendliness, installation speed and of course cost. So, if you stopped at a choice of material for a natural wood floor, then a covering is suitable - a board (sheet pile or sheet pile). If the floor is planned to be covered with something, for example, with a laminate, then you can also consider laying options for plywood or OSB lags instead of a board. The minimum thickness of plywood for flooring is 12 mm with a step of 30 cm. The minimum thickness of OSB is 18 mm with the same step of 30 cm.
From experience, most often a tongue-and-groove board is used to cover the floor on the logs, so in this article we will consider in more detail just this option for flooring.
The choice of wood for coating
Pine, spruce, fir - boards of which are most often suitable for floors with a small load, as these materials are quite soft, dents are easily made on them. If you decide to lay the floor of these materials in rooms with high traffic and load, you need to try to treat the coating as carefully as possible and not walk on it with thin heels. Such material is not suitable for wet rooms. - Aspen and alder are medicinal wood species, so they are suitable for a bedroom and a children's room. -Oak - dense and durable wood, it costs more, but the floor from such a board will be very strong and durable. -Siberian larch is as hard as oak; thanks to the resins, the board from the Siberian larch practically does not rot, therefore it is suitable for all floors, including with high humidity, for example, for a bath. But it costs 2-3 times more than pine. Also for the floors in the bath, you can use alder, birch, beech.
Despite the fact that a board made of oak and larch is more expensive than a more common board made of pine, but the floor is made of it, it will definitely serve not only the owner, but also the grandchildren (if there is such a goal). But if there is no such need for a board to serve 100 years without replacement, then choosing a board from pine can count on 50 years. Of course, with proper installation and proper care.
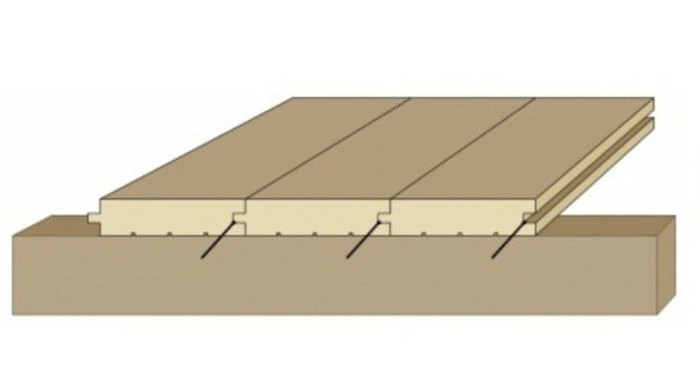
Sheet piling or not sheet piling
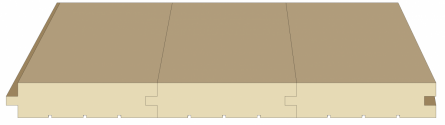
Grooved board. Connection in a rectangular tongue (tenon groove) 
The board is not grooved. End to end seam
Those floors that we see in old houses - with cracks and an uneven surface, these floors are laid out from an ordinary not grooved board. So, no matter what the ideal geometry, new, not grooved boards are, one must understand that this is how the floor will look in a couple of decades. An exception may be only not tongue-and-groove boards made of hard wood, such as oak or Siberian larch.
Therefore, not a tongue-and-groove board made of inexpensive wood: pine, spruce, fir, is suitable only for the subfloor, i.e. the floor to be covered on top. For a fine wooden floor you need to take a grooved board. 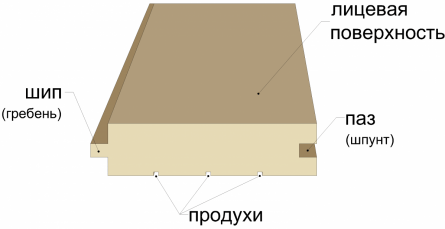 Tongue and groove board
This is a floor of a completely different level and not at all what we are used to seeing in old houses (creaks, crevices, uneven, etc.).
Thickness and size of floorboards
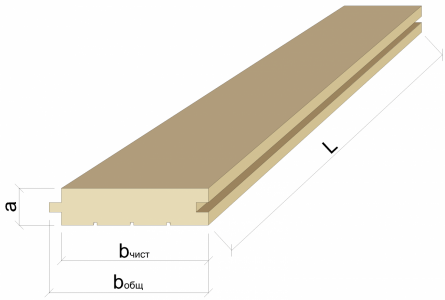
Main board sizes
Board thickness
Boards come in a thickness of 20 to 40 mm. Often, when choosing the thickness of the board, which they intend to lay on the floor, they are guided by the principle - the thicker the board, the stronger the floor. In this case, it should be remembered that a tree is a natural material that has the ability to shrink and at the same time it (the tree) leads a little, twists. So, for example, if you take a 40 mm board for the floor that is not dried properly in the drying chambers, but raw, as a rule, they take it, since it is cheaper, then such a board will behave very sharply during natural drying. Maybe she can tear out the self-tapping screw with which it is fixed. And at the same time, the same not sufficiently dried board of smaller thickness (22, 24 mm) will behave much better, the array is smaller, the array strength is less, so it does not break the screws. Therefore, the most practical thickness of the floorboard is 22, 24 mm. If you take a thicker board - 30, 40 mm, then it should be dry, dried in drying chambers to a moisture content of 10%, maximum 12%.
Board width
The width of the board used for flooring is also different - 100, 120, 140 and even 200 mm. Just as with thickness, you need to make your choice depending on the moisture content of the wood. With a moisture of the material of the board of 12%, you can take a wide board (150-200 mm), it is better to take a narrower narrower board - 100 mm. The most popular is the last width of the board - 100 mm.
Board Length
Boards on sawmills are sold in multiples of 1 meter in length, i.e. 3, 4, 5 and 6 m. It can never be longer. If you plan to stack the boards with an offset, then in principle the length does not matter much, and you can order a shorter board, it is a little cheaper, but the laying method itself is more time-consuming and has many joints. If the boards are stacked without displacement, then of course it is ideal to take the board along the length (or across the width of the room). So, for example, for a room with a size of 7x4 m - a length of 4 meters, and for a room of 4x3 m - a length of 4 or 3 meters. 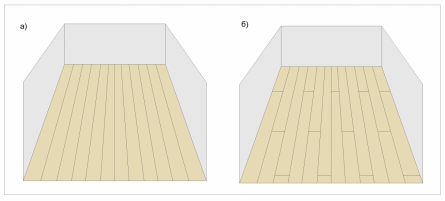
Laying options for floorboards: a) with an offset; b) without bias
Tree variety
The type of wood from which the board will be made depends on the purpose of the plank coating — it will be draft or fair, as well as financial ability and what the top floor covering will be like, such as varnish, paint, wax.
Top grade. Boards of this grade are the highest quality, but also more expensive. They should be completely without knots, which by the way not everyone likes. This is purely a matter of taste. They are suitable for coating with transparent compounds, under which the structure of the tree is visible - varnish, wax, oil, and there is no point in buying such expensive boards for such a coating as paint. 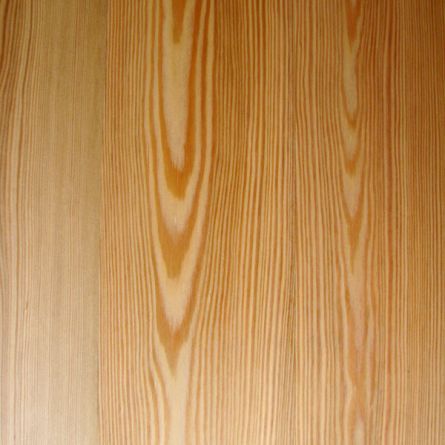 Top grade board
1 grade.Board with lively light knots. The best option in the issue of price / quality is under the coating with transparent compounds that show the structure of the tree. 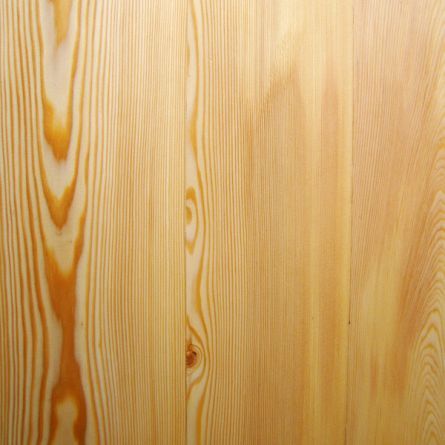
Board 1 grade
2 grade. On the surface of the boards you can see many knots, among them there are dead dark knots. Ideal option for a floor under painting, knots all the same will not be visible. 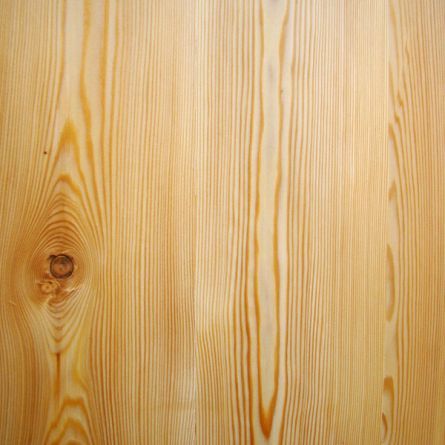
Board 2 grades
3 grade. Boards have a noticeable curvature, poor geometry, a lot of knots (sometimes even falling out). This board is noticeably cheaper, but its laying will be longer and more expensive - to customize, trim, cycle. Therefore, such a board is a suitable option for floors in utility rooms and technical rooms, where you do not need to especially heave and loop. 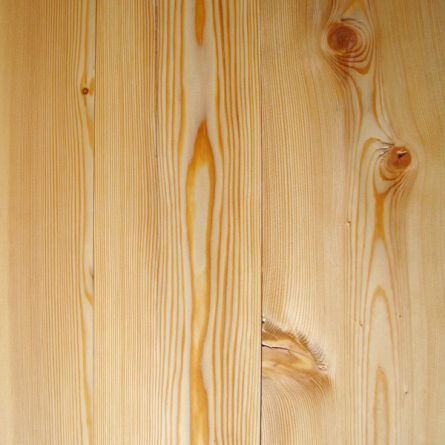 Board 3 grades
Humidity
We know that the ideal option is a board dried in special drying chambers on a sawmill to a moisture content of 12%. Such a board needs to be transported and mounted in dry weather, not in fog and not in rain. A more economical option is not a dried board, humidity is 18-20%. She needs to be laid as soon as possible. Those. on the day of delivery already be ready for installation, have the appropriate tool and already installed floor logs. If the installation is not planned to be done independently, then hire a brigade of working JSC flooring on the day of delivery. If you do not put them right away, then they will begin to dry out, get out, blow out with an arc. All this leads to losses as a result, since such a board will have to be looped, which can be avoided by laying it right away.
Board laying method
Boards are usually laid in the bedrooms and lounges - along the direction of light from the windows, and in rooms with increased cross-country ability, such as a vestibule and a corridor - along the direction of movement. 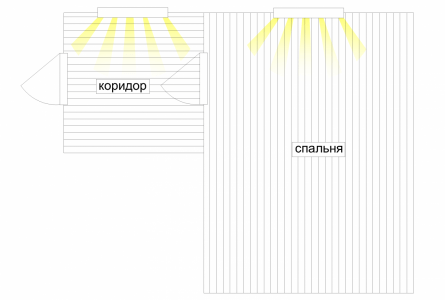
Floorboard laying orientation
Insulation of the floor on the logs
If we are talking about the floors of the first floor, then they need to be insulated necessarily and always, without exception. The floor on the logs can not be insulated only if the floor is bordered from below by the heated room. To insulate the floor on the logs, a vapor-permeable insulation, for example basalt mineral wool or fiberglass wool, is best. In the floors on the logs, the insulation does not carry a load, so soft positions with a density of 30-50 kg / m3 are suitable. The thickness of the insulation depends on the region in which the construction is located, it is usually not less than 150 mm, but in some cold regions, the thickness reaches 200 mm, so the thickness of the insulation should be calculated by a specialist.
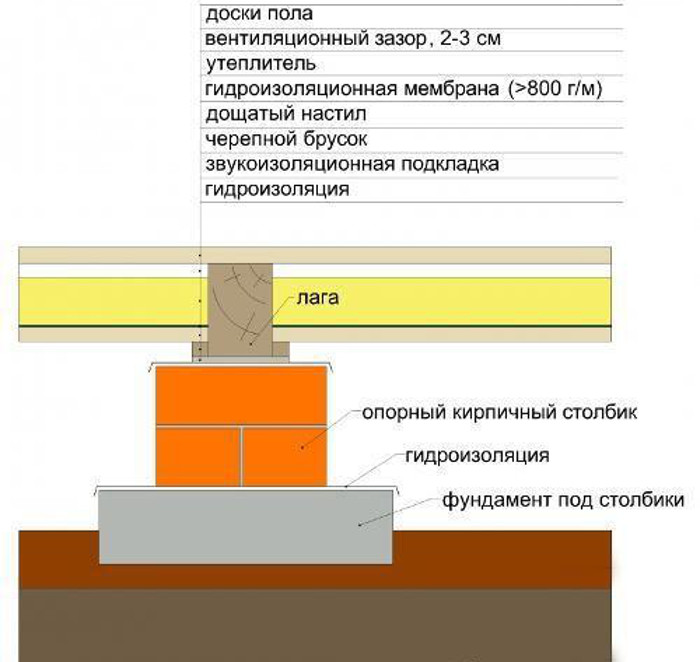
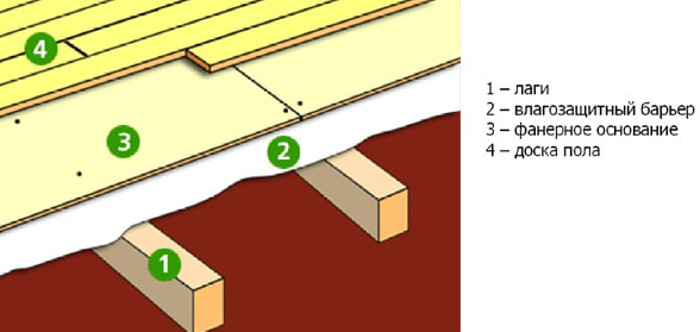
The device of the wooden floor on the logs
Wood species, variety, moisture. Logs for flooring are most often made from an inexpensive array of pine, spruce, fir, less often from a more expensive larch tree, grades 2-3, with a moisture content of 18-20%.
Lag section selection
The cross section of the log should be rectangular with an approximate ratio of the height should be equal to 1.5-2 widths. With this cross section, the lags work best. 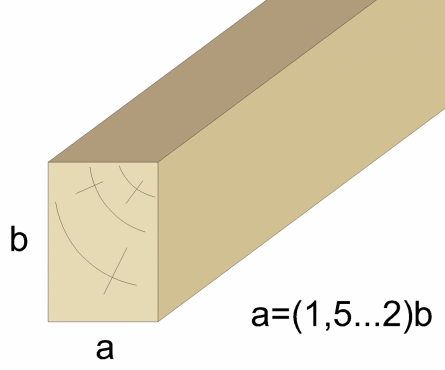
Section lag. Optimum height to width ratio
The cross-section of the lag mainly depends on the span on which these lags will be laid. The span in this case is the distance between the bars of the lower harness, on which the logs will rest. 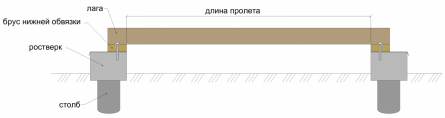
Span
Also, the cross section of the lag, namely their height - hlag in the figure below, also depends on the thickness of the insulation (hut), which will need to be laid between them. And here it must be remembered that between the upper boundary of the insulation and the floor board there must be a ventilation gap equal to hvent = 2-3 cm. And from below, the insulation will be laid on a roll (h roll), which is placed on the cranial block (h b.b.), fixed to the lags.
Thus, the minimum lag height is calculated by the formula: hlag = hb.b. + hnakat + hut + hvent,
- hb.b. = 50 mm;
- h ≥ 25 mm;
- hut is calculated for a specific region;
- hvent = 2-3 cm. 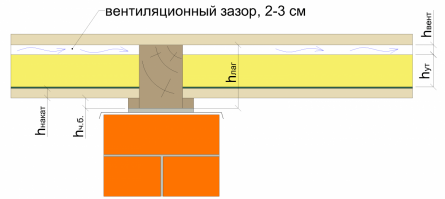
Ventilation gap between the insulation and the board
In order not to lay expensive logs of large cross-section, the span can be reduced by installing intermediate supports - supporting columns under the logs. 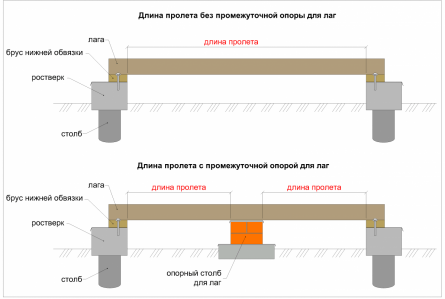
Span reduction due to the installation of an intermediate support - a support column under the logs
Below are the sections of the logs for different spans, provided that the logs are laid no more than 70 cm. 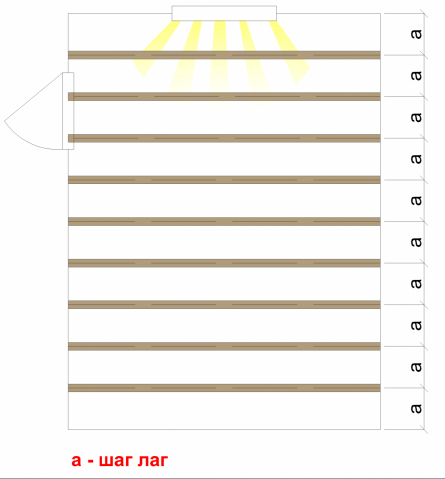 Step lag
If you have a lag step less than 70 cm, then the given sections will be with a small (indeed with a small) margin.
(span - lag section)
2 m - 110x60 mm;
3 m - 150x80 mm;
4 m - 180x100 mm;
5 m - 200x150 mm;
6 m - 220x180 mm.
When the span has an intermediate value, it is better to take the log section with a margin, i.e. such that is suitable for the next larger span. A lag step of more than 70 cm is permissible only if the floor is covered with a thick board, more than 40 mm, which is extremely rare. Therefore, in the framework of this article, we do not consider sections of logs laid with such a large pitch (800-1000 mm).
It makes sense to install intermediate support posts for logs in increments of 2 to 1 meter. Optimum 1-1.2 m. Log sections in this case will be as follows:
(pitch of support pillars - lag section)
2 m - 110x60 mm;
1.5 m - 100x50 mm;
1.2 m - 90x50 mm;
1 m - 80x50 mm.
Taking a lag section less is not safe, more is possible. Therefore, if for example, there are lags of a larger cross section than required, then they can be safely applied.
Step lag.
The step with which the logs are laid depends on the thickness of the floor covering, the stronger the floor covering, the less often the logs are installed and vice versa, if the coating is thin and not very strong, then the logs will have to be laid more often.
Below are the different options for flooring and the recommended step lag. (Board thickness - step lag)
20 mm - 30 cm;
24 mm - 40 cm;
30 mm - 50 cm;
35 mm - 60 cm;
40 mm - 70 cm;
45 mm - 80 cm;
50 mm - 100 cm.
Support posts for logs
They are mounted from brick of brand M 100. Often they say and write that silicate brick cannot be used on supporting posts. This statement is true only for areas with a high level of groundwater (less than 2 meters from the ground surface). Then it is better to apply a red brick. In other cases, red and silicate bricks are equally suitable.
Waterproofing the floor on logs
It is laid on the foundation for breaking the capillary rise of groundwater, as well as on the brick in front of the logs for additional protection. The number of layers of waterproofing depends on its thickness. So if the waterproofing is 3 mm thick, then 1 layer is enough, if thinner, then in 2 layers. We do not recommend using roofing, but if you have one, then for normal waterproofing it should be laid in 2-3 layers.
Sound insulation of the floor on the logs
Soundproof linings help dampen shock noise. They are laid on the roofing material, directly under the logs. In size, they should be slightly larger than the thickness of the log, about 1 cm protruding beyond the edge of the log on each side. For example, for logs 100x150 mm (width x height), the soundproofing lining should be 120x120 mm in size. 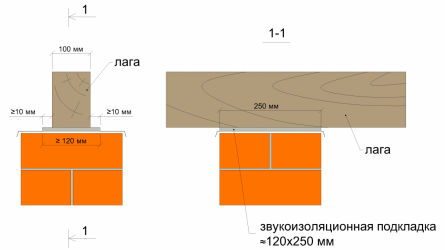
Soundproof lining. Lug size
Such linings are made of a variety of materials: plywood, chipboard, OSB, antiseptic wooden stitches, cork substrate, special compensation tape or a foam polyethylene substrate (like under a laminate, only thicker). The recommended thickness of such a substrate is 1-4 cm.
Foundation for posts for flooring on logs
It will take a small amount of concrete to build the foundation under the columns. This foundation can be either separate for each column, or common to one line of columns, as it is more convenient. 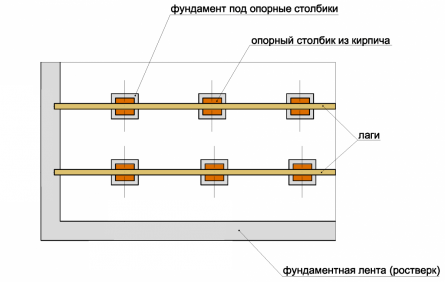 Separate foundation for each support pillar
Common foundation tape for each row of support posts
Preparation of the base of the floor for lags
The last thing you need is crushed stone (about 4 cm over the entire area of the base under the floor) or crushed clay (about the same, 4-5 cm).
Calculation of the amount of materials for the floor by logs
In order to start the calculation, you need to make a drawing of the room on a scale. The drawing schematically show windows and doors. 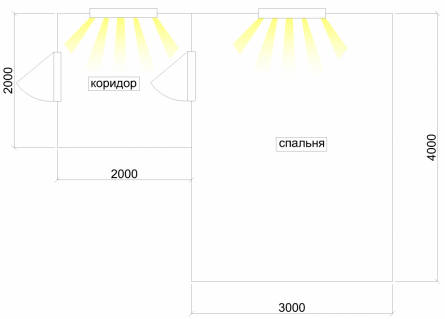
Floor plan
Now you need to make the layout of the floor lag. The step is selected taking into account the thickness of the board. For example, we have a 24 cm thick floorboard, logs under such a board should be installed in 40 cm increments.
In the first room (corridor), our boards will be laid in the direction of travel, and the logs, respectively, perpendicularly. In the second bedroom, the boards will be laid along the direction of the light from the windows, and the logs, again perpendicular. The distance of the first lag from the wall should be no less than the accepted lag step, will be ≤ 40 cm. Next, with a step of 40 cm. 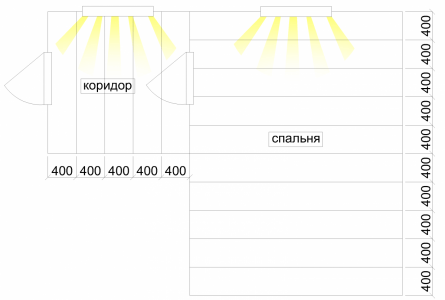
Mark the axis of the lag
Pay attention - a step, this is the distance between the axes of the lag. Having made this layout, we know how much we need lag. 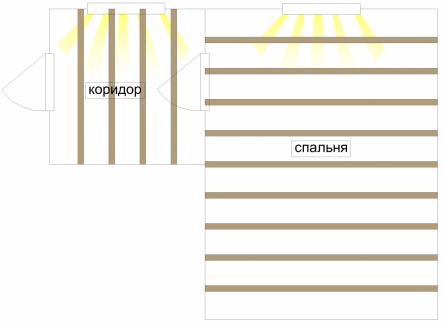 Lag layout
Now we will determine the cross section of these lags themselves. Suppose we need to place 50 mm of insulation between them, respectively, the height will be 150 mm (50 mm of cotton wool + ventilation gap of 20 mm + cranial block 50 mm + roll 30 mm = 150 mm).
At a step of 40 cm, for a span of 2 m (first room) bearing capacity, taking into account the required height of at least 150 mm, logs with a cross section of 150x50 mm (even with a margin) will fit without additional support posts for logs.
For a span of 4 m (second room) there are few such lags without intermediate supports. Here you need lags with a section of 150x100 mm. Therefore, we have three options.
Buy all beams of one section (150x100 mm) and use them.
Buy the right number of beams with a section of 150x50 mm and the right one - 150x100 mm. But buying a pair of lag of different sections for money can cost almost the same as buying a lot of lag of one section at once.
Buy all the logs with a smaller cross-section (150x50 mm), but in the second room install intermediate support columns for the logs. One column for each lag.
Note: Option - to buy all beams with a cross section of 150x50 mm and to merge them to obtain 150x100 mm, we do not consider it, as it is not recommended to merge floor beams in height. Then the floor covering will be attached to the lags and the fasteners will fall on the joint of the halves of the lag or close to the joint, which will negatively affect the reliability of fixing the floor covering.
Choose the third option, for this you need to calculate the number of materials on the columns. For each column there are 4 bricks, a piece of roofing material 52x52 cm, a lining for the lag, and concrete on the foundation floor column.
Board quantity calculation
Usually the order for boards is accepted in m2. Less often in pieces or m3. Further I give an example of calculation.
Square. Suppose you want to cover the same two rooms with a board: the first 2x2 m and the second 3x4 m.
1. We calculate the area of each room.
S1 = 2x2 = 4 m2; S2 = 3x4 = 12 m2.
2. Now we summarize the area S = S1 + S2 = 4 + 12 = 16 m2
And we determine that our board should have a thickness of 24 mm and a width of 100 mm. The length should be ordered the most convenient, based on the available size of the room. In our case, it’s convenient to take a length of 4 m: the whole board will go to the second room, and we will cut the remaining boards into 2 parts and cover the floor of the first room. Thus, our order will sound like this: 16 m 2 boards 4 m long, 100 mm wide and 24 mm thick.
Pieces. We determine along which wall the boards will be laid. For example, we decided to lay them in the first room along side a (i.e., in the direction of travel), and in the second room along side b (perpendicular to the entrance).
Then, to calculate the number of boards for each room, we divide the length of the side, perpendicular to which the boards will be laid (side g for 1 room and side b for the second) by the width of our board.
D1 = 2000mm / 100 mm = 20 pcs.
D2 = 3000 mm / 100 mm = 30 pcs.
In total, we need 20 boards 2 meters long and 30 boards 4 meters long, 100 mm wide and 24 mm thick, or 40 boards 4 meters long.
16 m2x0.024 m = 0.38 m3.
You will also need flooring material (varnish, wax, oil, paint) and wood putty.
We must not forget that the logs, roll and cranial bar should be saturated with an antiseptic. Preferably before installation.
Tools for installing the floor on the logs
And also do not forget to prepare the following tools before installing the floor: hammer, tape measure, water level, normal and water metal level 2 meters long, drill, puncher, electric jigsaw or conventional saw, screwdriver, nail puller, ax, plane, consumables (dowels , wood screws, nails).
The device of a wooden floor on the ground is most often used in the absence of basement, in order to save money, in houses from profiled (rounded) timber, as a continuation of the general wooden structure of the building. In addition, the wooden floor is environmentally friendly, is not a threat to human health, and in some cases even helps get rid of some diseases. And besides, wooden floors are easily repairable without causing damage to the whole house.
Content
- Soil preparation.
- Installation of columns under the logs.
- Laying lag.
- Installation of the floor on the logs.
Soil preparation
Ground preparation for the installation of a wooden floor is a fundamental point on which the durability of the flooring depends in the future. The process itself consists in the maximum compaction of the soil (ramming) and its leveling in order to make it easier to install columns under the logs at the same level.
The ramming tool can be made by yourself, having a log with a diameter of about 200 mm and a length of 700-800 mm. On one side of the log, a section of a board 300x300 mm in size and 40–50 mm thick is nailed, and on the other end of the log, a handle is attached at its discretion to raise and lower the “rammer”.
![]()
The indicated “tamper” sizes are purely recommended and in each individual case are selected individually so that it is possible to work quickly and not very hard. Other tamper designs are possible.
Installation of columns under the logs
After the soil is tamped and leveled, they begin to install columns under the logs. But first, you need to mark the installation locations of the supporting posts. In practice, cords are used for this, which determine the location of the lag. At the intersection of these cords indicate places under the foundation for the columns that are laid out from or concrete blocks. The cords are then removed, and the locations of the posts are fixed with wooden pegs driven into the ground.
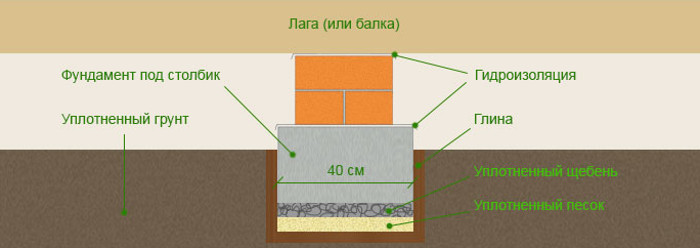
Further, in the locations of the pegs, holes are excavated under the foundation for the columns. The depth of the pits depends on the density of the soil and the depth of the groundwater. If the soil is sandy or rocky, it will be enough depth of 25–30 cm, however, and if the soil is clay, the depth of the foundation should be 40–50 cm, since gravel will have to be filled up to the bottom, which must be thoroughly compacted.
The foundation concrete should be taken very seriously, observing the required proportions of concrete, sand and water. You should not save on cement, but prepare the mixture in the following proportions: one part of cement + three parts of sand + three parts of crushed stone of a fine fraction (10-15 mm). Before pouring the solution to the bottom of the pit, it is recommended to lay a plastic film so that the “milk” does not go into the ground. And one more thing: it is more rational to attach a metal mesh of wire Ø 4–5 mm below the level of the middle of the pit, which will play the role of reinforcement for concrete.
After concrete hardens, the surface under brickwork the columns must be protected with waterproofing from roofing material or other material with an allowance of 10-15 cm on each side. Then you can start laying brick columns made of bricks, which, for reliability, it is advisable to put from two rows of bricks. The height of the brick columns must be calculated so that the upper bricks are perpendicular to the stacked logs.
Lag laying
When laying logs, you need to pay attention to ensure that they are all in the same plane. Such a result can be achieved by substrate under the logs of pieces of wood or tackle problem areas with a planer.
The installation level is constantly checked by the level. The lag is fastened to the posts through special corners using dowels (in brick) and self-tapping screws.

It is worth paying attention to the fact that it will be more reasonable to make a hole in a brick with a drill. If you do this with a punch, the brick may crack.
Installation of the floor on the logs
After the logs are securely fixed, you can proceed directly to the installation of the floor using floorboards. It is best to purchase floorboards with joining elements, that is, there is a spike on one side of the board and a groove on the other. It will be correct if before installing the floor between the lags lay mineral wool, which will serve as insulation for the floor. Polystyrene (polystyrene) is not advisable to use for this. It is possible to fill expanded clay, moss, sawdust, etc. as a heater.
Of course, the space between the lags can be used to lay and hide various communications: water and sewer pipes. You can make some floor boards in the form of a hatch for the maintenance and control of communications. Flooring should have a moisture content of not more than 12%, otherwise over time, when dried, they will warp.
How to fix boards? You can simply nail it with nails (see the figure above), or you can fasten using self-tapping screws. But in any case, it is advisable to cover the places where the boards are attached to the logs with sealant before decorating the floor.
Summer is the time for global renovation, and if you need to replace or strengthen floors, it's time to think about it.
Today I will tell you about the installation of floors from wooden boards along the logs on brick posts. It is quite simple, even a layman can handle it, moreover, in the shortest possible time and with a minimum of costs.
However, it is necessary to approach this occupation with all responsibility - high-quality performance of work, guarantee of durability and reliability of the design.
So, the basic rules that you must provide for during installation and in no case do not violate them:
The advantages of wooden floors
The main advantages of such floors include:
Materials:
For insulation:
Arrangement stages - from foundation to cladding
They are laid out from concrete sides or bricks on a cement-sand mortar 1 to 3.
In the soil for the foundation under them, you need to make the corresponding recesses, having previously marked the distance from 80 to 100 cm between them.
The depth of the foundation of the support pillars is 20-40 cm, depending on the moodiness of the soil and the proximity of groundwater. You can play it safe, in principle, it will not be superfluous.
The mortar for the foundation is cement / sand, crushed stone of a small fraction (5-10 mm) / water, in the ratio 1/3/3. You should get a thick mass, but at the same time elastic.
Meanwhile, instead of a thorough foundation, it is also possible to use rammed crushed stone spilled with bitumen on untreated soil.
To increase the strength of the foundation under the columns, it can be reinforced with a mesh closer to the middle, and in order that moisture does not penetrate the columns, it is laid with a waterproofing material. Before installing the posts, be sure to wait for the support base to dry.
2. Laying is carried out strictly in the dressing for cement-sand mortar 1/3. Cement is taken no lower than the M100 brand.

The level after masonry, as it is commonly called "under zero", can be provided with a solution, but reinforcement should be carried out if its layer is more than 3 cm.


3. On top of the pillar then, roofing material or other suitable waterproofing material is laid, as well as gaskets made of plywood, particleboard or wood.
4. Logs are laid on it, either specialized or home-made beams, with a standard section for ordinary loads - 150x50 mm, treated from beetles and moisture with special impregnations. It is not necessary to select the timber of the exact size, if the length of the lag is not enough, they can be increased.


When attaching the longitudinal lags to the posts, specialized, or again home-made corners are used. To fix the beams to a concrete or brick base, pre-drill holes for dowels.

Is it possible wooden logs to install on a concrete pedestal without brick columns?
Expert Answer:
Alas, we can only guess what you had in mind. A curbstone is a piece of furniture; it has no relation to building structures. By analogy, suppose that it is something rectangular and made of concrete. Perhaps monolithic concrete columns. Maybe the edge of a wide foundation protruding beyond the outer walls into the perimeter of the building. It is possible that you are going to install on the ground some typical concrete elements that were obtained at a reasonable price, for example, bases for fixtures or prefabricated reinforced concrete fences, columns for parking lots, trimming of pile heads, etc.
The top mark of the lag must match. Of course, you can put a lining, but its thickness should be minimal
If so, we respond with full confidence: it is possible. However, there are nuances.
It does not matter what the lags will rely on. It can be a brick or concrete column, steel profile, asbestos-cement pipe, any rigid object. The main thing is that the support is strong and does not sag over time. Accordingly, before installing the "pedestals" you must provide them with a reliable foundation. To do this, we recommend:
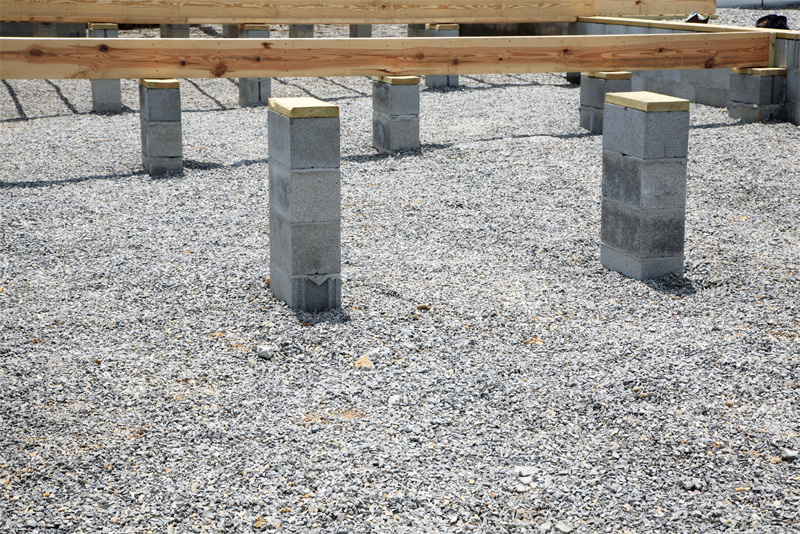

Various designs of wooden floors on the ground. The difference with your option is that you will have concrete columns. The waterproofing of the subfloor is not shown here, but we strongly recommend providing it
The pitch of the columns depends on the height of the log, but do not make it less than 80 cm across and 150 cm along the timber.
If the distance between the inner walls is small, and the height of the wooden beams, on the contrary, is large, you can do without pillars at all, resting the lags on the foundation.
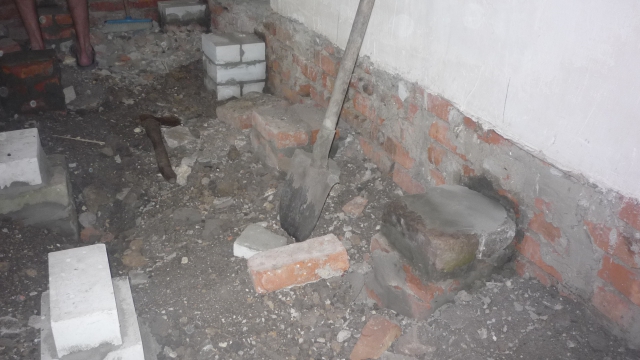
Since the plank floor was planned for the logs, then naturally the next step was the posts for the logs.
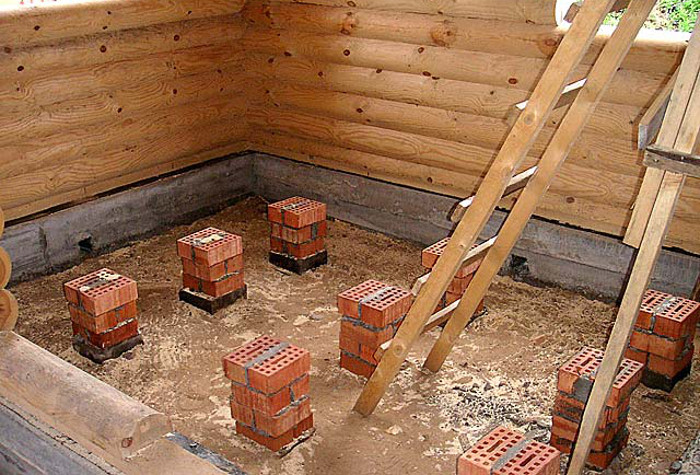
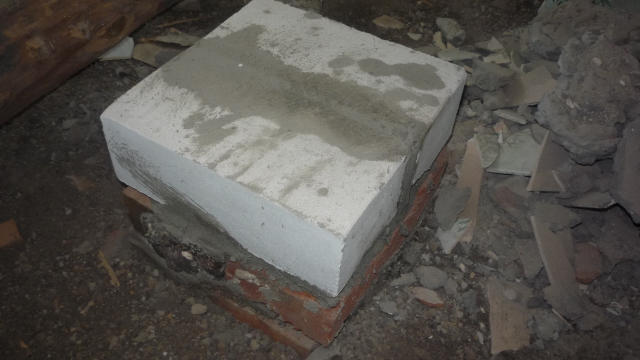
Here it is worth noting that the columns of brick are somehow not in fashion. For example, at the stage of acquaintance with the co-workers we were twice offered to make these columns concrete. The price for each such product ranged from six to seven dollars. They would be placed directly on rammed soil.
This option is cheaper than brick. In our case, 14 bricks went to each pillar and at the price of each ceramic full body at 50 cents it would go to the same 7 bucks. In my calculation, the concrete version does not take into account the material (cement and sand), but the brick work (I did it myself).
The choice in favor of columns made of brick was made for two reasons: after parsing the stoves, there was a lot of it left and the brick pillar had more support area.
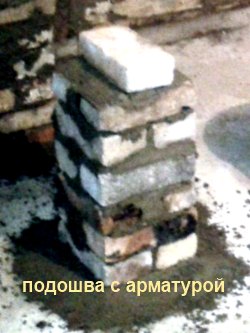
There was another reason for this area: I was afraid that the columns under the weight of the log and floor would be able to push the screed and waterproofing. Therefore, I wanted to make the area of the support as large as possible. For the same purpose, a square of reinforcement mesh, shown in the first photo on the right, was laid at the bottom of the column. As a result, the columns were made approximately as in the following photo.
The type of brick was not chosen randomly: it is recommended to use ceramic full-bodied bricks for lag columns, and white silicate brick is used only in the absence of dampness. Due to the fact that I had equal number of red and white bricks, then the lower ranks, like the most raw ones, were used for baking ovens, and in the upper ones - silicate.
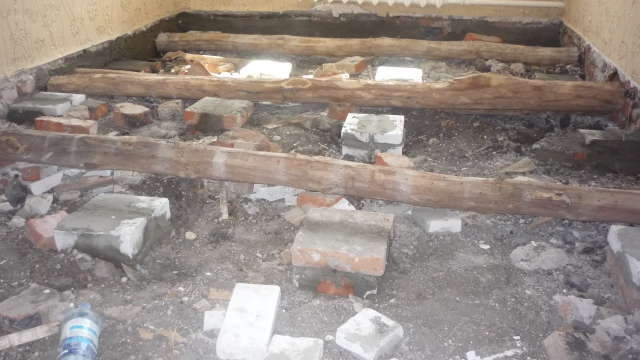
Distance between columns
The distance between the installed lag supports was selected according to several criteria. Longitudinally to future lags, the distance is taken from the permissible deflection of the beam. I calculated this deflection with the program "Calculator for calculating the bearing capacity of single-span wooden beams" → (download) and I got 2.4 meters for a 150x75 beam. Since the width of the basement in my building is 6.2 meters, I had to put two columns on the log in width, with a distance of 2 meters.
The transverse distance was selected based on the thickness of the floorboard and the need for laying between the insulation lags. The floorboard was planned with a thickness of 35 mm, but the distance between the lags was chosen from half the width of the mineral wool roll minus two centimeters, that is, 58 centimeters
Addition of the topic on the page → Book distance between columns under the logs of the floor
Installation sequence and column height
Alas, practically everything was not quite done as shown in the next animated picture. I came to a similar pattern for aligning the columns in height when half of them were already standing.

According to the picture.
1. Find the reference point for the height of the columns. In our case, this is the height of the old threshold minus the height of the logs, minus the thickness of the floorboard, minus the thickness of the brick-lag lining.
2. Set the height with a water or laser level and mount the corner posts (the water level is a blue curve). In our case, they are small and installed on the foundation
3. A thread is stretched between the corner posts and bricks are built under it on the foundation (the yellow line is the stretched thread, you can also use the laser level)
4. The same on the other side.
5. The thread is already stretched between the opposite columns and under it the posts are mounted inside.
Everything is even on this animated diagram, but in my case of curvature I added the foundation of the stove. When arranging the pillars, I had to take it into account: some of the supporting posts are attached to it, and part is shifted to the middle of the spans. What happened in the following photos.