Warm floor on the ground. The basis for a water floor heating - on the ground
Your question, it almost always arises with the installation of both a simple floor and a warm floor on the ground. The question is mainly whether it is possible to put waterproofing and all subsequent layers (epps, etc.) on the backfill, or necessarily on the subfloor. See, a lot of opinions for what you can. But here we thought for a long time, and consulted, and came to the conclusion that it is better to lay the waterproofing (and subsequent layers) either on a rough screed, or pour it on it. Let me explain what we are based on. You have the soil inside the box, although it was caked, but it just lay, without load. Now you will add more layers, and they are also not hard, but bulk. That is, the waterproofing will be between the hard eps and the bulk (albeit tamped) layer. Any movement of the layer under the waterproofing will lead to the fact that the waterproofing will be somehow unevenly located. Following the micromotors of waterproofing, there can be micropods of eps. I understand that all the top ties you will have are reinforced, and they will "keep" the ties from being moved. But still, why are these extra loads? And to guarantee that nothing will ever shift in the layers under the waterproofing, I will not guarantee :-).
By the way, you have waterproofing in the textual description, but not in the figure. If you have groundwater lower than 2 meters from the floor mark, then there may not be waterproofing. Just put eps and so on. But everything that I wrote above is still valid. Without a hard layer under the eps, any movement under it will create additional loads on the upper layers.
- sand bed 50mm thick, level to level
- filling from crushed stone or expanded clay with a thickness of 100 mm, and through it, or pouring a layer of crushed stone / expanded clay with a liquid cement-sand mortar ((2 parts of sand per 1 part of cement), or rough screed. In total, the thickness of the crushed stone / expanded clay solution already spilled will be 10-12 cm. If this pouring is not done, then on top of expanded clay it is necessary to make a rough screed 5-7 cm. Allow the solution to solidify and lay waterproofing and subsequent layers on top of it.
- waterproofing
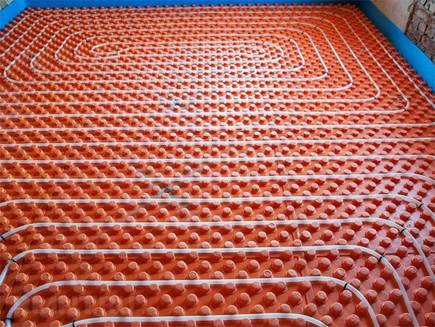
- laying of polystyrene blocks, a layer of 50mm blocks, 20mm blocks on it so that the total is 70mm
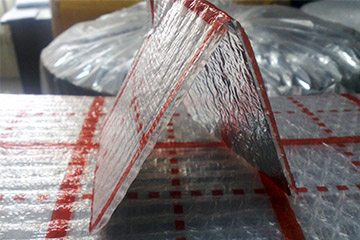
- waterproofing with foil
- fittings and heat-insulated floor pipes are poured into a concrete screed 100 mm thick
- finish coating (tile), about 20mm on it.
As for the fact that the top 100 mm of soil needs to be removed from the gravel for the filling device, this requirement is probably in order to arrange the filling on better caked layers (not on the surface). It can be done, it will only be beneficial.
The device of a warm floor in itself is considered a difficult engineering task. If the floor is in direct contact with the soil and serves as part of the liquid heating system, the likelihood of making a mistake grows significantly. Today we will discuss both the materials used and the phased device.
Laying underfloor heating on the ground is a complex engineering measure. This means that the contractor is responsible not only for the efficiency and long service life of the heating system, but also for the normal behavior of the flooring under conditions of cyclic heating. Therefore, act consistently and strictly follow the recommendations of the device technology.
What pipes are suitable for underfloor heating
The first thing to do is to determine the type of heat transfer tubes. While the issue of purchasing the right type of product is being resolved, you will have time to carry out all the necessary preparatory work. In addition, from the very beginning you will be aware of the pipe fastening system, and you will foresee everything you need for this.
So, let's start by abandoning pipes that do not have such an intended purpose as use in underfloor heating systems. This includes metal-plastic polyethylene pipes connected by a system of press fittings and PPR pipes for soldering plastic water pipes. The former do not perform well in terms of reliability, the latter do not conduct heat well and have high coefficients of thermal expansion.
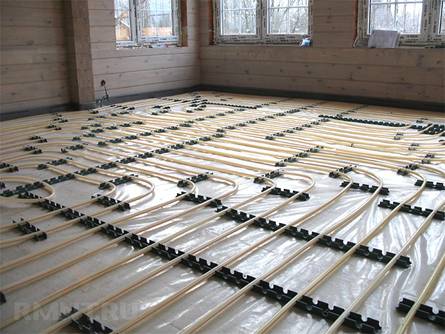
A convenient and reliable installation system for temporary pipe fastening is initially selected. It may also be a reinforcing mesh to which the pipes are tied with wire, but imagine installing in this way on an area of \u200b\u200b100 m 2 or if suddenly several ties come off during the pouring of concrete. Therefore, use a mounting pad or a rail system. They are attached to the base of the floor until the pipes are laid, then the pipes are fixed in the guides with clips or click-clips.
The fastening system itself can be plastic or metal. There is not much difference in this, the only thing you need to pay attention to is how reliable the fixation is and whether the guides themselves can damage the pipes.
Finally, we determine the material of the pipes. There are two types of products recommended for use in underfloor heating systems. For both, installation technology eliminates the influence of the human factor during bending and joining.
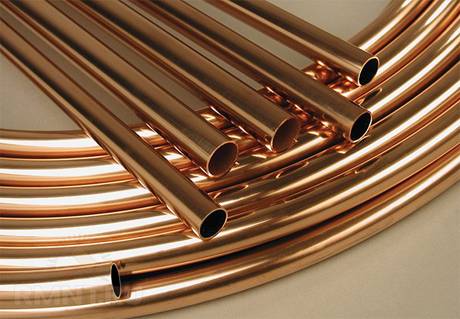
Copper. Despite the increased cost, copper tubes are easy to install, for soldering you will need a vial of flux and a gas burner. Copper manifests itself in the best way in systems of the “fast” warm floor, which works in parallel with radiators, but not on an ongoing basis. Bending of copper tubes is carried out according to the template, respectively, their kink is extremely unlikely.
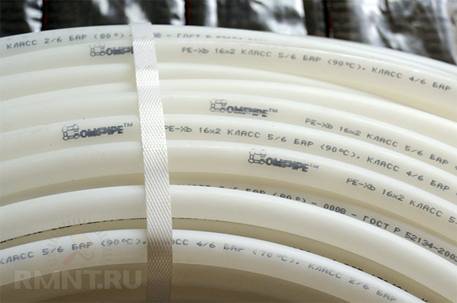
Polyethylene. This is a more common class of pipes. Polyethylene is practically not subject to fracture, but a special crimping tool will be required for installation. Polyethylene can have a different density, it is recommended not less than 70%. The presence of an internal oxygen barrier is also important: polyethylene is poorly resistant to diffuse penetration of gases, while at the same time, water in a pipe of this length can entrain oxygen from the environment in significant volumes.
Soil preparation
When installing a warm floor on the ground, a “cake” is prepared, the thickness and filling of which are determined individually. But these data are important already at the first stage of work, so that, if necessary, deepen the earthen floor and not sacrifice the height of the room.
In general, the soil is removed 30–35 cm below the level of the planned flooring, taken as the zero point. The surface is carefully leveled in a horizontal plane, a layer of geotextile is backfilled with incompressible material, in most cases they use ASG.

After careful manual tamping of the bedding, preparation with low-grade concrete is carried out. In order to provide additional thermal insulation, this layer may consist of lightweight expanded clay concrete. It is important that the surface is brought out into a common plane located below the zero mark by the thickness of the cake plus another about 10-15 mm.
Choice of insulation
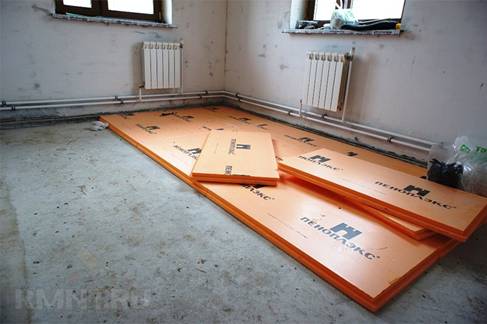
The water-heated floor cake consists of a heater tightly sandwiched between two layers of cement-sand screed. A fairly narrow series of requirements is presented to the insulation itself.
Mainly normalized compressive strength. Extruded polystyrene foam with a density of 3% or more, as well as PIR and PUR boards, as more fireproof, are ideally suited. If desired, you can use mineral wool plates of grade 225 according to GOST 9573–96. Cotton wool is often abandoned due to the complexity of its installation and the need to cover the insulation with a hydraulic barrier (polyamide film). It is typical that the minimum plate thickness is 40 mm, while when a reflective screen is made of EPS, the thickness of the latter rarely exceeds 20–25 mm.
Foam materials also serve as a good barrier to moisture migrating from the soil, and waterproofing is not required with them. Many can be stopped by the questionable safety of styrene-containing material or the price of more expensive boards with complete chemical inertness (PUR and PIR).
The thickness of the insulation is determined by the heat engineering calculation. If concrete with expanded clay was used as a filler in the preparation, 10–15 mm of EPSS or 60 mm of mineral wool will suffice. In the absence of insulated preparation, these values \u200b\u200bneed to be increased by 50%.
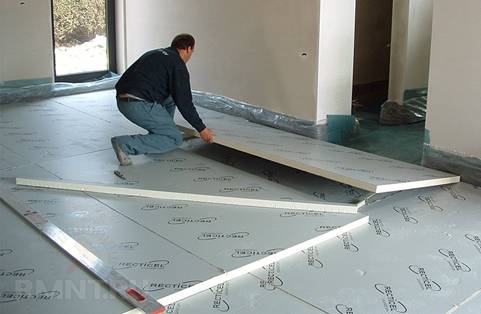
Preparatory and storage screeds
It is very important that the insulation is firmly sandwiched between the two screeds and that any movements or vibrations are excluded. The concrete preparation of the floor is leveled with a preparatory screed, then with the help of tile glue under the comb glued insulation plates. All joints are sealed with glue. If mineral wool is used, the concrete preparation must first be coated with a layer of penetrating waterproofing.
The layer of screed over the insulation should be so thick that its total thermal conductivity is at least 3-4 times lower than that of the heat shield. In general, the thickness of the screed is about 1.5–2 cm from the total height of the ceilings, but you can freely “play” with this value to adjust the inertia of the warm floor. The main thing is to accordingly change the thickness of the insulation.
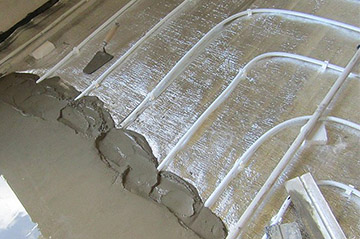
The top layer of the screed, which is subjected to heating, is poured after fencing the walls with a damper tape. Filling the accumulating screed can be carried out in two stages for convenience. On the first one, about 15–20 mm are poured with reinforcement with a rare mesh. It is convenient to move around and fix the pipe mounting system along the resulting plane, the rest is poured to the level of zero mark minus the thickness of the floor covering.
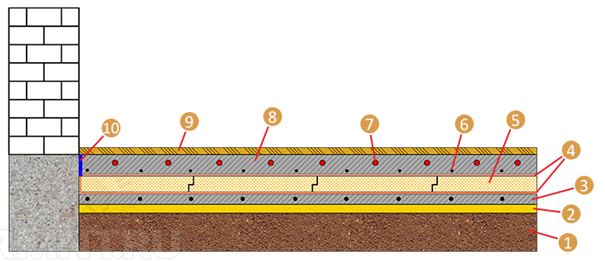
1 - compacted soil; 2 - sand and gravel bedding; 3 - preparatory reinforced screed; 4 - hydro vapor barrier; 5 - insulation; 6 - reinforcing mesh; 7 - floor heating pipes; 8 - cement-sand screed; 9 - flooring; 10 - damper tape
System mounting, proportions and loop pitch
Laying of underfloor heating pipes should be carried out according to a scheme previously thought out and drawn on the floor. If the room has a shape other than rectangular, its plan is divided into several rectangles, each of which is represented by a separate loop loop.
The same principle applies when zoning the floor. For example, in the playing area the tubes can be laid in more frequent steps, and it is advisable not to lay them under cabinet furniture at all. In each individual coil of a rectangular shape, depending on the priority of heating, the tubes can be laid either with a snake or with a snail, or combinations of options can be combined. The general rule is simple: the farther a particular point from the beginning of the duct, the lower its temperature, on average there is a drop of 1.5–2.5 ºС every 10 meters, respectively, the optimal loop length is in the range of 50–80 meters.

The minimum distance between adjacent tubes is determined by the manufacturer according to the permissible bending radius. A denser laying is possible according to the “snail” pattern or with the formation of wide loops at the edges of the snake. It is optimal to maintain a distance of 20–30 tube diameter values. You also need to make an adjustment for the thickness of the accumulating screed and the desired floor heating rate.

The installation system is mounted along the route of the installation through the insulation to the layer concrete preparation, accordingly, the length of the fasteners (usually plastic BM dowels) should be 50% greater than the distance to the surface of the preparatory screed.
When laying the pipe, you should consider an improvised spool for unwinding, otherwise the pipe will constantly twist and break. When all the loops are fixed in the installation system, they are checked with high pressure and, if the test results are satisfactory, the top layer of the accumulating screed is poured.
The inclusion of underfloor heating
It is recommended to lay whole pipe sections without joints in the screed layer. Tailings of loops can be reduced either to local collectors, or lead directly to the boiler room. The latter option is usually convenient for a small distance from the heated floor from the boiler or if all rooms have a common corridor, which indirect heating is enough.
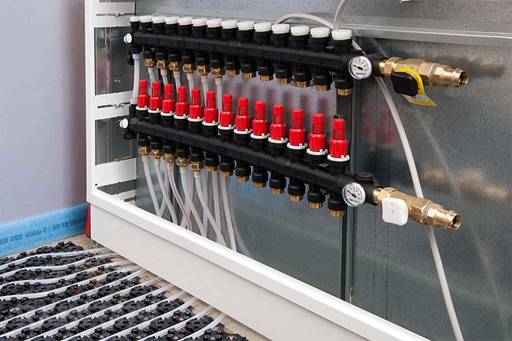
The ends of the pipes are rolled by an expander and connected by crimping or soldering to threaded fittings for connection to the collector assembly. Each of the taps is equipped with shutoff valves, ball valves with a red handwheel are installed on the supply tubes, and with a blue one on the return. A threaded transition with shutoff valves is necessary for the emergency shutdown of a single loop, its purging or flushing.
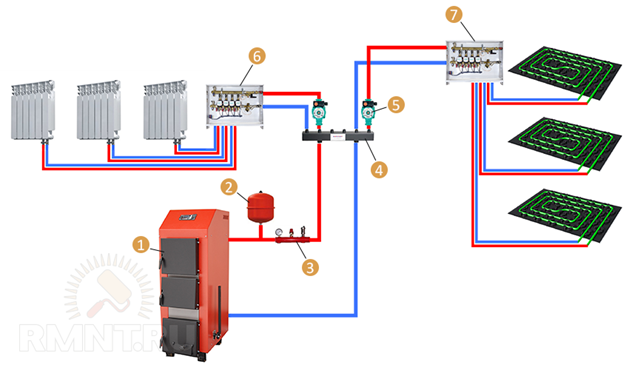
An example of a circuit for connecting a heated water floor to a heating system: 1 - a heating boiler; 2 - an expansion tank; 3 - security group; 4 - collector; 5 - circulation pump; 6 - a collector cabinet of heating radiators; 7 - collector cabinet underfloor heating
Connection of collectors to the heating main is carried out by analogy with heating radiators, two-pipe and combined switching schemes are possible. In addition to the thermostat, the collector units can be equipped with recirculation systems that maintain a comfortable coolant temperature in the supply of about 35–40 ºС.
http://www.rmnt.ru/ - site RMNT.ru
In the “warm floor” system there are many subtleties that affect the efficiency of heating.
With special attention, a screed for underfloor heating should be made.
Not only the composition of the mixture is important, but also its thickness, horizontalness, how to dry it, etc. Let us consider the step-by-step production of screed for water and electric cable floors.
If you make the screed too thin, it will not be strong enough (adding plasticizer to the solution can correct the situation, but in any case, the mixture should completely cover the pipes).
If the concrete thickness exceeds 6 cm, the heat from the pipes running under it may not be felt.
Or you have to heat the boiler much more (for a private house), which means that heating costs will increase.
It is very important that the surface is horizontal, so that the coolant is evenly distributed and circulates freely.
The thickness should be without cavities, cracks and other defects, and the composition should be correctly selected so that the pipe does not deform during operation.
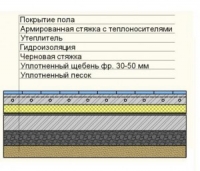
Screed cake for underfloor heating looks like this:
- Primed base.
- Waterproofing.
- Heat insulator and damper tape.
- Pipes (on reinforcing mesh, mats or aluminum profiles).
- Concrete.
- Topcoat.
The thickness of the concrete screed for a water floor heating will depend on the diameter of the pipes. About 4.5 cm of concrete should be above the pipe.
Screed under a warm water floor in preparation for pouring
Base
- At the preparatory stage, the surface must be cleaned and leveled. To do this, the old concrete coating is removed in the apartment with a puncher, the quality of the floors is checked and, if necessary, cracks, holes and other defects are sealed with a cement-sand mixture.
- A thorough cleaning is carried out. Dry, not wet. To have less dust, it is good to use a construction vacuum cleaner.
- After the base is cleaned, it is primed with a special composition that penetrates deep into the material and protects from fungus (2-3 layers are applied).
Waterproofing
When the primer dries well, arrange waterproofing.
It can be of two types:
- Okleechnoy (most conveniently with a self-adhesive layer).
- Lubricating: mastic, paste or liquid.
Okay the material is sold in rolls, which rolls around the room, rolls in, and all joints are processed with sealant.
Coating material wound up according to the instructions on the package and applied to the floor and bottom of the wall with a hard roller. Corners are smeared with a brush. After drying of the first layer, the second is applied.
Before starting repairs in the apartment and conducting a warm floor, you need to do some technical and material calculations. , heat transfer, as well as economic calculation.
We will consider the installation of a heated floor in the bathroom.
Water underfloor heating it is possible to equip both one room and the whole room. However, the installation of a water floor has some nuances and it is more difficult to connect them than electric floors. Here you will find the connection diagram of the collector of underfloor heating for an apartment and a private house.
Thermal insulation
 The next material is laid, which will direct up all the heat.
There is a choice, it can be:
- foamed polystyrene foam;
- multifoil;
- energy complex;
- “Super warm floor”, etc.
The sheets of the heat insulator are connected with construction tape.
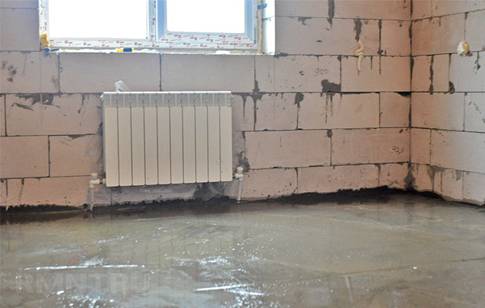
Along the perimeter of the walls, along their lower edge, a damper tape is laid. It compensates for screed expansion during heating. Its height depends on the thickness of the future concrete layer, about 10-15 cm.
Also, at the preparatory stage, a special niche is made in the wall, the “collector cabinet”, where the pipes will be supplied. To make water circulate faster, a pump is built into the system.
Mixture preparation
Here are two options for screed compounds:
- Cement-sand.
- Concrete.
In the first case, one part of cement (grade M400 minimum) is taken for three parts of sand (fine-grained). It is good to add plasticizers, which make the composition more resilient on the mechanical level and to temperatures.
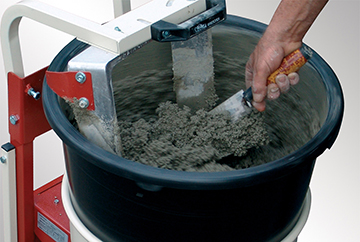 For concrete mortar, the following components are taken in parts:
- cement \u003d 1;
- sand \u003d 1.9;
- crushed stone up to 5 mm \u003d 3.7.
This composition belongs to the group of heavy concrete.
Semi-dry mixes can be found on sale. They cost less than cement, and due to the small amount of moisture they dry faster, do not shrink and do not require leveling. Just be sure to make a reinforcing layer.
How to install an electric floor under the screed
A cable is much cheaper than other options for an electric heated floor, but you need to approach the creation of screeds for it no less responsibly than for a water heated floor.
The stages of construction are as follows:
- Surface preparation.
- Cable distribution.
- The electrical part.
- Filling screeds.
Training
At this stage, the old floor layer is removed from the floors. The surface is cleaned as best as possible from dirt and dust, leveled. Sharp protrusions, cracks, knolls, vertical drops are not allowed.
Cable management
- At the distribution stage, a detailed drawing of the house, the arrangement of furniture, plumbing is compiled, and based on this - the layout of the cable (at least 5 cm deviates from the walls, about 10 cm from the risers).
- The place where the thermostat and the sensor will be placed is determined. Channels for them are gutted in the wall.
- An insulator is laid out on the floor. Sheets are connected with construction tape.
- The marker on the insulation transfers the cable arrangement, and then a fixing tape is glued along these lines, on which the wires are later attached.
- Damper tape is laid (along the walls 10-20 cm in height).
The cable lines should not touch each other, stretch or cut. In places of turns, the diameter of the bend should be more than 10 cm. The cable must be grounded.
Electrician
Wires lead to the thermostat. Before and at the end of work, it is necessary to check the resistance on the cable. It must comply with the instructions. The integrity and serviceability of the cable is checked by the tester. If everything is in order, there are no gusts, you can proceed to the cement works.
Screed
- The solution must be diluted with such a consistency that it does not clump and spread.
- Before filling, beacons are set.
- The pouring of one room cannot be divided into several stages: if concrete begins to set (and this is a break of 40 minutes), “cold seams” will appear that will weaken the structure. Therefore, in order to speed up the process, it is better not to work alone.
- The fill starts from the far corner opposite the door and moves to the exit.
- The layer is smoothed first with a trowel, and then with a rule.
- For a day, the surface is covered with a film.
- After a day, the film is removed, and only now the beacons are removed. And the channels left from them are poured with exactly the same solution as the entire floor.
- Before the solution has completely dried, you need to wait about a month.
- While the floor dries, it is periodically irrigated with water.
It is impossible!
- To step on the cable with a hard sole while filling the floor.
- Coat the surface with a finish to dry completely.
- To allow sharp jumps in temperature during drying or to ventilate the room.
- Arrange a “test” inclusion of the wire until the concrete is completely dry! If you start the current too early, the floors will simply burn out and all efforts and money will be wasted in vain!
Conclusion The installation of underfloor heating in a concrete screed is a complex construction technology. Therefore, if you decide to carry out all the work on your own, do not neglect the many rules and subtleties. And it’s better to print them, and refresh each step in your memory. Good luck!
It so happened that we bought a plot with a house, or rather: with the object of unfinished housing construction, that is, the first floor of the house was built under the floors on strip foundation. There was no floor inside - bare earth and walls around. Naturally, the question arose about the design of the floor.
Since I originally planned to make warm water floors throughout the house, after much deliberation, "digging" on the Internet, I made a concrete floor on the ground floor in all rooms on the ground, and on it is already warm water. Now, going back, I want to describe the process of how these floors were made.
So, first of all, I didn’t have any thoughts about the expected height of the floor device: since the doorways in the walls were already built, it was decided to do the floor in such a way that its finishing layer would be flush with these openings. It was decided to erect the floor according to this scheme:
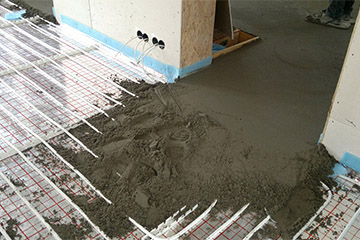
 First, sand was poured over the compacted soil inside the premises, which was spilled with water over the entire surface to make it denser. A layer of crushed stone (about a fraction of 30-50 mm) was poured over a layer of sand. After leveling and compacting this layer, a rough concrete screed was made, approximately 7 cm thick, without reinforcement. A simple plastic film was laid on top of the rough screed and already on it were plates of EPS (extruded polystyrene foam), with a density of 28-35 kg / m3, and a thickness of 50 mm, then “warm floor” pipes were laid on top, on top of which was a reinforcing mesh with a cell 100x100mm and a wire diameter of 4 mm. All this was flooded with a finishing screed with a layer of about 7-10 cm.
That's all. I am pleased with what happened.
Then, on top of this “pie”, the floor covering is laid: tile, porcelain tile, parquet, etc.
What you should pay attention to:
1. Sand filling can be any, but the sand in the screed is certainly river.
2. Crushed stone in the screed - fractions of 5-10 mm (small).
3. When installing a warm floor, you need to make a gap in the level of the final screed between the walls and the floor. All other layers of the "pie" are placed against the walls without a gap.

EPSP - best stuff for warming. It has low thermal conductivity, is dense and able to withstand significant loads.
User comments:
06.10.2012 02:24
In this article, the name does not correspond to the work performed. Preparatory work for the installation of a warm water or electric floor always involves leveling the plane of the room by level, carrying out waterproofing work. In my apartment there was a floor level difference of 45 mm. He also completed the screed and laid a warm (though electric) floor on the finished even plane. Very rarely found perfectly flat rough floors.