How windows are installed in the house of aerated concrete. Jumpers for aerated concrete blocks on a private house - types and characteristics
- Preparatory work
- Main work activity
- Completion and results
Modern construction requires modern solutions. Installing windows in aerated concrete is no longer the process when wooden frames were planted on cement mortar and a whole series of actions had to be performed, but rather quick and easy installation that anyone can do with a basic tool.
Windows can be cut in the finished house with a chainsaw and special corners.
Preparatory work
Tools and materials:
- roulette;
- hammer drill;
- steel sheet;
- nail clipper;
- polyethylene film.
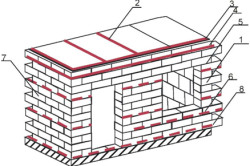
Units for reinforcing a building from aerated concrete blocks: 1 - a wall from aerated concrete blocks; 2 - reinforcement in the joints between the floor slabs; 3 - reinforced concrete belt; 4 - elements of warming armopoyas; 5 - reinforcement of the bearing zones of the jumpers; 6 - reinforcement of the window sill; 7 - reinforcement of blind walls with a large area; 8 - reinforcement of the supporting seam.
Before starting work, you need to find out what material you have to work with:
- Foam block. This option is quite reliable, it has average indicators of mass and thermal conductivity, which is why the walls become thick. It is advisable to use diamond drills for work, as crumbles quite simply. Relatively environmentally friendly, as blowing agents always come on a synthetic basis. Among the advantages are good moisture resistance (all pores are closed) and low price.
- Aerated concrete. Environmentally friendly material, which will cost much more than the previous one. High strength indicators do not interfere with the ability to simply process it, so a conventional hacksaw with a small tooth is used for cutting, and any well-sharpened drill bit for wood or metal is suitable for drilling. The only significant minus of the blocks is the absolute instability to water. Aerated concrete absorbs any moisture like a sponge.
All furniture is preliminarily taken out of the room, and if possible, it is necessary to put a plastic film on the floor so that later you do not have to try to remove dust from all corners. Even high-level professionals raise a lot of dust due to the specifics of the work surface.
If before the installation of the window in the opening there was (or is) obsolete, then it must be dismantled. This can be done with a chisel and hammer, which is very long and tiring, but you can use a puncher with a fixed chisel, so removing an old window will take a matter of minutes.
Provided that the window is installed in aerated concrete at a height above 1 floor, you should always carefully look down, because there may be air conditioning or passers-by. If there is such a possibility, then at the edge of the future slope, you need to fix the steel sheet over the entire width. For fixing, you do not need to screw anything in, but simply squeeze the steel between the walls to a state of complete immobility.
Together with the window, the tide is also dismantled. If it is fixed too securely, you can use a nail clipper or pliers.
The most difficult thing is to remove the windowsill, because it can be not only a board, but also a concrete slab. To extract, you will need to do a basic groove with a puncher so that you can swing it. The board (plate) carefully swings and is gradually removed from the groove. Here you need to be careful, because concrete weighs quite a lot, so at the last jerk it is advisable to grab it from opposite sides, while keeping your feet at a safe distance. Even if you accidentally drop, you shouldn’t hurt your legs.
Dust and debris are swept out with a broom or brush with a long hard pile. For starters, it’s enough to simply sweep everything to the floor, but you can immediately into the trash bag. This stage should be carried out as qualitatively as possible in order to well dedust the surface.
Many craftsmen, for some unknown reason, forget to prime the surface, although it is dust that is the most serious factor that worsens the adhesion between the base and the mounting foam. After the primer has been applied, you need to wait 3-4 hours, and then continue to work.
Back to the table of contents
Main work activity

Tools and materials:
- hammer drill;
- level;
- frame;
- wedges;
- mounting foam;
- anchors;
- roulette;
- windowsill;
- low tide.
Now you can start installing windows in aerated concrete. To do this, you need to take the frame and completely clear it of the film. The casement windows themselves are also cleaned of the film, but not yet attached.
The design is last checked on all sides for cracks and scratches, after which all the work will go in stages:

- A frame is installed in aerated concrete (slotted groove). When installing it, you do not need to try to immediately deliver it directly: first one side hangs in, and then the other. Otherwise, the installation of the window will be blocked by walls.
- It is almost impossible to make a straight groove in advance, so you need to lay special wedges. If you use wooden ones, then you will need to remove them, while it reacts remarkably to plastic aerated concrete. All alignment takes place using the mounting level.
- Now you need to align the width. Here, not a level is used, but roulette. Ideal accuracy is not required, but you should not go beyond a gap of 3 mm. Wedges are fixed from the sides so that movement is impossible.
- Even the best foam block will not provide ideal protection for the room if the window was not installed correctly. The vertical is leveled with a level, after which the wedges are driven in from above.
- Now you can pay attention to the inside of the frame, where there are 2 holes on each side. A base is drilled through these holes, and it is imperative to remember which drills for aerated concrete and foam concrete are needed. The drilling depth is 40 cm, so you need to prepare in advance to go this distance.
- Anchors are driven into the holes. They get clogged while the hat can still potentially interfere with closing the window.
- As a result, the design is perfectly fixed. Now it can be blown with a special mounting foam with small pores. It costs a little more than standard analogues, but the quality will be higher. If wooden wedges were used, then they will need to be removed in the process, while plastic remains forever.
While the foam hardens, you need to take a new window sill and mount it. Before laying the board you need to apply silicone sealant to the surface, which will play the role of glue. For installation, you need a mounting foam, which all the cracks are closed. After the window sill is installed in its place, you need to crush it with something on top (water, metal).
At the very end, the ebb is fixed. To do this, a foam is initially applied to the foam block, which is pressed by the ebb. Fastening to the window is made on aluminum screws.
The house is made of aerated concrete. During construction, an arm belt was not mounted. Beams of floors 1 and the attic floor are supported by a gas block. Cracks appeared in the partitions and over the window of the capital wall. What to do and is it dangerous to leave like that? Dmitry
Hello Dmitry!
The appearance of cracks is a sign of uneven deformation of building structures. Let's see in which cases cracks form in the walls.
- Uneven deformation of the base of the building. They can occur in problematic soils due to various inclusions in the base of the building (construction waste at one of the corners of the building, manifestation of subsidence properties under the condition of leakage of water-bearing communications, etc.). Another possible reason is the uneven frost heave of the soil, which especially often affects private houses of an asymmetric shape with basements without undermining and insulation.
- Not enough load bearing capacity individual structures, incorrect design decisions, violation of the rules (technology) of the construction of the structure.
- Foundation washout.
- Insufficient foundation depth (above the gas treatment plant) with heaving soils.
- Incorrect foundation type selected. Soil studies have not been conducted. Weak bearing capacity of soils (quicksand, peat).
- Lack or defective waterproofing between the walls and the foundation.
- If the walls are covered with multiple small cracks - how to drink give they are plastered. Moreover, the plaster was done too quickly, before the blocks dried out, and with a low vapor permeability material.
The result of rushing and applying inappropriate plaster. The crude block was quickly laid and quickly plastered with a low vapor permeability mixture.
Without determining the causes of cracks and based on the amount of information provided, it is not possible to formulate a list of necessary measures. You should call in the place of a specialist (foreman or design engineer from the design organization) with experience in strengthening structures. Provide him with the maximum information, namely:
- Compressive strength (in use - the strength grade) of aerated concrete blocks, on what composition (solution) they fit. The pitch and dimensions of the floor beams, rafters, from which the jumpers are made above the door and window openings, on which the deformed partitions stand (on their own foundation or simply on the floor).
- The construction of floors, floors and roofs.
- Report on engineering and geological surveys.
- It is necessary to examine on-site the effectiveness of water disposal from the building (integrity, angle of inclination and width of the blind area).
- If the house is plastered, then with what mixture and after what time after the erection of the walls.
- What time has passed from the acquisition of blocks to the installation of walls. In what conditions were they stored.
Based on these data and based on the results of an on-site examination, a specialist should create a list of measures to strengthen structures. Unfortunately, there is no information about the jumpers over the openings. The presence or absence of home decoration inside / outside can have a significant impact.
The general principle of reinforcing unreinforced walls from aerated concrete blocks with a reliable foundation and access to the wall surfaces is as follows:
We emphasize once again - the above list is nothing more than an indicative recommendation. It is impossible to make a final decision without an on-site inspection of the building. Moreover, some types of reinforcement work may require the installation of temporary supports for floors, etc. It is dangerous to independently carry out reinforcement work without consulting a specialist who has directly examined your home.
If the house has stood for quite a long time (at least a year), and only then cracks appeared, moreover, small ones, you can try to limit yourself to installing gypsum beacons on the cracks themselves. In the first month they need to be examined once a week, then once a month for a year. If cracks appear on the lighthouses, then deformations continue and a specialist call cannot be avoided.

Cracked lighthouse - a sign of increasing deformations
Installation of doors in a house with walls of aerated concrete blocks (of cellular concrete blocks).
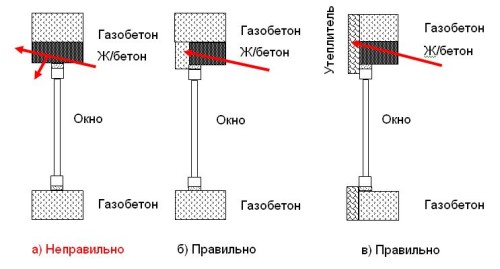
The user manuals of American companies of aerated concrete manufacturers Contec, E-crete, Delta indicate that, if necessary, doors can be installed in relatively small openings (up to 91 cm) directly on aerated concrete. The door frame is secured in these cases with cellular concrete anchors (see fig. 1, option D)
Why come up with more complex assemblies for attaching door frames to aerated concrete walls? Aerated concrete is a fairly fragile material. When installing heavy steel doors, doors in large openings (openings of more than 91 cm, garage doors, etc.), doors in commercial premises with high traffic of visitors, aerated concrete in places of direct fastening of the door frame may experience significant shock loads (shear, pulling) . To prevent the gradual coloring of the porous structure of aerated concrete (cellular concrete) under a very small area of \u200b\u200bthe anchor, it is recommended that the door frames be installed in such a way as to distribute the load from opening and closing the doors to a much larger area. When installing doors in individual houses made of aerated concrete, it is possible to use intermediate reliably fixed wooden frames or embedded bars. Wooden frames can be made of dry boards, glued wood (furniture board), timber or plywood. The tree must be pre-saturated with indelible antiseptics or, even better, impregnated with antiseptics under pressure. Heat-treated wood can be used since it is much less susceptible to rot. When using ordinary dry wood, preference should be given to larch - as one of the most rotting wood species available for a reasonable price.
In simpler cases, the installation of interior doors uses either a mortar beam buried in aerated concrete (Figure 1, Option A)or overhead wood panels according to the thickness of the wall in the opening (Figure 1, Option B). Wood is installed on a layer of glue for aerated concrete or tile glue to prevent the formation of voids between the wall and the wooden panel. The tree is fixed to the wall using anchors for aerated concrete and, if necessary, to prevent articulated swaying - using self-tapping screws with a length of at least 7.5 cm (shear screws 4.5–10 cm long in aerated concrete can withstand the load applied perpendicular to their axis from 30 to 150 kgf. The value of pulling loads is 50% of the above values). The door frames are attached to the wooden frame of the doorways with self-tapping screws.
Wood panels can be solid, covering the entire height and width of the doorway (Fig. No. 2, option A)or made of pieces of wood installed at intervals of no more than 61 cm in the centers (Fig. No. 2, option B). In the second version of the installation, after installation and fixing to the wooden planks of the door frame, the free spaces between the wall and the door frame are foamed with a mounting foam with a small degree of expansion. This allows the door frame to be more rigidly fixed due to the oppositely directed holding forces of the self-tapping screws and the bursting forces of the mounting foam.
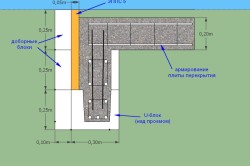
For doors in large apertures (over 91 cm or garage doors), a stronger fastening of the wooden frame-tying of the aperture using adhesive anchors is recommended (Fig. No. 1, option B). In this case, threaded studs or anchors are monolithic into the drill hole with a depth of at least 15 cm, aerated concrete blocks of doorways with a pitch of not more than 61 cm using epoxy resin. The use of glue for aerated concrete is not recommended, since due to its fluidity it is impossible to achieve uniform filling of the horizontal drilling hole. It is possible to use glue for aerated concrete or mortar when mounting an anchor or stud during the laying of a wall of aerated concrete. At the same time, a groove open at the top is cut out in the aerated concrete block, an anchor or a stud is laid, and the cavity is filled with glue or mortar. To the monolithic stud on the layer of glue for aerated concrete or tile glue, a wooden trim of the aperture is attached with the washer and nut. If necessary, the strapping of the opening is additionally fixed with screws. Either garage hinges or a door frame are attached to the trim.
Figure number 1. Mounting units of door frames to the walls of aerated concrete (cellular concrete)
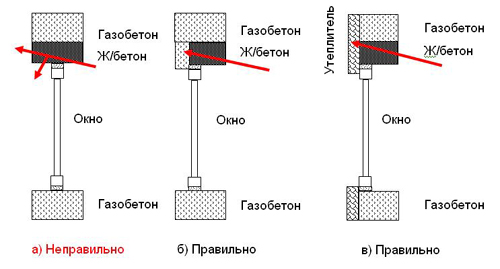
HidePrivate houses can be made of various materials: most often it is expanded clay or aerated concrete block, brick, other modern materials. Each has its own characteristics, which is why when it comes to installing windows and doors, you need to know them. This article will discuss how to install a window in a house made of aerated concrete.
Approach to work
There are several technologies for fastening, all of them can be applicable, it all depends on the individual preferences of the builder, the ability to use certain materials.
One of the most common installation methods is application. This material helps to quickly fix the window, make the opening airtight, the use of additional fasteners is not required. Installation of PVC windows in aerated concrete is also possible in a more traditional way. For this, dowels and other fasteners are used. Both approaches have a place to be, each of them has its own advantages and disadvantages, so each master will choose to his taste.
When should I start installing windows?
The manufacturer of cellular concrete indicates that the material shrinks no more than 0.3 mm per meter, that is, installation can begin already after the box of the building is ready. The walls will not give strong shrinkage and will not exert pressure on the frame, do not confuse this data with the general shrinkage of the building.
In a house made of aerated concrete, it is better to insert after the roof is erected. Otherwise, there is a big risk of breaking a double-glazed window during roofing.
What causes wall deformation?
Strong shrinkage is caused not by the material of the walls, but by the incorrect distribution of pressure on the soil. If the soil rises or falls, changes its structure due to the fact that it contains a large amount of groundwater, there is a risk of shrinkage of the building. It can happen both immediately and several years after the building was erected.
You can protect the building from this by properly equipping the foundation. If you are building on unstable soil, the base of the building should be well reinforced, have waterproofing and gutters that divert water to the side. Only competent preparation of the foundation can protect the building from moisture and shrinkage.
Practical installation approach
You can install it in the foam block at the optimum time three months after the walls were erected. During this time, the material will give maximum shrinkage and will no longer be deformed. The foundation will also gain sufficient strength, which will ensure the overall stability of the structure.
Some builders argue that finishing the building should not begin earlier than a year after the erection of the walls, as this is due to the shrinkage of the building and the movement of the soil. However, it is worth noting that the soil moves continuously, if the foundation was laid poorly, then you will know about this much earlier. On a reliable basis, finishing work can be done much earlier.
Thus, installation in a house of aerated concrete is possible already 2-3 months after the foundation was poured and the walls were raised.
How to make the installation of windows the highest quality?
Installing windows in the foam block is usually straightforward. Installation is carried out in the same way as when working with any other material. It is not easy to ensure only the tightness of the connection, to make the joints between the wall and the frame durable, impervious to moisture and cold. In order to achieve a high-quality connection, the following requirements must be observed:
- All seams must be sealed.
- Connection areas must be protected from cold air: this will ensure minimal heat loss.
- The contact between the wall and the window must be protected from mechanical damage.
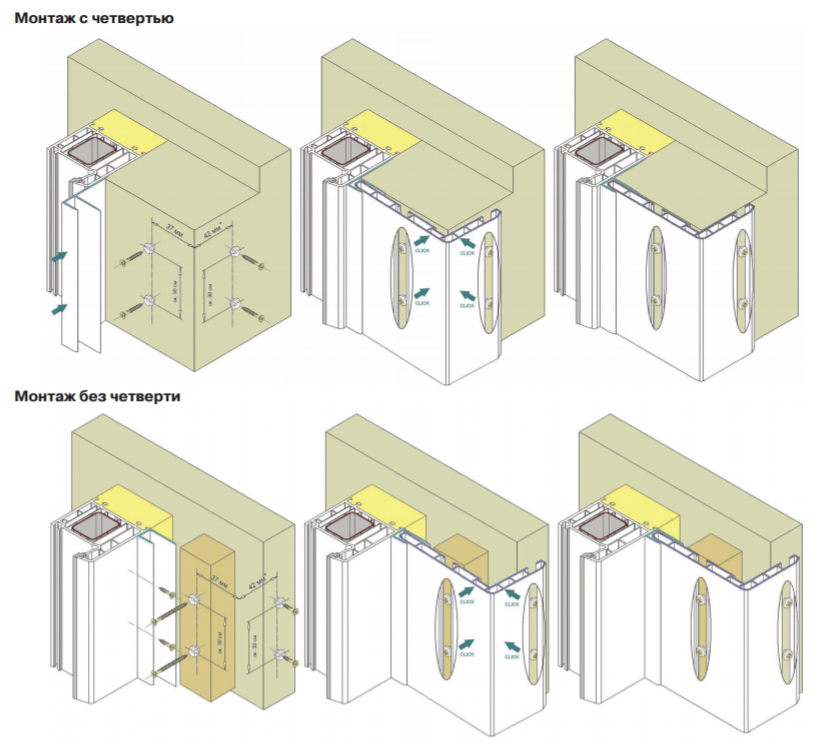
How to insert a window hermetically into a foam block? Blocks have special quarters: these are the protrusions that are carved into them. In order to improve the quality of the seam, it is necessary to use a frost-resistant sealant, mounting foam or tape that can expand.
The easiest way to solve the problem is in the contact zone between the wall and the frame. For this, it is most convenient to use construction foam. It itself will expand, occupying all the voids, and ensure the tightness of the connection. In order for the fastening to become mechanically strong, it is recommended to use special plates and dowels. The joints can be protected from external influences using platbands. They not only protect joints from wind and moisture, but also give the windows a complete decorative look.

Methods of fixing the frame in the opening
Installation of plastic windows in the house of foam blocks can occur as follows:
- removed, after that a hole for a long dowel is drilled in the profile of the plastic window, with which the frame will be attached to the wall. After that, the double-glazed window is returned to the place.
- If you do not want to remove the glazing, you can install anchor plates and attach the frame to them using self-tapping screws. The window, fixed in the required position, is attached with the help of these plates to the wall of the dowel with nails. The disadvantage of this fastening is the dustiness of the work, the expenditure of great physical effort, in addition, it requires a decorative masking of the fastening method. Installing the windows in the foam block in this way is inferior to the mounting on the mounting foam in that in fixing the frame you cannot change its position, that is, from the very beginning it is important to establish exactly how smoothly all the mounts fit.
- If you intend to use mounting foam, the window is first placed on special plates, the position of which can be changed.
Installation of windows in the house of aerated concrete is not much different from the standard installation of windows in the house of any other material. The main thing is to choose the right method and install the frame smoothly, otherwise the wings will not open correctly or problems will arise when opening.
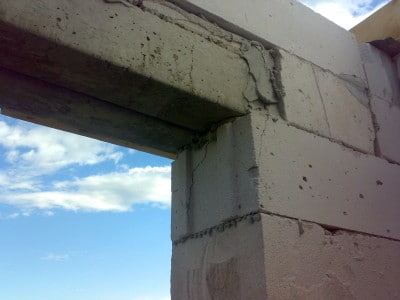
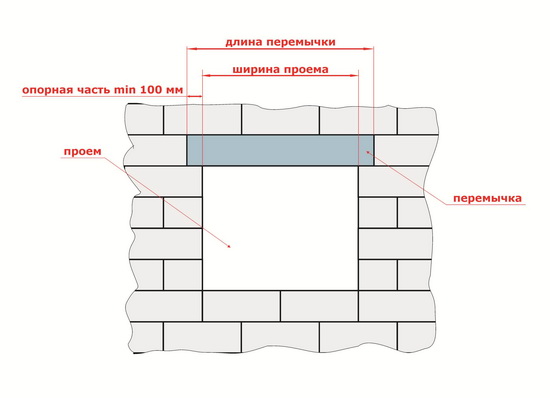
The most common version of jumpers - those that are made of reinforced aerated concrete. This is the most common way. Ready-made jumpers for aerated concrete blocks are an independent supporting part, and it is used to close openings, and their width should be no more than 175 centimeters.
They are reinforced with, which means that it is not necessary to insulate the structure. Their installation consists in the fact that on a thin layer of glue jumpers are placed symmetrically to the blocked opening. It is worth noting that the minimum support area should be 25-30 cm, which depends on the width of the openings.
Installing pre-prepared jumpers has one important advantage - the rapid creation of a uniform, even and smooth wall surface, and this will facilitate work on the future. But there is a drawback - high cost.
Monolithic concrete lintels
Inexpensive and reliable method used in construction. Its essence is that the lintels are concreted and reinforced, as well as insulated in a wooden formwork, which is located above the opening. After the blocks are laid, it is required to build the wooden formwork itself, which is made from OSB, board or timber. Outside, inside, insert a heater 100 mm thick.
It should be spread from the inside with a solution of glue so that it clings to concrete more tightly. And inside the formwork, a frame made of reinforcement is installed.
The next step is to fill the formwork with concrete at a level that should be equal to the height of the block, which means 20 cm. After it hardens, the formwork needs to be removed, after which a bridge of reinforced concrete is formed. Do not forget that it needs to be plastered and reinforced using an alkali-resistant facade mesh.
This option is much cheaper, but if you use the corners, then all this will be more expensive. But in the end we get a reinforced jumper, which certainly does not crack.
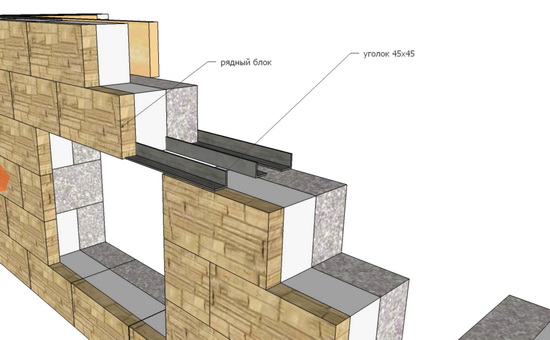
Jumpers in combination with metal corners
Jumpers using metal corners is another way to get them. Its essence lies in the laying of blocks of aerated concrete on jumper corners of metal. There is one important point - the corner must be cut into blocks, leaving a third of the width of the edge. Do not place a corner on the inside or outside of the unit.
It is worth remembering that the thickness of the corners directly depends on the width of the span of the openings. If the width of the opening is not more than 1.2 meters, then you should use a corner at 50, and if the width reaches two meters, then the corner should be at 75.
Please note that the corners have a bearing capacity, which is enough to withstand just one row of blocks of aerated concrete laid on glue. Blocks should be laid tightly, and the ends of all vertical joints should be filled with a thin layer of glue.
When the glue hardens, the lintel will look like a monolithic aerated concrete having a strength comparable to an aerated concrete block. When the windows have already been made, the part of the corner located on the outside should be insulated with mineral wool and polystyrene, and then it must be plastered.
This method has one drawback - if the corners are incorrectly inserted, and the insulation of the outside will also be incorrect, condensation will appear on the inside of the room on the slopes.

Jumper made of U-blocks
This option involves the manufacture of jumpers for aerated concrete blocks directly at the construction site using tray blocks or, in other words, U-shaped blocks. They are laid on a previously prepared base for installation. It is made from a bar or board.
The base for the lintel must be very strong, because it should not bend when pouring concrete into a finished structure. In order to prevent this from happening, the boards must be supported.
On such a platform, the blocks must be laid tightly, and the vertical seams between them must be filled with a thin layer of glue. Further, inside each block, or rather, closer to the outside, it is necessary to lay the thermal insulation represented by mineral wool or a foam sheet, because the thickness of the chute block is 6 cm, and it is small for warming a concrete monolith.
Now, a reinforcement frame consisting of 4 rods, which are fastened in cross section to each other, is installed inside the jumper. The step of the cell is 10-15 cm. Note that for the jumper you need to use bar reinforcement with a diameter of 1.2 cm. For fastening the frame, a knitting wire is required, and for ring strapping, a wire with a diameter of 6 mm is taken.
At the next step, concrete is poured into the cavity of the aerated concrete lintel, which is compacted and leveled. Its brand must be at least M200, i.e. ordinary foundation concrete.
The use of U-type blocks ideally simplifies the jumper, and the created floors have excellent load-bearing capacity. The only and most important drawback is the high price.
![]()
More and more firmly strengthen their position in the construction industry of aerated concrete houses. They look quite attractive - the color of the blocks is almost perfectly white, and the seams ...
Arbolit is a building material in the form of hollow blocks, used for the construction of buildings for any purpose: country cottages, cottages, garages, etc. From arbolit, you can erect ...
The development of gas silicate began more than 100 years ago - the first attempts to obtain this material were carried out at the beginning of the last century. The manufacturing technology of the material was improved by the Swedish architect ...