The dew point in the brick wall is what threatens. How to determine the dew point
I cordially welcome you, dear readers!
Today I want to make out one urgent question that many readers often ask on the blog. But the essence is this: what is the dew point and why should it be taken into account when warming an object? So let's go ...
Would you like it to be warm in a welcoming home? In this case, you need to insulate it. To do this, you should choose and buy high-quality raw materials intended for thermal insulation of the structure and sheathe the surface of the home. It would seem that the process is simple. But it is not so.
Getting started, it is necessary to take into account a lot of technical conditions so that the walls of the structure do not damp inside and do not freeze outside. One of them is to determine the dew point to exclude the possibility of condensation on surfaces in the room, as it promotes the multiplication and spread of certain pathogenic microorganisms. Therefore, we must be extremely responsible in determining the value of an indicator, or rather, in calculating it.
Have you decided to insulate yourself? This means that you simply must find out what the dew point in construction is.
The concept
So, the dew point is a temperature indicator at which the vapor in the air space is converted into water (condensation is created). As the saying goes: physics is 6th grade.

Remember a simple example - all the instructions for household electrical equipment say: before turning on the device, brought from the cold to a warm room, it takes some time before turning it on. This time is necessary so that condensate formed on electrical circuits and circuit boards, evaporated and did not cause a short circuit.
Accommodation
It directly depends on the humidity and temperature in the room and beyond, that is, on the street. Since the indicators can not boast of constancy, then the dew point is a very capricious lady.
- If the room has + 20 ° C and 60% humidity, then the plane of the wall with a surface temperature of + 12 ° C will already “decorate” droplets of water.
- If in the room + 20 ° C and 40%, then condensation will appear on the plane with + 6 ° C.
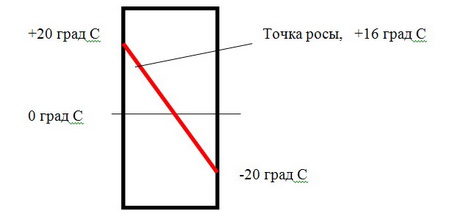
- If in the room + 20 ° С and 80%, then the wall plane at + 16 ° С will “decorate” droplets of liquid.
In addition, let's look at how the placement of an extremely important indicator in the wall changes:
- without heat-insulating material;
- with heat-insulating material inside;
- with insulation material outside.
The wall is not insulated
If there is no insulation near the wall, then the location of the dew point can be as follows:
- closer to the outer surface of the wall - the structure is dry;
- on the inner plane - the structure is wet in frosty times;
- approximately the average location in the wall plane - the internal structure is dry, but may become wet with a sharp temperature difference.
External insulation

If the insulating material is outside (from the street), then the position options are as follows:
- inside heat-insulating raw materials (we take into account the type of material, climatic zone, the required thickness) - the structure will be dry inside;
- in the case when the thermal insulation has a smaller thickness than it should, all three methods applicable to a non-insulated surface (previously discussed) are appropriate.
Wall insulated internally

The wall insulated from the inside is “fenced” from the heat that reigns indoors. Here the dew point shifts toward the inside of the wall. As a result, the temperature value under the thermal insulation material decreases. That is, "our heroine" occupies a location in which the occurrence of condensate, alas, is almost inevitable.
- in the thickness of the wall - the structure is dry, but it can get wet with a sharp temperature difference (it shifts to the inner surface - to the room);
- on the inner plane of the wall under the insulating material - the structure may be wet for the entire harsh period;
- inside heat-insulating raw materials - the wall and insulation can be wet all winter.
How to properly insulate the house: inside or outside?
Are you going to warm your cozy "nest"? Want to sheathe with raw materials intended? What is the problem? Concerned about the allegations of experts that this venture must be abandoned? Of course, it is desirable to insulate the walls outside. Why?
Yes, because the dew point is shifting to the street. As a result, condensation does not form in the thickness of the wall. The same can be said about the insulation of the ceiling and roof. When warming the attic, it is also worth considering the accumulation of water vapor in the roofing pie.
What is the conclusion?
Still want to insulate the walls from the inside? Okay. So, you need to find out when this can be done, and when - it is strictly forbidden. And the conclusions are as follows:
- if in winter period the wall of the house is stably dry - you can insulate from the inside;
- the wall is usually dry, but with sharp temperature changes it can become wet - it is advisable not to risk it and not to make insulation;
- if the wall is constantly wet - insulation should be done only from the outside, from the inside - it is impossible.
Conditions to consider
Why is it possible for some people to insulate the walls from the inside, but not for others? What kind of discrimination? The fact is that there are a number of factors that allow or prohibit the internal wall cladding.
So, for example, you need to build on:
- mode of residence in the house;
- operability of the ventilation system;
- operability of the building heating system;
- insulation qualities of all elements except walls (ceilings, floors, windows);
- material and, accordingly, wall thickness;
- temperature conditions in the building and outside the window;
- moisture percentage in the building and on the street;
- climate and location of the house.
Based on the above factors, the following conclusion suggests itself. Insulation from the inside is likely if:
- the mode of living in the room is permanent;
- the ventilation system operates in accordance with all the rules;
- the heating system is made correctly and is functioning properly;
- all structures are insulated and fully cope with the task;
- the wall to be insulated is thick;
- the region of residence is relatively warm.
In principle, before you start warming from the inside, you should analyze all the "incoming data", after which you can make a decision. But, as practice shows, out of 100 people who want to sheathe the walls from the inside, only 10 were able to carry out insulation without deplorable consequences. In the other 90 cases, the lining must be performed externally.
Deplorable consequences

Insulated the walls inside, when it was impossible? My sincere congratulations - You are truly a Russian person who first does and then thinks. Hope it blows? No! Alas, now you have to face the following problems:
- wet walls;
- moist heat-insulating material;
- a musty aroma;
- dampness;
- fungus;
- rot;
- peeling of facing raw materials;
- destruction of structures - elements in a wooden house fall apart very quickly;
As you can see, the consequences are very serious. Therefore, when insulating the walls, one should not neglect the advice of specialists and turn on the "Russian" option. True, in the event that you do not want saturated steam to turn into water, which will happily settle on all kinds of surfaces in the home.
Dew point calculation
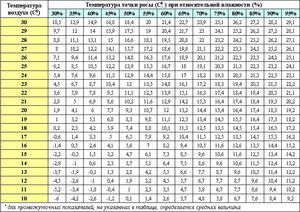
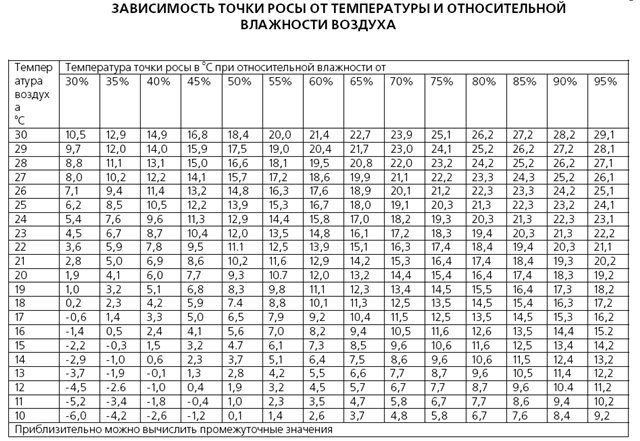
So, determining the dew point is an incredibly important job, although in practice it is never done. Of course, the temperature indicator cannot be calculated by eye. To do this, you need to arm yourself with some tools and a special table:

Devices
Need to stock up:
- tape measure;
- conventional thermometer;
- non-contact thermometer - pyrometer;
- hygrometer.
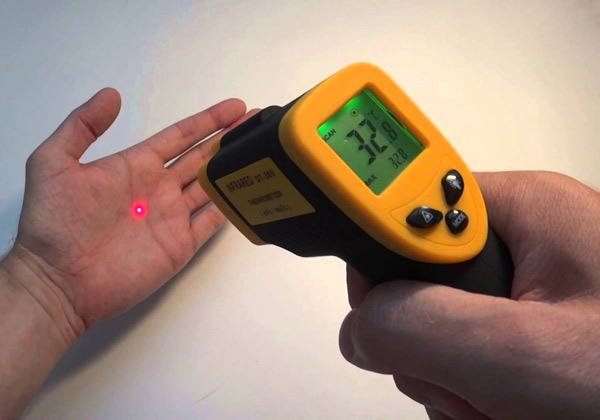 Pyrometer
  Thermometer and hygrometer
Sequencing
The process consists of the following steps:
- measured 60 cm from the floor with a tape measure;
- measured temperature in the measured area;
- humidity is measured in the measured area;
- the obtained indicator is in the above plate;
- the wall surface temperature is measured with a pyrometer;
- two indicators are compared;
- the result is determined: if the surface temperature differs from the dew point by more than 4 degrees, then the room has high humidity. In view of what, it is necessary to carry out insulation under the supervision of a specialist.
By the way, not only when warming, it is necessary to calculate the dew point. When installing windows, you also need to find out the temperature indicator so that they do not “cry”.
Complicated? Of course, there is nothing supernatural.
Remember, do not neglect such an important indicator, since there is nothing easier for water vapor than to destroy the structure and damage health. Well, not specifically, to him (a couple), but to what he is reborn into.
Joke on the topic : It's a shame that it turns out: spring, summer, autumn - once a year, and winter two times. Once at the beginning of the year, a second time at the end.
That's all, dear friends! Do not judge strictly: as I could - and explained. I hope the article helps not to do stupid things to a “truly Russian person”.
Home - comfort and warmth, and you - good health and wonderful mood! See you!
Quote of wisdom: Insane is the one who, not knowing how to control himself, wants to control others (Sir Publius).
One of the important aspects of building construction is the correct determination of the dew point in construction for the device to effectively protect wall, roofing and foundation structures from abnormal heat losses. During the thermal calculation of the building, the size and location of the dew point is determined, the parameters of which are the basis for choosing the design of the external horizontal and vertical fences, the material, its thickness and the position of the insulation layer.
Dew point
Dew point called temperaturein which moisture or condensation appears from the airspace, which were previously in a state of steam. By definition, the dew point in a house is a conditional boundary for the transition of low outdoor air temperature to warm indoor air. The dew point in the house depends on the conditions:
- material of enclosing structures and its technical characteristics;
- wall thickness;
- indoor or outdoor placement of insulation and its properties.
Dew point does not have a permanent location in the thickness of the wall, it can move to the outer or inner edge depending on the change in temperature in the street or the presence of heating in the house. If the heating stably keeps a constant temperature within standard limits, but it gets colder outside, then the point will be shifted thicker closer to the inner edge.
 By the amount dew point indicator not only the temperature inside and outside will affect, but also the humidity. There is a direct correlation between humidity and the temperature index of the dew point at which drops appear on the object. With an increase in relative humidity, the condensation temperature rises. In a completely wet room, in which the humidity is 100%, condensation will appear on all objects in the room and warmed to room temperature.
Building Standards for Dew Point
If public construction underway, then specialists have the opportunity to take into account the dew point indicators depending on the approved building codes and rules, the design of insulation layers is regulated by special documents SP 23 - 101 - 04 and SNiP 23-02, the information in them determines the dew point value and the criteria for its location.
SNiP 23–02 describes that the thermal protection of buildings is based on three mutually working standards, which must be taken into account:
- resistance to heat transmission of individual structures and materials used for thermal protection of the house;
- the values \u200b\u200bof the temperature difference between the outer and inner spaces;
- adopted specific consumption of heating energy, allowing you to select the required technical parameters of materials for walls and floors, taking into account ventilation parameters.
Requirements for materials and structures are considered fulfilled if, when designing a project, a combination of the first two standards or the last two is observed.
The effect of dew point on the formation of moisture inside the walls
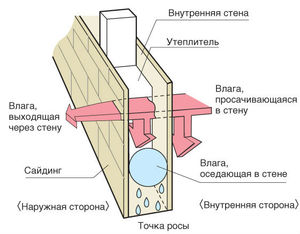
 That condensate formed on the surface walls or other objects can be seen with the naked eye, but moisture sometimes appears in the thickness of the wall. If the dew point is too close to the surface, which occurs when some weather factors coincide, then condensation will necessarily occur on the wall area. The absence of an insulating layer on the outside almost always contributes to a shift in the boundary of condensation formation inside the room.
Appearance moisture on the wall surface and structures leads to their gradual destruction. In such an environment, microbes and molds actively multiply and live, spores of which are flooded with airspace. So that these negative consequences do not interfere with the operation of the enclosing structures, it is necessary to calculate the dew point, then select the thickness of the walls and floors in accordance with this parameter.
If the temperature of the wall surface inside the room or window structures is lower than the dew point calculated in the calculation, then drops will necessarily appear on the fences, especially in cold weather when the temperature drops to frosty indicators.
Determining the position of a point in the wall
To make normal heat protection at home, you need to not only calculate the temperature at which condensation will take place, but also determine the location of the border in the wall. To facilitate the calculations, three main options for the construction of walls made of materials with an insulating layer are identified:
The house is built of stone, brick, concrete, wood, but the external or internal insulation has not been completed, so the border condensation located closer to the inner surface of the walls. With a cold snap in the street, the dew point will shift to the inner area and will gradually appear inside the room. In this case, the walls of the house will be constantly wet from moisture. For wooden walls, this situation is not so critical, because wood is a natural material with low thermal conductivity and good vapor permeability. Properly calculated thickness of wooden walls absolutely does not require the creation of additional insulation.
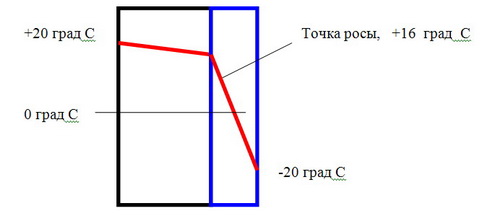
The second option is construction of a building, in which an additional layer of insulation is located outside. If the calculations are carried out correctly, then the dew point is located in the middle of the insulation, even a decrease in the temperature of the outside air will not lead to such a significant shift that the boundary of the formation of condensate will move to the inner surface of the wall.
 In the third case option providedwhen the heater is mounted indoors. This leads to the fact that the boundary of the formation of condensate is shifted to the inner surface, this in cold weather will transfer the dew point to the inner surface of the wall in the room. This type of insulation is very rarely performed, in cases where there is no other option. The implementation of the inner layer of insulation is accompanied by additional measures to ensure a ventilated space between the insulation and the finishing layer, the device ventilation gaps, the organization of the removal of water vapor, additional conditioning.
The influence of vapor permeability of the material on the position of the dew point
When developing a project construction, pay attention to the ability of thermal insulation materials to pass air. The vapor permeability depends on how much water vapor can pass through the pores of the material in a given unit of time. Many familiar construction Materialsused for the construction of walls and ceilings (brick, concrete, wood, etc.), have pores inside that allow air to pass through. Therefore, designers choose materials based on certain principles:
- the material must have good vapor permeability to allow moisture to freely escape if it formed inside the wall structure in the form of condensate;
- the ability to pass wet vapors increases from the inner surface to the outer;
- thermal conductivity of the insulation on the inner surface is accepted as optimal and decreases to the outer layer.
 All modern facilities are built and insulated by such principles. An exception is the types of insulation, which absolutely do not allow moisture and air. They include polystyrene, polystyrene foam, foam gas concrete and others. Therefore, when developing a project, the thickness of the insulation layer is calculated so that condensate forms inside the insulation. The location of the dew point plays a paramount role in the insulation of walls and ceilings of buildings. It must be fixed in the thickness of the structure so that it does not move towards the inner surface.
If you do not take into account the dew point
In construction neglect and rules for the installation of structures can lead to undesirable consequences, for metal, brick, concrete, wood and other materials, the service life is reduced. Unacceptable condensation formation on the area of \u200b\u200bpolymer dense materials when installed as a heater, this will lead to the following problems:
- the surface of the material swells;
- detachment of significant areas of finishing materials is observed;
- on surfaces with a temperature below the dew point, condensation necessarily occurs;
- harmful fungus and mold develop on the walls, leading to human disease;
- bearing structures earlier fail, which leads to premature destruction.
Dew point calculation
Make calculation at visual inspection walls will not succeed, since this requires a special table. It defines the parameters of temperature, humidity and other information, based on which everyone can determine the approximate location of the dew point. But the table is intended for averaged data, and for a more accurate calculation, special formulas are used using reliable information for each structure.
Many sites practice calculation of dew point location online, where each developer can enter specific information about their own property to obtain settlement data. The concept of the dew point is individual for each building, so you need to calculate it every time in a new way. At the same time take into account:
- climate in the region of construction;
- wind frequency and the presence of gusts in certain weather conditions;
- wall thickness according to the project or in kind;
- wall materials used in construction:
- mode of operation of the premises (permanent or temporary);
- climate in the adjacent space with the examined wall (the presence of a canopy or temporary structure).
 Moisture in some insignificant limits always contained in any material, but the main concern of designers and builders is to prevent an increase in the amount of liquid and the appearance of unplanned condensate. If the humidity rises inside the room, then this indicates an improperly selected insulation material or poor-quality installation on walls or floors.
When determining the dew point in the fences of a private house, you should decide on the parameters:
- view and technical characteristics insulation, its thickness and installation method;
- the choice of the heating system in the building and the type of ventilation;
- the quality of insulation of the remaining structural elements of the house;
- temperature and humidity inside and outside the room;
- operational characteristics in the next room or room.
Sometimes in the winter during the onset long frosty periods the dew point shifts toward the interior of the house. If the walls are made of dense materials with a low coefficient of vapor permeability, high resistance to heat transfer, then there is no danger. But in the case of the use of porous materials with a high permeability threshold as a wall material, especially when combined with such heat insulation materials, one should strive to ensure that the condensate boundary moves inward only for a short period of time.
For fences from such materials a layer of insulation is required approximately two times thicker than usual. Effective removal of moisture is carried out when organizing a ventilated space between the finish and the insulation layer.
The possibility of insulation from the inside
It becomes clear that the same options insulation of various buildings does not exist, some developers practice installing a layer inside the room. This is the worst option, but in some individual cases, such insulation can be considered justified if:
If we summarize all of the above, then conclusions follow such that the warmer the calculated climate in the construction region and the wall material is dense with sufficient thickness, then internal insulation can be done. But to make the right decision, all input calculation data should be considered.
The current rise in energy prices of many makes us think about the issue of their economical consumption. And the first, and at the same time the most effective, way to reduce energy costs is to reduce heat loss. And one way to minimize heat loss is to wall insulation building.
No sooner said than done. Are you not afraid to make a mistake? Do you know for sure that you have found the right approach to the issue of wall insulation? After all, improperly insulated walls can lead to the speedy destruction of the building.
Dew point
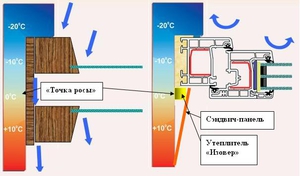
Responsible for wall insulation dew point. It is necessary to deal with it first of all. Imagine for a moment the wall of a house. On the one hand, it warms up - the temperature is positive on its surface, and on the other - severe frosts are bright and the temperature on the outer surface is negative. As frost moves on one side and heat on the other deep into the wall, the temperature gradually equalizes and at one point reaches zero. It is the position of this zero that determines the location of the dew point. This is where condensation forms.
 What do you think happens to the dew point when the temperature rises or falls (on either side of the wall)? It is not necessary to explain for a long time, it is shifting. With an increasing negative temperature, the dew point moves closer to the inside of the house, and the moisture accumulated in the previous place of its position freezes. As you know, when freezing, the volume of liquid increases, and this leads to the destruction of the walls of the building. About the same thing happens with an increase in street temperature, only in the reverse order.
It is on the basis of these considerations that wall insulation cannot be performed from the inside of the room. Having taken such a rash step, you transfer the dew point either to the insulation or to the space between the wall and the insulation. As a result, the constant freezing of the walls of the building in the winter is guaranteed. And as a result, the early destruction of the walls of the building.
 Roughly the same thing happens when creating an insulating “sandwich”, which has the following design: wall - insulation - wall. Although in this case the dew point is located in the region of the insulation, it can shift towards the outside of the “sandwich”. We get complete freezing of the outer wall in the winter and a great habitat for fungus and mold inside the wall the rest of the year. Over time, the fungus can migrate to the inner space. Believe me, he will not be long in coming.
The situation fundamentally changes when creating an outer insulation layer. Firstly, we get a wall completely warmed up by internal heat, and secondly, the dew point displaced outside the walls of the structure. From this moment, everything is in the “hands” of the insulation used, its thickness and vapor permeability.
 Let's start with vapor permeability. What happens if the moisture coming from inside the room and gathering in the wall blocks all the exits? She simply will have no choice but to accumulate inside the walls. Periodic ventilation and good heating are unlikely to prevent this process completely. So, if you want to have constantly increased humidity in the room, please use vapor-proof materials for wall insulation. In principle, this is not so scary. Moisture should and is simply obliged to go outside the room, its excess does not have a place in our walls. And if you decide to take such a step, take care of good ventilation.
Wall insulation: materials
Based on these considerations, when warming walls, it is better to give preference to mineral wool or peat slabs. True, there is one “but” - with increasing humidity in the insulation itself, it loses its heat-insulating properties. For this reason, such heaters require additional protection.
Firstly, they must be placed, so to speak, in a waterproof environment, sandwiched on all sides by a special cellophane film (vapor barrier and wind barrier). Secondly, the appearance of the building requires specific refinement. Typically, buildings insulated with such material are additionally lined with some frame facades.
Now a few words about the most common material used for wall insulation. Such a insulation as polystyrene or expanded polystyrene is widespread due to its low cost. When installing such thermal insulation, you need to be very careful. Here it is all about the thickness of the insulation. The insufficient thickness of the foam or polystyrene shifts the dew point either to the surface of the outer part of the wall or to the intermediate space. And this is a guaranteed fungus, which over time is able to migrate into the room.
 The question remains how to correctly calculate the thickness of the insulation so that the dew point is in the middle of it? Here two main factors are taken into account: directly the properties of the insulation itself and the material of the walls. It must be remembered that the denser the wall material, the faster it transfers the temperature. For example, concrete has a high ability to conduct heat, so concrete walls warm up and freeze faster, and to insulate them you need a thicker layer of insulation. Porous cinder block gives off heat more slowly, respectively, and the insulation can be installed thinner. Along with the wall material, its thickness is also taken into account - the pattern is exactly the same as with the material used.
Styrofoam and polystyrene also require additional protection. For example, the foam, when exposed to sunlight, turns yellow and eventually crumbles into separate balls. You can use almost any facade system. Starting with wireframes (siding, eco-bond) and ending with all kinds - here, as they say, it's a business. The main thing to remember is that all plaster masses, including even warm plaster, are applied over a fixed metal mesh. Otherwise, it will disappear.
As you can see, wall insulation with your own hands is not such a difficult process, if you approach it wisely. But if you are at least a little doubt of your abilities, it is better to entrust the insulation of the walls to specialists, so you will avoid many possible problems.
We wish that in the most severe frosts in your home it will always be warm and cozy!
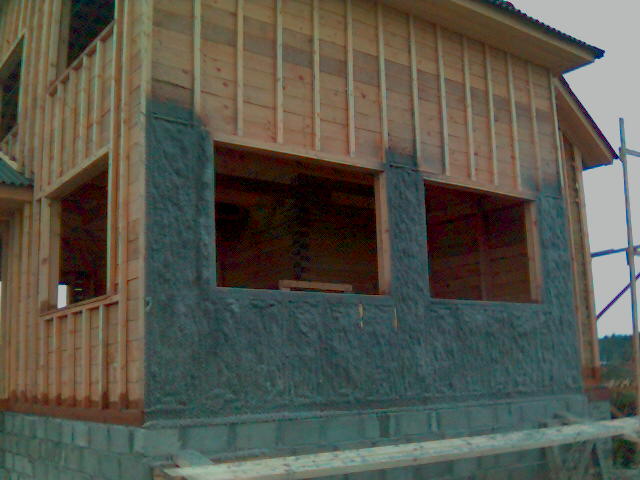
He built the walls, brought the house under the roof and put the windows - the box is ready. It is at this stage that the “constructive” construction period ends and the installation of equipment begins, the walls of the house are insulated and its further preparation for finishing.
And it is at this stage that it is important to correctly install the insulation, and the whole insulation cake on the walls of the house, so that in the future you do not get yourself such a headache as the dew point in the wall from the side of the living room.
What kind of beast is this - dew point and why is it exactly the dew point in the wall that is bad, how does it look in practice?
To begin with, a little theory, and then practically examples from my own experience, which I got by buying a box at home with an already installed layer of insulation.
Dew point temperature
The dew point tends to move. This moment depends on two indicators - temperature and humidity.
Each of them is also divided in half - by the temperature indoors and outdoors, by the humidity indoors and outdoors.
In all calculations and formulas that are used to calculate the dew point, it is assumed that moisture will condense from the vapor as it moves from the inside out. This is precisely the situation observed in winter, when the temperature and humidity in the room are higher than the temperature and humidity in the street. The dew point temperature will be calculated at calculated indicators for external and internal conditions.
In summer, when the humidity and temperature in the street is usually higher than the humidity and temperature in the room, the dew point does not have such a value. Why? Because the temperature difference is low and both temperature indicators, street and brownie, are in positive values.
And also because even if the dew point in the wall could form at the positive values \u200b\u200bof both temperatures, this would not have a strong impact on the comfort of living in the house.
Another thing in the winter. Moisture condensed from steam at low temperatures enters the heater and the wall, and there it freezes. For a heater, wetting is fraught with either a complete loss of heat-insulating properties (basalt cotton wool) or destruction upon freezing of water (polystyrene). Everything is the same for the wall, especially for aerated concrete and gas silicate blocks.
He personally observed the sad picture of the destruction of the wall of a block house in the winter due to improperly made insulation. By spring, there were almost through holes in the wall of 400 mm thick gas silicate.
How to calculate the dew point
To calculate the dew point, a table of water vapor condensation values \u200b\u200bis used depending on humidity and temperature. The value of the external and internal temperature and the value of the external and internal humidity are taken. It turns out the dew point temperature at which water will fall out of the water vapor (dew formation).
What does this temperature give us? A lot of things. We are able to calculate where the steam will condense in the insulation cake, that is, where the dew point in the wall — in the insulation, in the load-bearing wall or on the inner surface of the load-bearing wall — will be right in the room.
Naturally, the most correct option is the dew point in the insulation. In this case, there will be no negative aspects for the interior. So that there are also no negative aspects for the insulation, it is worth planning the right type of insulation for the walls at the planning stage.
A less acceptable option is the dew point in the wall of the house, which is the carrier. Here, the negative aspects for the interior will depend on the material of the wall. This situation turns out when the insulation is mounted incorrectly or the thickness of the insulation is incorrectly selected.
The most unacceptable option is the dew point indoors, on the inner surface of the load-bearing wall. Usually this happens when the house is not completely insulated or improperly insulated - from the inside.
Dew point in the house - what to do?
So, the promised example from my own experience. I purchased a box brick house, which was insulated with foam inside. What those people who built this box thought about, one can only guess. Thanks to such warming, the dew point in the house, on the inner surface, turned out bearing walls, between a brick and a heater.
What was the dew point in the house expressed in, what are the negative aspects?
There were two of them. Firstly, the brick wall from the inside was always damp in small plus and minus temperatures. There was a musty smell in the rooms; at dissection, there were large pockets of mold under the entire foam.
Secondly, in sub-zero temperatures it was impossible to properly warm this house, brickwork was excluded from the thermal circuit of the house, due to the fact that it was cut off from the warm air of the premises with foam.
What did I do to defeat the dew point in the house?
Firstly, the entire foam was removed from the inner surfaces of the bearing walls.
Secondly, the insulation was mounted outside and was plastered according to the wet facade technique.
And, thirdly, instead of the previous internal insulation of 50 millimeters, an external insulation of 150 millimeters was installed.
With proper insulation - the dew point is outside, in the house it is warm and dry.
What has become? It became warm, dry and comfortable.
FINAL NOTE. Do not make an air gap between bearing wall and the air of the room. Often sheathe walls from the inside of the GCR - it is cheaper and faster than plastering. However, micro-drafts form in the air gap between the gypsum board and the brick, which impede heat transfer and heating of the inside of the brickwork.
I plastered my brick walls from the inside with the most ordinary stucco mixture. From above, you can now paint or glue the wallpaper. The thickness of the wallpaper is such that they, as a heat insulator, can be neglected.
Wall insulation is one of the main issues during construction. At first glance it may seem that it is very simple to solve it - choose the one that is suitable for climatic conditions and finances, and insulate. However, it is not. There are a number of technical conditions that must be met so that the walls of the house in the cold season are not damp inside and not freeze outside. One of these conditions is to warm the house so that the dew point is closer to outer wall, and in no case - inside the house. To do this, you need to be able to determine where the dew point will be located under different conditions in order to exclude the possibility of condensation on the walls inside.
What is the dew point
The dew point is a measure of the temperature at which the maximum vapor saturation of the air occurs and it begins to condense. This indicator depends on two main factors: temperature and air humidity.
If at least one of these two values \u200b\u200bchanges, the dew point also changes, that is, it constantly moves, just as the air temperature and humidity are not constant all the time.
There is a table of dew points at different temperatures and humidity, developed by specialists. From it one can see under what conditions the steam begins to condense. For example, in winter, at a standard indoor air temperature of +20 0 С and humidity from 50% to 60%, the dew point will range from 9.3 0 С to 12 0 С. That is, condensation should not form inside the room, since Under these conditions, there are no surfaces with such a temperature.

Let's consider further. If the house has +20 0 C, and the street temperature is -20 0 C, then there is a dew point in the wall with a temperature of +12 0 C with a relative humidity of 60%. The dew point can move along the wall thickness depending on the temperature indoors and outdoors, as well as on the humidity in the wall itself. The closer the dew point to the inner surface, the greater the likelihood that the wall will be wet from the inside. And this is already creating adverse living conditions. By warming the house, we can shift the dew point, as this changes the temperature of the wall itself.

Where will the dew point be
There can be three options for wall construction: without insulation, with external and internal cladding. Consider where the dew point can be in each of these cases?
- Design without insulation, then the dew point is:
- inside the wall closer to the outer surface;
- inside the wall shifted to the inner surface;
- on the inner surface - indoors, the wall will remain wet throughout the winter period.
2. There is an external heater, then the dew point is:
- inside the insulation - this indicates that the dew point and thickness of the insulation were calculated correctly and the wall in the room will be dry;
- any of the three cases described in paragraph 1 - the reason is the wrong choice of insulation and its characteristics.
3. The inner lining is made, then the dew point will be:
- inside the wall closer to the insulation;
- on the inner surface of the wall under the skin;
- in the insulation itself.

From the above it becomes clear that the location of the dew point also depends on such characteristics of the fence, such as temperature and vapor permeability. Most modern heaters practically do not let steam through, therefore, external wall cladding is recommended.
If you choose internal insulation, then the following conditions must be met in order to:
- the wall was dry and warm;
- the insulation had good vapor permeability and a small thickness;
- the building had ventilation and heating.

Knowing the possible condensation zones, i.e. the location of the dew point, it is possible for certain climatic zones to choose a type and material of insulation that will not create conditions for damp walls inside the house.
There is an opinion that the house should be insulated from the outside, and the insulation in all respects corresponds to GOST. Then the dew point will be inside the cladding, that is, outside the house, and the inner walls will be dry in any season. That is why external insulation is more advantageous than internal.