Do-it-yourself frame house from the foundation to the roof. Stages of building a frame house - what you need to know.
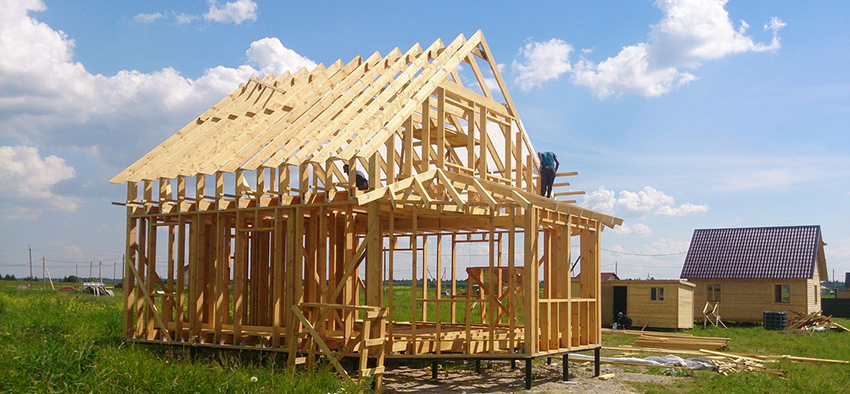
Erection frame houses becoming more popular in Russia. All new technologies are being introduced into the construction of such structures and it does not matter what technology - Finnish or Canadian - the house is being built. In this article we will tell you how to build frame house with our own hands, we will give step-by-step instructions, as well as diagrams, photos and videos of the phased construction.
Foundation
Since frame houses are recommended to be built no higher than two floors, a massive foundation is not required for them. Suitable tape, precast of concrete blocks, columnar foundation. The most important thing is that they fulfill their main purpose - they ensure the rigidity of the frame in space.
To do this, reliable and durable reinforcement is used in the strip foundation, and in the column foundation - wooden or concrete grillage.
Frame mounting

Frame houses are being built using wooden or metal structures. With independent construction, the latter are rarely used, they increase the cost of construction by 40-45%, but their use allows you to save financial costs on the construction of the foundation, this is due to the ease of metal structures.
A wooden frame is best erected from oak, but it can also be from other types of wood. The beam should be from high-quality wood with a cross section of at least 150x150 mm. Corner joints must not have gaps. Choose a spike groove connection method.
Note! A metal compound is undesirable since the wood rots when it comes into contact with metal. Over time, such fasteners will weaken, and the house will begin to loosen. Wooden pins provide reliable and durable fastening, which guarantees a long service life frame house.
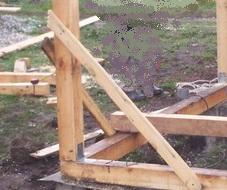
The frame should be unfastened by braces, they give the house rigidity. The technology for the construction of a frame house provides for the installation of three braces. They are made of the same material as the racks.
Outside, the house is sheathed with boards or lining with a width of not more than 60 mm and at an angle of 45 °. Old masters do not advise nailing them firmly; during the first year of operation, they can swell and dry out.
Floor
The manufacture of the floor of a frame house begins with the laying of a wooden beam with a section of 150x50 mm along the perimeter of the walls.
Note! It must first be treated with an antiseptic solution.
It is necessary to lay the beam on the roofing material, and fasten every two meters with anchor bolts. Pay special attention to setting corners, check them with the help of a level. Possible deviation of 10 mm.
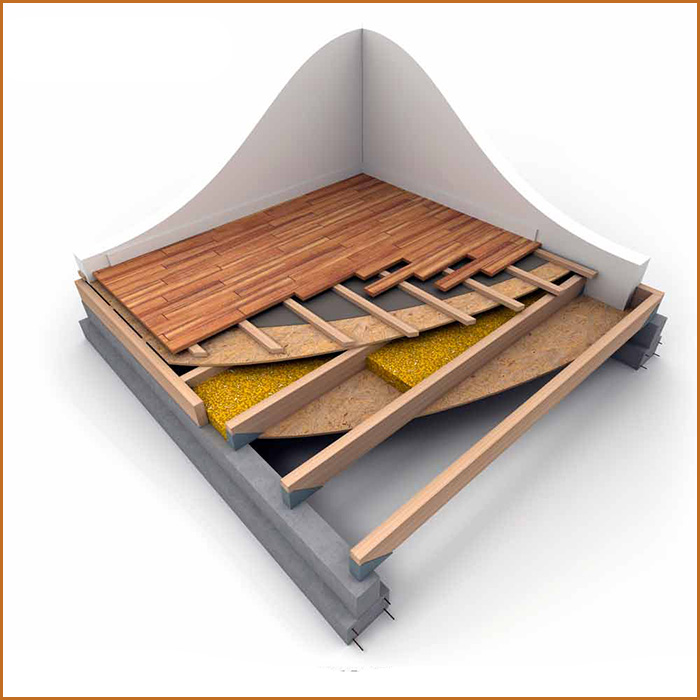
First, lags are mounted, then a rough floor is made from a cheap edged board, insulation is laid between the lags, and then floor boards are mounted.
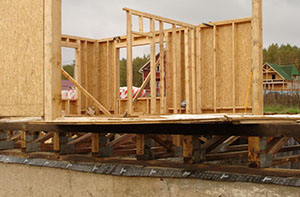
Walls

After installing the floor, you can begin to build walls. It is best to make them in sections. They are collected on a dry surface of timber, equal in length to the height of the future premises. The width of the step for installing the beams, you choose yourself, usually 300,400, 600 mm.
Note! All wooden parts of the frame house should be from one species of wood.
Window

According to accepted building codes, windows should make up 18% of the wall area. Try to stick to these sizes. In a house for year-round use, it is better to install double-glazed windows with double glazing and a large area of \u200b\u200bglass.
Roof

The roof frame is the main part of the entire structure of the house. The frame accounts for most of the mechanical load. It should be made according to the accepted rules of high-quality material. If you do all this, you will have a reliable and durable roof. You choose the roofing material, insulation and waterproofing material yourself, based on your financial capabilities.
It’s easy to build a frame house, you just have to follow all the rules prescribed by this technology. Then in the end you will get a beautiful and warm, reliable and durable home.
How and how to insulate a house

Warming of a frame house depends on what role it will perform. If you are building a house for permanent residence, then the insulation should be appropriate. The house is a structure of racks located vertically, fastened with horizontal bars.
Note! In the voids between the bars, a heat-insulating material is mounted, lined with various finishing details on top.
What heat-insulating and finishing material you will use depends largely on the climatic conditions of your place of residence. There are tables indicating what thermal conductivity various materials have. For example, a 4 cm layer of polystyrene foam replaces 14 cm of wood or 86 cm of brick.
Video
We offer you to watch a series of videos about building a frame house:
The construction of residential buildings with a wooden frame has a long history - in particular, the construction of such houses in the countries of Southeast Asia, North America and Scandinavia is widespread. Recently, they have become popular in the CIS countries. This is associated with the emergence of modern insulation and various wall cladding materials.
The variety of technologies for the construction of frame houses, which are presented on the market, is quite large. This is due to the fact that various types of engineering solutions are characteristic of such technology and it is easily adapted for any needs.
DIY wooden frame houses
Frame houses are undoubtedly considered the most reliable, economical, warm and energy efficient of all known in our time.
 This technology requires developers to carefully study, but, alas, not everyone refers to it with the proper level of responsibility to comply with the requirements for the construction of frame structures. It is often violated due to a bias in favor of the conveniences of builders, and sometimes simply because they have not studied it enough.
Building a frame house on your own is a simple and very inexpensive task. Here you do not need to have special knowledge or skills, you do not need to recruit a team of builders. It will be sufficient to have a high-quality detailed project, 1-2 assistants and skills in using ordinary tools at a general level.
Installation
 The construction process is quite simple. Pre-prepared elements of the future home are brought to the site. Due to the ease of construction, this method does not require the use of expensive equipment.
If the base for the frame house is ready, the work is performed in the following order:
- Mounting and securing the lower harness. The beam is fixed with anchors directly to the foundation;
- Installation of the floor, waterproofing is carried out in advance, then the floor self-supporting insulated wire - panels up to 20 cm thick are laid on the base tape, subject to the technology that the span cannot be more than 5-6 m;
- An angle is set, after which wall panels are installed and fixed;
- Bearing walls are installed;
- The overlap is laid;
- A roof system is installed and the required finishing work is carried out.
The construction of frame houses is associated with the use of frame structures made of wood and metal. The metal frame is much more expensive, which affects its popularity. The wooden frame is mainly made from oak wood.
 Naturally, it is logical to mount the insulation in the cracks between the walls. If the house is not braced with braces, external loads will contribute to the occurrence of distortions and further destruction. The frame from the outside is sheathed using boards. It should be remembered that wood swells or shrinks over the year due to the influence of natural factors.
Modern technologies
 The modernized technologies for the construction of carcasses surpass brick and concrete houses in such indicators as: reliability, strength and durability.
- Prefabrication and a rather low price of the construction process.
- Low probability of damage to the home from design errors or soil features. The large weight of the stone walls contributes to their destructive effect.
- All season finishing work.
- The relative ease of construction.
- Fire resistance. Using new non-flammable materials, frame structures have a higher level of fire safety than concrete or stone.
- « Breathable room. ” With proper planning of such a building, using modern vapor-permeable materials of external cladding and high-quality insulation, it is permissible to create vapor-permeable walls.
Knots of a wooden frame house
There are nodes of ceiling systems, roofs and walls. They are divided into subnodes.
 The bottom harness assembly is the fastener for the harness bars to the base. Joints are made through the use of bolts, clamps or other means.
Another structural unit of the lower harness is considered to be the junction of the bars with each other in the corner.
 In the process of creating a frame dwelling, angular vertical supports are first placed, followed by intermediate ones. The following nodes stand out here: places of joining of vertical racks in the corners of the upper and lower harnesses and joining of racks with strapping beams.
 The bars of the upper harness are fixed like the bars of the lower.
The rafter system includes:
- The node supporting the rafters on the ridge run;
- The node supporting the rafters on the Mauerlat;
- Docking of rafters with a crossbar and other struts;
- Docking of rafters with bars of counter-lattice;
- Docking of crates and counter-crates.
Foundation for frame house
The base of the frame structure can be any.
The main thing is that the structure itself be built in accordance with the soil soil where the dwelling is located and have the necessary strength.
If a tape base is used, then it should be remembered that the central partitions "stand" on the foundation tape, and are not in a "hanging state".
 Similarly with the columnar base. The design of the house should take place so that the joining of the partition and the wall is on the support, but not along the gaps.
The frame structure of the frame house
The frame of the home is made of any material: metal, lightweight wood, massive wood, etc.
 At the time of choosing the material and frame structure, one should be guided by the strength of the latter, its service life, the number of cold bridges, and the fact how independent construction is real.
The connection of the base of the frame with the foundation must have the necessary strength. The wood for the production of the frame must be dry and of sufficient quality. Also, do not save on processing. All elements of the frame must be planed prior to installation. Then all the components of the tree must be impregnated with special compounds that impede the process of decay and increase refractoriness. It is worth remembering that dry wood changes its geometry when used.
If the project is completed successfully and the construction work is carried out efficiently, then such a frame will be quite strong and durable.
The device lag and floor
 The most popular option for installing the floor is the installation of the floor on the logs. Although the process itself seems confusing, it is quite possible for an amateur. To properly lay it, you need to carefully understand all the nuances.
 Between the pillars and lags it is necessary to lay a layer of waterproofing. The thickness of the log reaches from 4 to 6 cm. The distance from the soil to the floor should be more than 15-20 cm, and the lower side of the boards must be treated with an antiseptic. The lags are attached to the beams. Optionally fasten them to the sides of the beams. Then there is no need to use pads.
 The device of a wooden floor on logs is considered the most popular and durable. This floor can easily be repaired. It is necessary to carefully monitor and verify the correct installation of the lag, in which case the design will be strong and durable.
Installation of frame racks at home
 In the process of building frame housing, angular vertical racks are first installed, then intermediate ones. Holes are made to secure the uprights in the corners. Fixture of intermediate racks is done in the same manner.
Vertical supports are strengthened with special brackets. Make them easy enough. An armature of 0.5 m in length is pointed at both ends and bends with the letter “P”. Then drive into vertical and horizontal beams. They greatly strengthen the frame. It seems possible to make them in the forge, but their absence will not be a drawback.
When installing vertical bars, you need to carefully check the diagonal of the future wall. For these purposes, the level and twine will be quite enough.
Fastening the upper beam
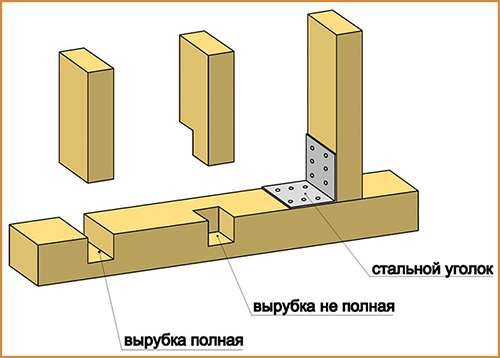
 At the corners, the bars of the upper harness are connected by cutting. They are fixed in the same way as the lower bars. They are connected in the corners and with the supports of the building.
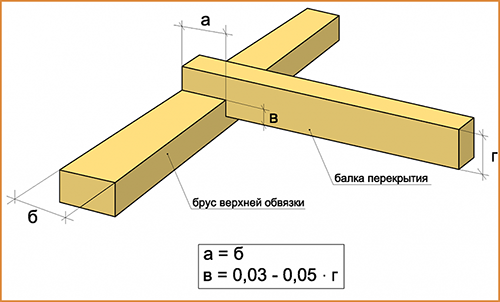
- Fixing corners: there are no characteristic features. Mounted with wooden screws.
- Fasteners by cutting down: previously, before putting the bars on the vertical supports, grooves are made in them for each rack. It is necessary that they are located clearly vertically in relation to the grooves of the lower harness. Only then will the vertical supports be truly vertical.
The device roof of the frame house

- Creating a rafter system;
- Insulation installation;
- Arrangement of crates and counter battens;
- Fixture of material for the roof and the final components of the structure.
Wall insulation of frame house
 Properly made insulation will save the home from heat loss in the cold period and will contribute to the creation of comfort and coziness indoors.
Recently, mineral insulation has gained great popularity. Basalt cotton wool is produced in the form of a fibrous substance as a dense slab. No less popular are heaters, consisting of glass fibers. The latter are extremely simple and easy to install. Thanks to the air gaps, fiberglass effectively isolates sound and heat.
 The technology of insulation of frame housing is the same for all materials. In the process of choosing a heater, it is important to build on its value. At the same time, it is not recommended to save on warming environmentally friendly housing. The inflated cost of insulation repeatedly pays off with the saved heat.
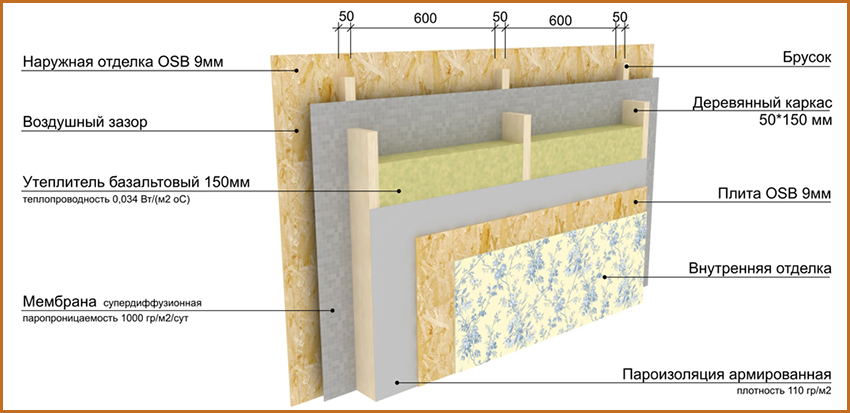
Exterior wall cladding of frame house from OSB
 OSB's manufacturing technology is far more advanced than chipboard manufacturing. In this regard, they have greater resistance to moisture and mechanical stress. OSB is considered the most promising material for cladding a frame building. The main disadvantage is the high cost of the stove.
The lower harness is completely covered by a sheet of OSB.
OSB plates are fixed if:
- In the intermediate section - a step of 30 cm.
- At the joints of the plates - a step of 15 cm.
- On the outer edge - a step of 10 cm.
- From the edge of the plate to the mount, the distance is 0.8-1 cm.
- Among the plates, the gap is 0.5 cm.
- A self-tapping screw or nail goes into the support 4-5 cm.
Wind protection and waterproofing of the walls of the frame house
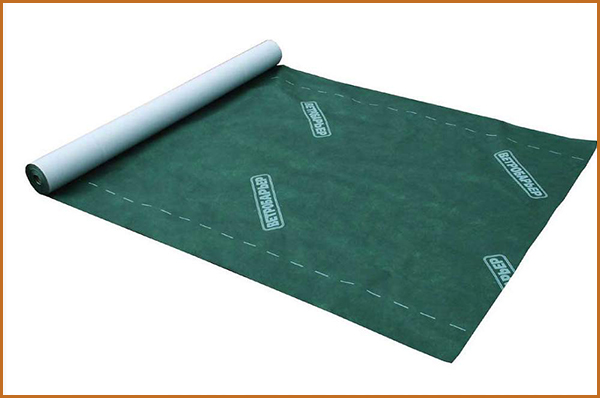 Wind protection and waterproofing are carried out by a superdiffusion membrane. In addition to the membrane, it is often advised to use a waterproofing film and polyethylene. But these materials have low vapor permeability. In this regard, the film does not guarantee the necessary removal of moisture from the insulation, which can lead to all sorts of negative consequences.
 The membrane is nailed to the frame supports, tight with respect to the insulation. After the crate, thanks to it, a gap is made. Then flashing.
A similar scheme is used:
- in the process of plastering for sewing;
- if sewing with a board turns into a fine finish;
- when facing with siding on top OSB, LSU, TsSP, boards.
Rough sewing is nailed to the frame supports. On top is a membrane, tight, without gaps. After, on the crate, they fix the siding.
Vapor barrier of the interior walls of the frame house
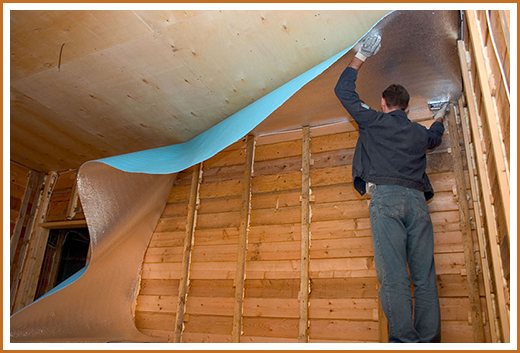
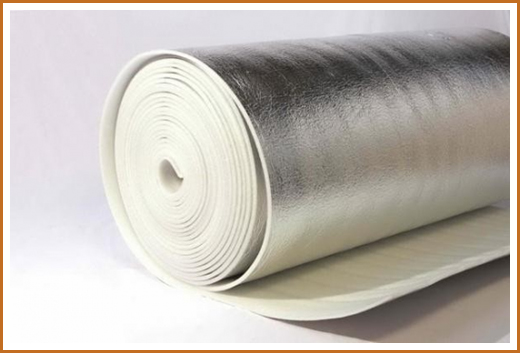 Penofol installation technology is extremely simple. She needs a construction stapler. The vapor barrier is mounted horizontally to save time and money. It overlaps approximately 5 cm.
Penofol is fixed with a foil outward, so that the heat radiation of the room is reflected. Moreover, this situation reduces the risk of condensation. When penofol is carefully fixed, the entire wall structure is lined with boards.
 Insulation of the walls and other components of the home on its own is quite simple and relatively cheap process, with the right selection of insulation and studying the technology of the construction process.
Internal wall covering of frame house
 To carry out internal sewing of the walls of the building, plasterboard or OSB is used. In connection with the irregularities of the frame supports, drywall will take their shape. As a result, more drywall layers will have to be done for drywall. OSB plates are much stiffer and will have to be less aligned.
Often, internal flashing is done with. When these panels are not laminated, they should be used carefully since they do not tolerate moisture. They are not advised to use them in the kitchen, in the bathroom, in the bathroom.
Ceiling device
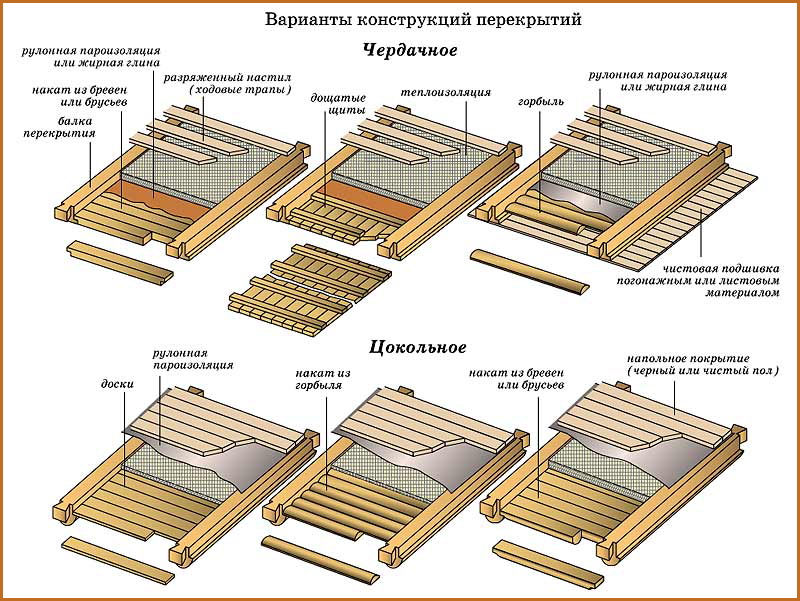 The ceiling is one of the most significant structures in the building. It should be approached very carefully. Usually, the heat goes up and if the ceiling is equipped without implementation in all the details, the heat loss will be quite large and this may affect the means for its repair.
To equip the attic flooring you will need:
- edged board up to 3 cm thick;
- hydro-vapor barrier;
- construction foam;
- insulation;
- nails
- Fiberboard or drywall;
- pegamine or ruberoid;
- croaker.
General construction mistakes
The most common mistakes that occur during the construction process:
- Poor frame reinforcement;
- The use of wood of poor quality;
- Insufficient vapor and waterproofing;
- Wrong step when installing vertical supports;
- Weak fixture of vertical support.
Tree Care Mistakes
When constructing a frame dwelling on your own, you cannot make mistakes.
 Often, poorly dried wood is used to erect the structure. This is a gross flaw. When the tree dries, its shape changes. As a result, the building may squint, nails or self-tapping screws can be uprooted. The house, the insulation, and the finish will also be destroyed.
The wood must be carefully looked after to avoid defects and early damage caused by mechanical stress, as well as the influence of natural factors.
Builders Recommendations
- Having begun construction work, it is worth determining its purpose. Will it be temporary housing, or a room where there will be permanent residence.
- It is reasonable to use all frame buildings for low-rise construction. Do-it-yourself building a frame building of more than 2 floors is not recommended.
- To create a wooden frame, it is more appropriate to use an oak tree.
- It is not recommended to use a metal mount, since the wood rots heavily, when interacting with metal, naturally, the joint weakens at the junction and the building can become loose.
- Before building walls, you need to find a level and dry surface. for installation, so that there is no warping of the walls.
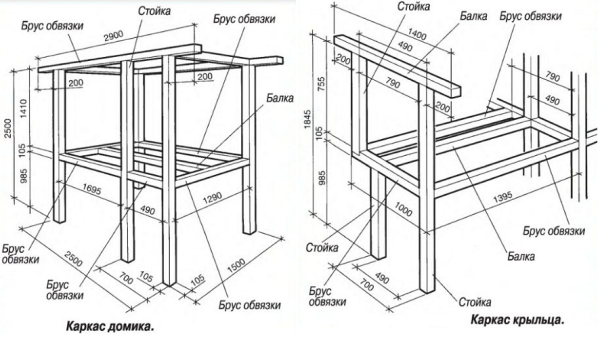
- Everything bearing structures, walls and floor must be built from the same material, otherwise there is a risk of the building skewing. Wooden frame houses drawings
Despite the fact that the general construction season is ending, some developers continue to build houses. How can this be, because with the advent of cold weather the construction site usually freezes, the unfinished building is canned and waiting for the next season? All this is true when it comes to brick, stone or block buildings. However, frame houses can be built year-round. Therefore, if you have not had time to get your own house this year, do not despair - find out how to build a frame house in one season!
What is the essence of frame buildings?
First, we’ll deal with wireframe technologies. What does a frame house mean? These are, as a rule, wooden buildings, which are based on the frame. The frame can be made of dry solid or glued beams. It is mounted on, fixed to it with the help of a strapping. All work can be done with your own hands, since working with a tree does not require any special skills that an average man does not possess. How to assemble the frame - we will consider later.

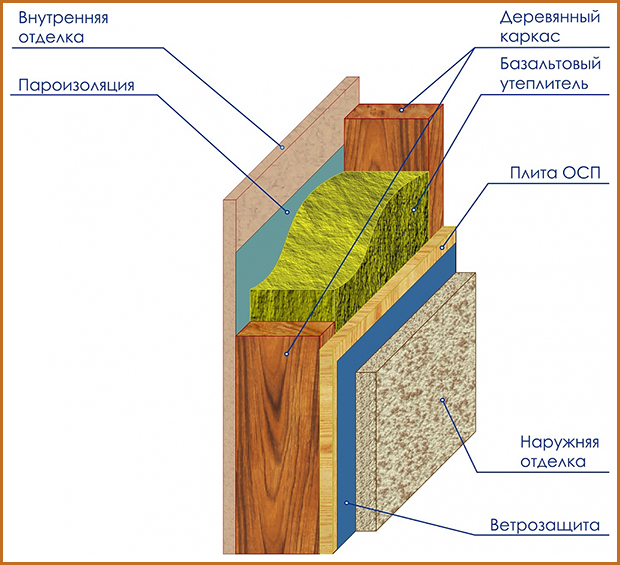
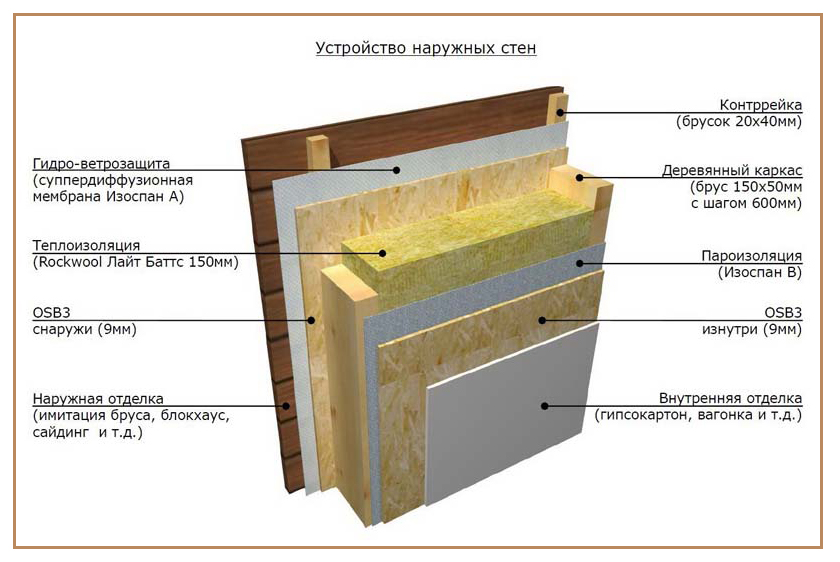
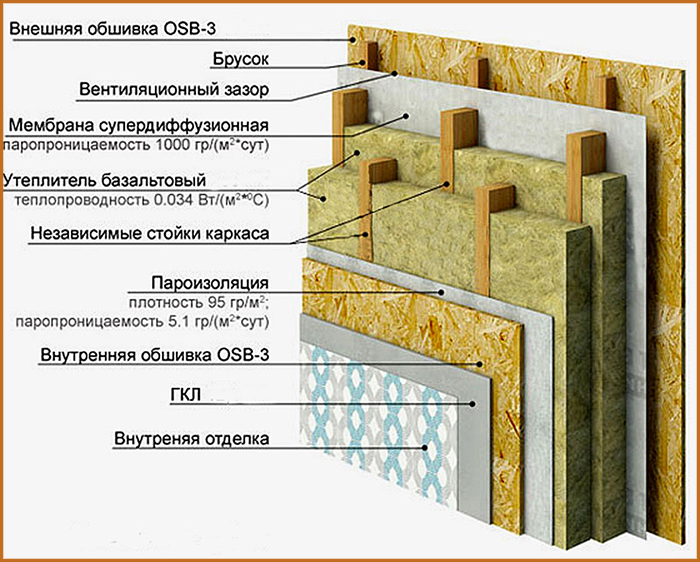
The next stage is insulation and waterproofing. We insulate the frame so that the wall looks like a multi-layer cake. On the frame is fixed, most often mineral wool. It overlaps and sticks. You can use rolled, mats, liquid alluvial, polystyrene foam and other types of insulation. Outside, the house can be additionally insulated with polystyrene plates, making wind protection and soundproofing.
Waterproofing is carried out by films and membranes. They protect the walls from moisture inside.
Vapor barrier in a frame house is an important element of the wall. Without it, the wall is covered with condensate, and in addition, moisture accumulates at the dew point, which falls on the center of the insulation. As a result, the insulation quickly becomes worthless, and the walls are covered with fungus and mold. Good vapor barrier acts as ventilation gaps, but this applies to modern membranes, not films. Films are significantly cheaper, but not so functional. A properly assembled wall cake guarantees the warmth of the house and reduces its energy loss.

At the next stage, we fill the wall filling with OSB-3 sheets. It is advisable to foam the joints, ensuring the absence of cold bridges.
Next, we carry out internal and external decoration. The inner wall is most often pasted over with wallpaper, and the outside is painted. However, you can also use siding, block house, stone finish, "brick", "under the beam" and any other.
About Finnish houses built by wireframe technologyyou can read. And about the Canadian frame houses -.
The foundation for the home is the foundation
Despite the fact that there is a huge selection of foundations for a frame house, experts recommend staying on a tape. The strip foundation has undeniable advantages:
- can be done by yourself
- inexpensive
- reliable
- make it simple enough
So, if you decide to make a strip foundation with your own hands, you will first have to work with the site. Determine where your house will be located, taking into account the neighbors, the fence, the septic tank device, the location of the well, etc. It is necessary to take into account all the nuances, check whether it will be convenient to drive vehicles, if there is enough space for other buildings, if you want to later build a garage or a bathhouse . The site is desirable to have a flat, you may have to use the technique to level it by removing the top layer.
When the site is prepared, we begin to markup. You should already have finished project or a plan with the dimensions of the house. Based on these parameters, using a rope and pegs, we mark out all the bearing walls.
Further to us, if we decided to do everything on our own, we must either take a shovel or hire equipment. We dig a trench under the foundation, about 40 centimeters wide. Next, we install the formwork, which you can buy, rent or mount with your own hands from the boards. The formwork should rise about half a meter above the ground - the high foundation looks more beautiful, and protects the less durable walls from snow.

Finished formwork, if it was made by oneself, must be covered with a film from the inside, fixing it to the formwork. This is necessary so that liquid cement does not seep in the gap between the boards, while it will be easier to remove the formwork - the cement will not stick to rough wood. Under the weight of cement, self-formwork can break up and the film will hold the cement slurry.
If you have clay soil, add 20 centimeters of ASG to the bottom of the trench. Pour cement over the sand to the edge of the formwork. This must be done quickly, as the cement hardens. Most likely, you cannot do it alone, and you will have to call for help from two or three people.
We give the foundation to freeze, this will require at least a week. If it is forecasted to rain, the surface is covered with a film. We leave the foundation for the frame house for about a month, and only then you can do the strapping.
A sturdy frame is the key to a strong home
As the name implies, frame houses are frame-based houses. Thus, the frame is the main element of the entire building, so it must be mounted correctly.
How to make a strapping - read here. When the harness is ready, proceed to the construction of the future wall. You can mount the wall using the following elements from the timber:
- racks
- braces
- insertion
- cross members
These are all elements of the wall. Racks are a vertically placed beam, which is located between two harnesses - lower and upper. The upper harness refers to the floor beams.
Braces are a bar put at an angle between racks. They are also fixed in the upper and lower harness (not to the racks, as some mistakenly assume).
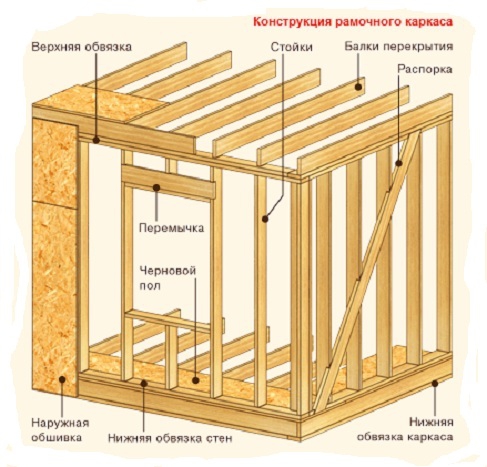
The inserts are small pieces of timber used for additional frame strength.
Crossbars are a bar laid strictly horizontally between vertical posts. They are fixed on racks.
Racks should be knocked down with 80 mm nails, 450 mm apart. To the harness, they are nailed 2 nails 120 mm from the top and 2 of the same from the bottom. Using metal corners, the structure can be made stronger. All materials used in construction must be treated with a septic tank.
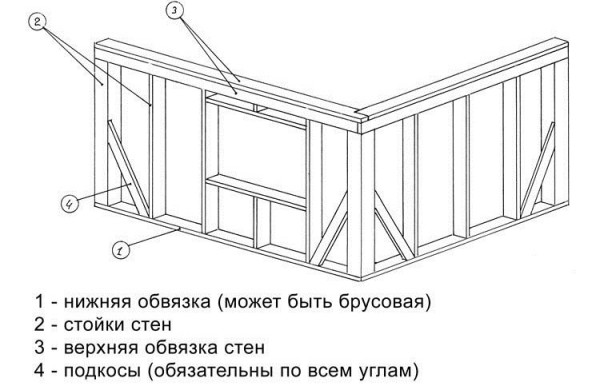
Particular attention must be paid to corners. Here, the mandatory reinforcement of the racks by jibs is performed.

Do not forget to check the geometry of the house after each stage - all horizontal bars should lie strictly horizontally, and vertical - straight up. The harness must be laid evenly, and for this the foundation surface must be flat around the entire perimeter - an error of 1 cm is allowed. The upper harness is also checked with a level. If there are errors on the foundation - it is added with cement, leveling. If the level shows small irregularities - we use parts of the timber, having previously processed it with a septic tank and level the surface. We check the evenness of the walls with a plumb line.
All the constituent elements of the frame roof
The roof is the most important element, and in the frame house the roof can be mounted with some experience with your own hands. However, before installing the roof, it is necessary to make the upper wall trim and check its level. From the evenness of the harness depends on how the overlap lies. If there are small irregularities, we eliminate them with our own hands with the help of a chip lining under the understated part.
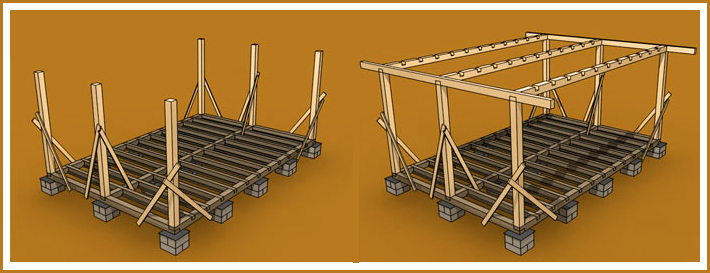
There are two ways to install a rafter system:
- in an open fashion
- hanging
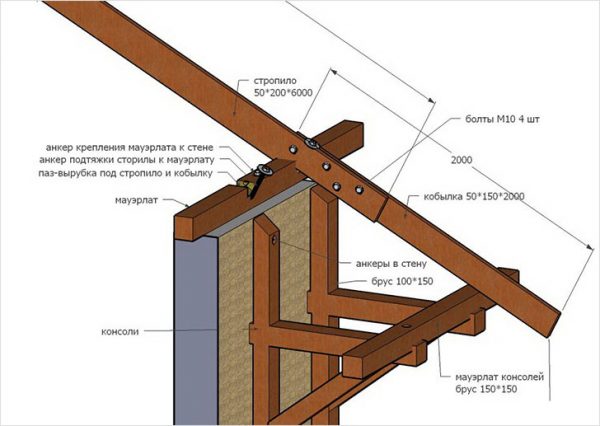
Both types of rafter systems are used in frame constructionHowever, beams with a hanging rafter system rely on Mauerlat. Mauerlat is made with his own hands, it is a timber beam with a cross section of 10.0 × 10.0 cm, which is arranged around the perimeter of the building and fixed to the surface bearing walls on the top row of strapping. On the upper side, the rafters are attached to each other with the help of a ridge beam.
Roof frame
First you need to collect the rafters in the amount of 2 pieces. Ties are needed to connect the first rafter legs in their lower part, they are attached with anchor bolts to the rafter legs. The legs are attached to the Mauerlat and are fixed with sawn grooves. We cut the grooves of the correct shape with our own hands. Rafters are installed in the grooves, the distance between which depends on the size of your roof. The approximate step is about 1 meter.
If your roof is loftier than three meters, pay attention to the rafters with a vertical direction.
Thus, the frame of your roof will consist of:
- rafters
- baseboard
- ridge beam
- racks
- attic floor beams that overlap over the internal load-bearing wall
- run
- truss legs
- lying
- contractions
When the roof frame is assembled, it is necessary to produce a crate. This is the most important element of the roof, so when doing it with your own hands, be careful and accurate: the lathing is not only necessary for fixing the roofing material, but also for connecting together all the structural parts of the roof frame. The crate ensures the stability of the frame, therefore, prior to its installation, it is necessary to organize a temporary wiring from the bottom. The crate can be:
- solid
- intermediate
The choice of the type of lathing primarily depends on the material with which the roof will be covered. A continuous crate is performed for soft roofwhich is best for a frame house. A metal tile or slate can be laid on an intermediate crate.
The basic rules of frame construction

Frame house - the best choice
In order not to get a frame house of poor quality, you must follow some rules:
- Only high-quality materials. If you choose wooden construction, use either glued timber, or a technical drying timber, or do not tackle the construction at all. The timber sold at sawmills is raw - after 3 years of operation, a crack will receive 90% of the timber, and twist the remaining 10 so that it breaks off the screws.
- Do not know how to do it yourself - trust the professionals. Do not experiment in complex construction work - entrust something to specialists. This is especially true for work at heights, wiring electricity and other complex narrow-profile jobs.
- Do not save on trifles. You won’t save much on trifles, but you can substantially damage your future home. This is especially true for wood impregnation. Make two layers, and choose European fire protection.
- Down with Chinese materials. Do not buy Chinese heaters and insulation, they are not only of poor quality, but also emit harmful substances. European materials have a certified certification and safety class.
The technology of building fast-erected buildings is very popular. This topic is constantly discussed at construction forums and causes a lot of controversy. Pros and cons of frame houses will help form a general idea of \u200b\u200bthe method, get acquainted with the stages of the construction of objects.
Based on the experience of European countries, there is no doubt that frame-panel houses will soon become leaders in low-rise construction. Compared to traditional construction systems, technology has its own advantages, the main one of which is profitability. The financial aspect is one of the stimulating factors for acquiring your own housing. The cost of 1 square. m less than half the foam concrete blocks, 2.4 brick walls, 1.4 times the beam.
The frame-panel constructor is assembled by the efforts of 4 people in 1.5 months. According to this principle, it is permissible to erect an object of any complexity up to 3 floors. In addition, the construction of a frame house with their own hands will save on the foundation, equipment, and a team of workers.
The disadvantages are:
- Moisture absorption.
- Risk of fire.
- Poor ventilation.
- Sensitivity to vibration.
- Fragility.
There was an erroneous opinion that only brick, panel or wooden walls hold heat well. However, according to current thermal protection standards, modern buildings in some regions do not meet standard requirements. Canadian houses with walls of 150 mm in terms of thermal protection are equivalent to double block masonry and are quite suitable for housing. In cold weather, when the heating is turned off, the rooms keep the normal temperature for a long time.
Temporary or permanent residence determines the thickness of the frame house. If the housing is planned for a seasonal stay, there is no need to purchase expensive insulation. Accordingly, the wall thickness will be slightly less. For a comfortable microclimate, a substrate of 10-15 cm is sufficient. If we are talking about permanent housing, the material is laid in a thick layer - more than 15 cm. Ultimately, the wall is 20 cm without taking into account the outer and inner cladding.
For this purpose, there is a special table with indicators for each region. The following is inserted into the formula:
- insulation thickness parameters;
- coefficient of thermal conductivity of the material;
- compute the parameter.
You can make your own calculations using our construction calculators.
When ordering a house kit at the plant, calculations are performed on site, and they offer the customer plates with an increased margin of safety. Many believe that if they are thick, the insulation does not need to be laid. This is a misconception - without a quality substrate, the cost of a heating resource increases significantly. The walls of the frame structure should resemble a layer cake. Thanks to the air cushion between them, even in cold weather, the house retains heat.

Do-it-yourself frame house is built according to Finnish or Canadian technologies. The process algorithm is the same, and consists of several stages:
- Purchases of materials.
- Base fillings.
- The lower binding of the foundation.
- The erection of walls, roofs.
- Installation of windows and doors.
- Wall cladding and insulation.
- Interior decoration.
To avoid heat loss and provide good ventilation, it is important to adhere to adapted technology during the construction of the facility.
How to build a frame house: pouring the foundation
The prefabricated structure is lightweight, so it makes no sense to build a powerful base. Depending on the type of soil and number of storeys of the building, choose between:
- columnar;
How to make harness and lags
The following are mounted transverse logs. Boards with a cross section of 150 x 50 mm, turned over on their sides, with a pitch of 40 cm, 9 cm oblique nails are pinned to the end and lower beam on the left and right. If they are long, but the transverse beam is laid, then jumpers with a length of 45 cm are filled on top.

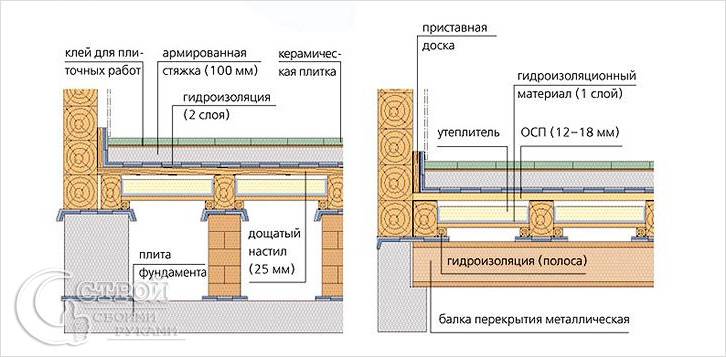
Flooring
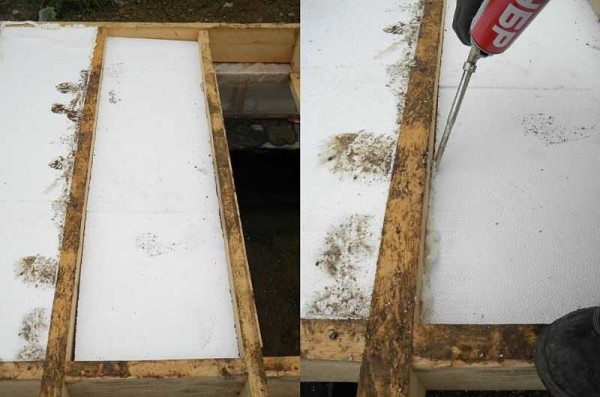
After the installation of the battens between the cells, a waterproofing film is laid, on it is a heater. Budget option - expanded polystyrene from 15 kg / m3 with a thickness of 150 mm. The insulation is cut with a hacksaw, laid in 2 layers. The material is distributed so that the edges of the second row of paintings do not coincide with the first, otherwise the sheets will move. To fix the foam at the bottom of the grate, a cuttings bar of 50 x 50 mm is stuffed around the perimeter. Seams are blown with foam.
The material is covered with a vapor barrier membrane, then the flooring is constructed. For the subfloor choose plywood, dowel boards or cheap OSB-3 boards. Canvases cover across the lattice. For reliability, the sheets are laid in a checkerboard pattern or perpendicular to the lags.
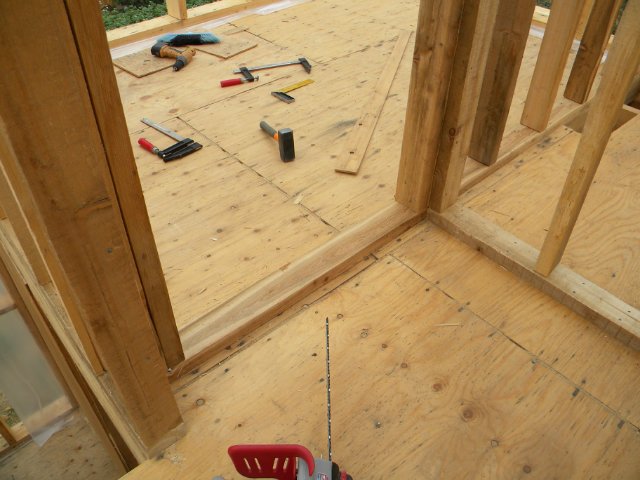
The flooring is fixed to the logs with 50 mm self-tapping screws or ragged nails. First, glue is applied to the back of the sheets, then pinned every 15 cm along the edge and with a step of 30 cm in the middle. A gap of 3 mm is left between the segments on all sides.
Now for the construction of walls you need a frame: wooden or steel. A popular solution is oak timber, larch or other wood with a dense structure. Such designs are one third cheaper than metal counterparts. Prior to installation, they are planed, treated with impregnations from fire, decay, pests.
Installation of uprights
How to build a frame house to live in it for a long time without repair? Follow the sequence of steps and take into account all the construction nuances. First of all, this concerns the fastening of parts. When erecting the skeleton, corner posts are first installed. If the pins are selected for the connection, they retreat up to 10 cm from the edges, holes are made in the end face 1 cm longer than the length of the pins, and a timber is vertically fixed.
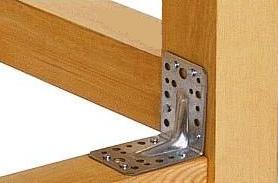
Now choose a method of mounting intermediate longitudinal racks. The first is fixing to the harness with a partial or full notch, or connecting with galvanized corners. The second method is simpler and more reliable, although it increases the cost of the project.

The principle of installing the upper bars is similar to installing the lower harness. Horizontal structures are joined in corners with vertical posts, connected by 2 nails and corners.

How to build walls
How to make a frame house: first collect the spans on the ground, then lift up or assemble on the spot? Usually they are already ready to fasten to the lower base. The first span is nailed to the floor and supported by jibs, the second is connected to the stand of the first and so on around the perimeter.
Regardless of the principle of connecting the racks, they are strengthened with temporary struts. This strengthens the lower harness until the installation of permanent supports, giving the frame stiffness and resistance to wind loads. After installation of all structures:
- the skeleton is measured with a plumb line and level;
- temporary backups are removed;
- 2 brackets are screwed to each support on top and bottom.
Windows, doors
Door and window openings are installed in places according to the design. First, racks are fixed on the sides of the niches, then jumpers at the top and bottom. The internal partitions are mounted as well as the frame, tied with boards for rigidity.
Ceiling
The process consists of several stages:
- Grooves for beams are cut down in a bar.
- Transverse structures are inserted into openings, nailed, and steel corners are screwed.
- Inside the partitions, supports are installed, connected to the upper and lower bars.
- They lay a ceiling shield from grooved boards.
- A vapor barrier layer is laid, a heater and a waterproofing membrane are on top.
- Build a rough floor.
Roof
For the device, choose: an attic, multi-gable, single-pitched or multi-pitched roof with a slope of 10 °. For the calculation of rafters and step crates, we use building tables or ours.
- The rafters are collected from the bottom of the beam. To do this, 2 boards are spliced \u200b\u200btogether at an angle above, then lifted into place.
- First, the rafters are installed on the gables with an overhang of 400-500 mm.
- The slope of the ramp is regulated, the structures are mounted to the upper harness.
- The rest of the system is installed in increments of 700 mm.
- Then they are integrated with a ridge bar, which serves as a support for the upper rafters, and is fixed to the floor of the paws.
- A solid or rare crate with a cross section of 25 x 30 cm is built, fixed on the rafters with side locks. The step of the bars is the same as that of the rafters.
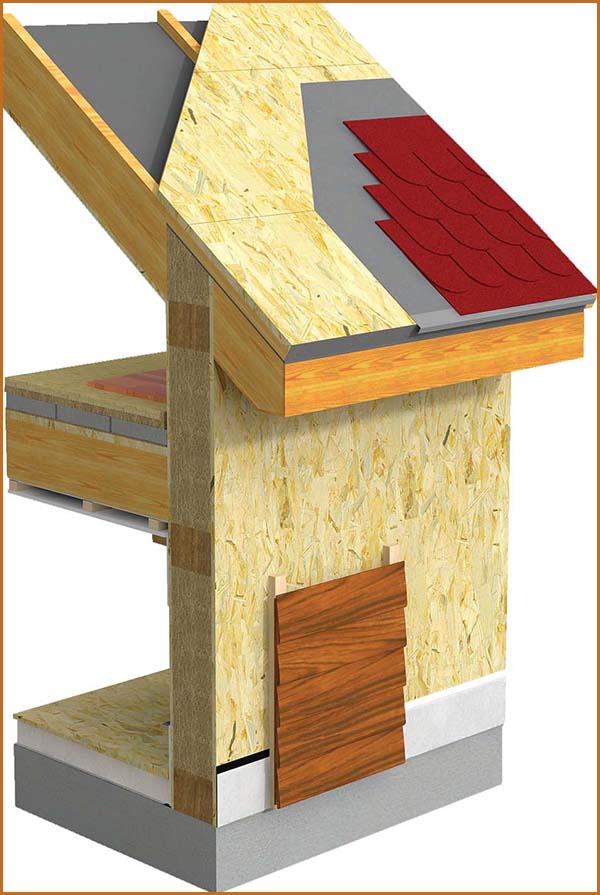
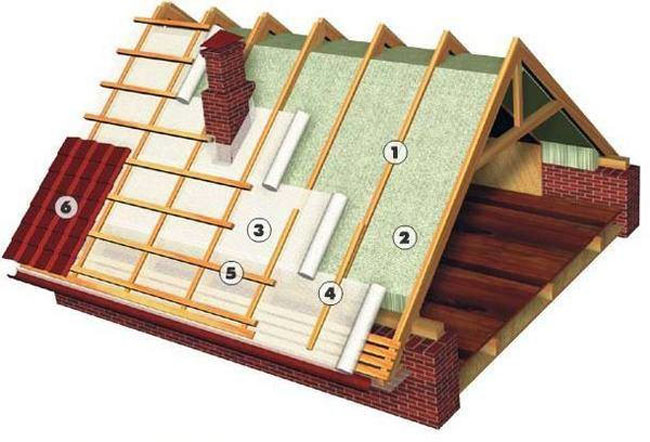
A vapor barrier membrane is fastened to the inside of the rafters with a stapler. The joints are sealed with tape, the space between the bars is filled with heat-insulating plates, then with a diffuse film. At the finish stage they lay a roof. The process algorithm is graphically presented in the picture.
Wall insulation
Choose a protective material with a thickness of 50 mm: polystyrene foam, mineral wool or polystyrene.
- Lay mats between the uprights of the skeleton. With double flooring, the joints of the paintings should not coincide. To protect against moisture from the outside, waterproofing is laid.
- Then fill the crate of thin rails corresponding to the thickness of the insulation. This will provide air movement.
- From the side of the rooms, the vapor barrier is stretched, fixed with a stapler. The walls are faced with thick plywood, gypsum sheets or wall paneling. Drywall base ready.
- Outside, the walls are sheathed with finishing material: block house, siding, euro lining.
It remains to ennoble the house inside and celebrate the housewarming. The nuances in the construction of prefabricated frame-panel houses are a great many. Experience and knowledge will come in the process.
Full video how to build a frame house
Houses in our country have traditionally been built in the form of log cabins or stone buildings. However, there are other options for low-rise construction, which can be preferred. For example, methods have been developed how to build a frame house with your own hands. Step-by-step instructions include 4 main steps:
- foundation pouring;
- installation of the frame;
- erection of walls and insulation;
- roof construction.
Such structures are built quickly and without the use of special lifting equipment. Frame houses are inexpensive and assembled in one season, and they turn out to be no less warm and comfortable than capital ones from a log or stone.
Choosing a place for home
The use of wood implies that the land under the house will not contain much moisture. And the place itself should be dry and well-blown so that dampness does not lead to rapid decay.
Drawings of frame houses should be based on calculations and tied to the construction site. Descriptions from the Internet are understandable only to specialists who have a certain amount of theoretical knowledge and practical skills.  The foundation should be built in accordance with the nature of the soil, and the house - based on operational loads.
The need for a house project
The developer must have a house project created by specialists. In addition, it is consistent with many services that can make changes and additions to it.
At the first stage, you can make a sketch of the house yourself, but in the future you will have to choose a suitable project for it. For construction, drawings of frame houses are always needed, based on the necessary calculations. You will have to pay for the project. A cheaper one is typical, but you can order your own, where the requirements of the developer will be taken into account. It also incorporates construction technology, which should be strictly adhered to. This also applies to the creation of engineering systems. 
House Engineering Systems
The project should indicate all utilities when a frame house is being built with one's own hands. A step-by-step instruction provides for laying communications at certain stages of construction, starting with the foundation. When pouring it, technological holes are immediately made. Drilling them later in concrete will be much more difficult.
The electrical system includes a switchboard, wiring, appliances, sockets and grounding. Outlets are located at a distance of no further than 4 m from each other. They contain protective covers if there are sources of water nearby.
The usability of drinking and hot water, as well as the withdrawal and processing of effluents, depends on the correctness of the laying of water supply and sewage systems.
The ventilation system contains ducts with openings.
Foundation construction
The foundation is selected columnar, shallow tape or from concrete blocks. To increase the strength, reinforcement and monolithic strapping are used. Timber frame houses are being built with a small foundation, designed for low loads. It takes a little material.  Due to their savings, the cost of a frame house becomes lower. For him, a trench is digging or wells are being drilled, and then a sand cushion is made. Before concreting, reinforcement and formwork are installed. Fill strip foundation It is advisable to produce with a thorough ramming. For mounting the house frame in liquid concrete, vertical studs with a length of 500 mm are installed in increments of about 2 m. The grillage plane is leveled with a solution.
Installation of the lower trim of the house
A week after pouring concrete, the lower piping is laid on top of the entire foundation - with a cross section of at least 150x150 mm. It is pre-impregnated with an antiseptic, and waterproofing from two layers of roofing material is made from below. The beam is mounted on foundation studs or anchor bolts, under which holes are drilled with a depth of more than 100 mm. Along the length and at the corners, a half-tree connection is made and fastened with nails.
The bars must be completely laid and connected between themselves and the foundation. After that, grooves are cut out in them and sex lags are inserted from the 50x150 mm board. Their upper part should be set horizontally, and in the lower part the bars are beaten onto which the rough floor is laid. A vapor barrier is attached to it with a stapler, and then the space between the lags is filled with insulation (mineral wool or polystyrene). Top is made from 40x150 mm edged boards.
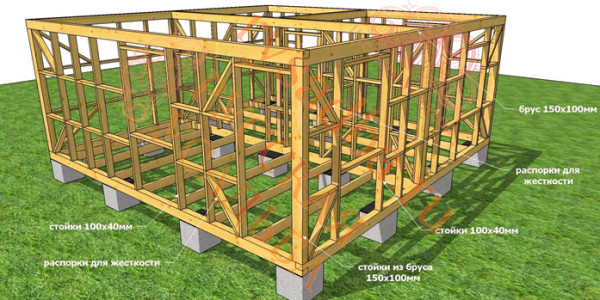
Frame assembly
The frame is the foundation that holds the entire structure of the house. It is a vertical strut connected by horizontal harnesses and crossbars. When a frame house is being built with your own hands, a step-by-step instruction provides for a strict installation sequence. The material may be a metal profile or wood. The use of metal requires welding equipment and the ability to work with it. Hardwoods, such as oak or larch, are used for the timber frame. Racks make the height of the room. They are connected to the lower harness using a spike-groove method. Fitting is done accurately, without gaps.
The dimensions and distance between the uprights should be selected, first of all, depending on the load transmitted from above. For them, they select the dimensions of the material that is used for sheathing. The racks with the lower harness are connected by temporary braces, which gives additional rigidity to the structure.
After the vertical beam is exposed, the upper harness is laid. The principle of its connection is the same - with the help of grooves identical to the lower beam. Fastening from above to each rack is done with two nails, not less than 10 cm deep. The frame is finally strengthened with permanent slopes, and temporary ones are dismantled.
The construction and insulation of walls
Outside the house is sheathed with boards, lining, siding, pseudo-beam.  Warming is done with polystyrene foam, polystyrene, mineral wool and other materials. They take on the heat-shielding properties of common building materials. In this regard, frame houses are inexpensive. For living all year round, the insulation must be at least 5 cm thick. This material fills the entire space between the beams so that there are no voids. To prevent displacement, the insulation is fixed with special fasteners.
When we build a frame house, it is necessary to protect wooden structures from moisture. 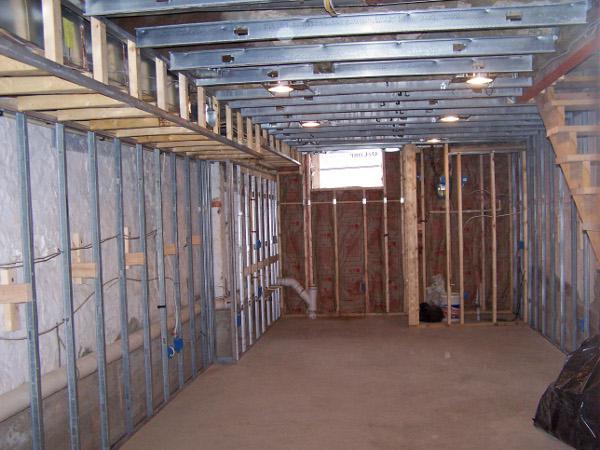 On top of the insulation, a waterproofing film is attached to the racks, after which a crate of laths for ventilation is stuffed under the outer casing.
The walls of the frame house are sheathed with gypsum boards or OSB from the inside.
Ceiling mounting
The ceiling rests on top of the harness mounted on the beam, in which grooves are cut for them. Fastening can also be done using steel brackets. Marking is done previously on the ground. The beams are inserted into the grooves and attached to the harness with nails. In places interior partitions The supporting support bars are installed. They are also connected in a common design with upper and lower harnesses. At the locations of the uprights, a ceiling shield from tongue-and-groove boards is nailed.
Ceiling insulation device
It is laid on top of the ceiling shield. It is placed with an overlap on the beams and fixed with a stapler or slats. For vapor barrier polymer membranes or special films are used.
The insulation is flush with the floor beams: mineral or glass wool, expanded clay, polystyrene. It is closed on top with a waterproofing film and covered with a shield of boards across the beams. With a distance between them of more than 500 mm, logs are laid perpendicularly, and then the floor is already made.
The opening for entry to the 2nd floor is done by tapping from two crossbars between the beams.
Erection of a roof
The roof has a significant weight, so it should rest on the walls of the house, which are already finished, but do not have decorative finishes. When we build a frame house (as well as any other), for the manufacture of the roof, it is necessary to determine the slope, the number of slopes, the roofing material, the dimensions, the number and pitch of the rafters.
The roof looks beautiful if it has a complex shape. But this increases the complexity of manufacturing and the cost of a frame house. Most common gable roofwhich is suitable for attic and attic. Its construction is simple and contains only one ridge. The absence of valleys (concave angles) is an advantage, since these places are the most vulnerable and difficult to manufacture.
The slope of the roof must be selected more than 28º, so that snow slides from it. If it is made more than 50º, the wind load will be much higher. The optimum slope is considered to be 35-45º, which is fine from the point of view of design: then the roof is not flat, but not too sharp. Many frame wooden houses are made with attics, allowing you to get additional living space. For convenience, you need to erect small walls with a height of 1.1-1.6 m. Then in the lowest places you can arrange beds or wardrobes.
A frame house with an attic is an easy and durable construction, which, if properly erected, allows you to create comfortable conditions with a minimum investment of time and money. 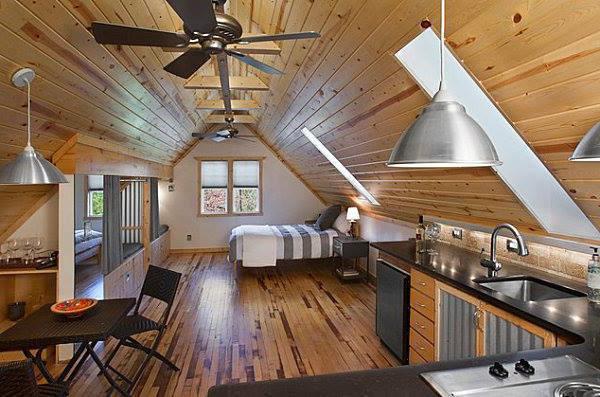
The cross section of the rafters is selected based on the location of the insulation between them, the thickness of which is usually 100-150 mm. For safety, take a board measuring 150x50 mm. Its length is 6 m. Two boards are knocked together with a nail on one side in the form of the letter L. Then they are lifted to the roof and the desired angle is selected, relying on the beam of the upper trim. In this case, the overhangs should protrude behind the wall at a distance of 30-55 cm. After the board is connected with a crossbar, and a sample of rafters is obtained. In places of support, triangular cuts are made to a third of the height. The technology for the construction of frame houses provides for the use of an upper frame frame as a Mauerlat. The rafters are made according to the model on the entire roof, so that the step between them is 70-80 cm.
The crossbar is located no lower than the level of the first floor. It should not be placed too high, since the connection will not work out sufficiently rigid. Rafters in the ridge are connected in half-paws. First, they are installed on the gables, then the cords are pulled between them and the rest are put on them.
The type of crate depends on the type of roofing material. It can be thinned or solid. For any type of roof, the crate is mounted in the area of \u200b\u200bthe ridge beam without a gap.
Roof device
A convenient material for covering the roof of a frame house is bitumen tile. It is lightweight, ductile, easy to install and cheap. The disadvantages are flammability and fast fading.
Metal and decking are universal materials and give the roof a spectacular look. They are easy to install, light in weight and low in cost. By cons include noise during rain and hail.
When the roof is ready, drainage and drainage systems are installed to drain precipitation away from home.
Conclusion
For someone who is seriously thinking about reliable and comfortable housing, today it is not a problem to build a frame house with your own hands. Step-by-step instructions give you the opportunity to do the job quickly, efficiently, inexpensively and without errors.